RESOLVE FX · COMPRESS VARIATION TOWARD ONE COLOR
Color Compressor.
Isolate the right pixels.
Then make them agree.
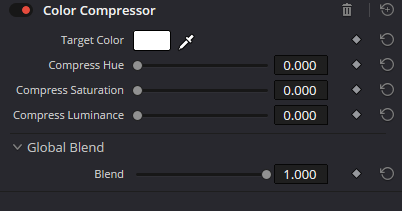
Color Compressor is a Studio-only consistency tool. Target Color is the H/S/L destination; Compress Hue, Saturation, and Luminance independently tighten the processed range toward it. The important trap is selection: Target Color is not a hidden qualifier, so product, fabric, or skin work usually starts with a deliberate secondary isolation.
Qualifier / Window
Hue · Sat · Luma
3 independent axes
Try the lab with Isolation enabled, then turn it off. Unrelated blue/green samples start moving because the target defines where values converge, not which pixels are selected.
Teaching model only. The point cloud linearly visualizes independent H/S/L convergence and isolation ownership; it does not reproduce Resolve OFX pixel math, gamut behavior, or the internal Color Compressor implementation.
Actual Resolve captures + an independent HSL teaching model; no claim of reproducing Resolve OFX math.
5 controls · 4 captures · 4 exercises01READ THE CONTRACT FIRST
Target Color is the destination. Isolation decides which pixels are allowed to travel there.
This distinction fixes the most dangerous misconception on the old page: the effect does not behave like an HSL key centered on Target Color.
Target Color is a destination, not a built-in key
Color Compressor does not automatically key “colors near the target” like a Qualifier. Blackmagic describes it as a filter that compresses the processed range toward one Target Color, and separately recommends isolating similarly colored regions with a secondary qualifier or Power Window. That distinction matters: without isolation, unrelated colors in the same node can be pulled by the compression too.
Hue, Saturation, and Luminance compress independently
The three Compress sliders control how strongly the processed range along each axis moves toward the H/S/L components of Target Color. This lets you stabilize the hue of branded packaging while preserving natural lighting and saturation variation, or even out saturation without forcing luminance toward the target.
Build isolation and sample a representative target before adding strength
In practice, Color Compressor depends most on what reaches the node and which color is chosen as the target. If the matte contains background, a specular highlight, or a neighboring object, raising Compress simply pulls the wrong pixels toward the target more aggressively. The workflow therefore starts with clean isolation and a representative sample, not with maximum sliders.
Manual wording: the filter works best on similarly colored regions isolated with a secondary qualifier or window. That recommendation is part of the effect design, not an optional “advanced trick.”
02READ THE ACTUAL PANEL
Five controls, but three very different responsibilities: target, convergence, and final mix.
Every visible control below is tied to the four actual Resolve captures. There are no invented dropdowns or fake isolation controls.
ATarget state
First define the H/S/L state toward which the selected range should converge.
- Target Color
A color control with an eyedropper. The sampled Hue, Saturation, and Luminance become the reference values toward which Color Compressor progressively compresses the corresponding axes of the processed range.
CHECKSample a representative color inside an already isolated object. An extreme highlight, shadow, or contaminated reflection is usually a poor target for the whole surface.
BThree compression axes
Each axis controls a different kind of variation; they do not need to be raised equally.
- Compress Hue
Narrows hue variation in the processed range toward the hue component of Target Color. It is useful for product color, fabric, painted surfaces, and skin when the actual problem is unwanted hue variation.
CHECKHeavy compression can erase useful local hue differences and make the object feel like a flat fill. Judge it together with the qualifier matte and natural references for the material.
- Compress Saturation
Compresses saturation variation toward the saturation component of Target Color. This is not a normal Saturation gain: different starting values converge toward the target, making the control useful for evening out patchy saturation within one color family.
CHECKIf the target is highly saturated, compression can pull weaker areas upward as well. If the target is too gray, stronger colors converge downward. Check the target swatch before blaming the slider.
- Compress Luminance
Compresses luminance variation in the processed range toward the luminance component of Target Color. This is local evening-out inside the isolation, not a global Contrast or exposure control for the shot.
CHECKDo not erase intentional lighting shape on a face or product. If you need to preserve modeling, Compress Luminance often belongs much lower than Hue/Saturation or at zero.
CFinal mix
Blend is the final trim after target, matte, and the three axes are correct.
- Global Blend · Blend
Mixes the completed Color Compressor result with the original node state. A value of 1.000 shows the full effect; reducing it restores some original variation without rebalancing every axis individually.
CHECKIf Blend needs to be reduced heavily, check isolation, Target Color, and the specific Compress axis causing the problem first. Blend is useful as a finishing control but poor at hiding a wrong setup.
03BUILD SELECTIVITY OUTSIDE THE FX
A reliable graph gives isolation, compression, and validation separate jobs.
The Qualifier or Window can live on the same serial node or upstream; the important part is that Color Compressor receives an intentional range rather than the whole image by accident.
Sample the destination, then compress only the needed axes
Sample a representative Target Color. Raise Compress Hue, Saturation, and Luminance independently according to the actual defect. Preserve useful color and lighting variation rather than forcing every channel to converge equally.
Green lines show image flow. The red bracket is a teaching warning about selection ownership, not an extra Resolve node. A Qualifier/Window may live on the same serial node or upstream; the important point is that the range entering Color Compressor is intentional.
The page deliberately keeps Qualifier outside the Color Compressor panel. Target Color is not a selection control.
04BUILD IT IN RESOLVE
Four exercises cover product color, fabric, skin, and the most common isolation mistake.
These are teaching workflows, not universal presets. Evaluate real footage, the matte, scopes, and the visual reference together.
Lock a branded product color
Reduce unwanted hue spread on packaging without pulling the entire scene toward one color.
PrepareUse a product shot with uneven lighting and a known brand-color reference.
- 01
Create a separate node and isolate the package with a Qualifier plus Power Window; inspect the matte in Highlight mode.
- 02
Use the eyedropper to sample a representative Target Color from a correctly lit part of the package.
- 03
Raise Compress Hue until unwanted shifts converge while local texture and reflections still read naturally.
- 04
Add Saturation or Luminance only if those axes are actually inconsistent; finish with Blend if needed.
The brand color looks more consistent, background and neighboring objects remain unchanged, and the product keeps natural lighting shape.
Fabric under mixed light
Tame unwanted hue/saturation patches in fabric while preserving folds and luminance modeling.
PrepareUse clothing where the same fabric drifts into different hues because of mixed light or reflections.
- 01
Isolate the fabric so skin and background are excluded.
- 02
Choose Target Color from a mid-lit area rather than a deep shadow or highlight.
- 03
Set Compress Hue first, then separately evaluate whether Compress Saturation is needed.
- 04
Keep Compress Luminance at zero or low if the folds should retain natural volume.
The fabric reads as one material and dye family without losing shape, shadows, or texture.
Local skin-hue stabilization
Reduce color blotches in an isolated skin region without treating Color Compressor as a replacement for a full skin grade.
PrepareChoose a shot with local red/yellow shifts and a clean skin isolation.
- 01
Build a soft skin qualifier and constrain it with a Window so lips, hair, and background do not drive the result.
- 02
Sample Target Color from healthy representative skin near the problem area.
- 03
Use a small amount of Compress Hue; add Saturation only when saturation itself is patchy.
- 04
Compare bypass and scopes, then reduce Blend if the skin becomes too uniform.
Blotchiness is reduced while natural variations, blush, and facial lighting shape remain.
Diagnostic: unrelated colors are moving
Learn to distinguish a poor target sample from missing isolation.
PrepareUse a frame with a target object and a clearly unrelated color in the same node.
- 01
Temporarily raise Compress Hue/Saturation above normal so the behavior is obvious.
- 02
If the unrelated object changes too, this is not a “wide Target Color”; the problem is the region reaching the FX.
- 03
Add a Qualifier/Window before Color Compressor and repeat the test.
- 04
After fixing isolation, return to restrained settings and resample the target if necessary.
It becomes clear which pixels belong to the correction, and Target Color is no longer mistaken for a built-in key.
05CHOOSE THE RIGHT TOOL
Color Compressor fixes spatial color spread. It does not replace selection, temporal stabilization, or free-form color remapping.
| Tool | What it owns | Use it when |
|---|---|---|
| Color Compressor | Compresses Hue/Saturation/Luminance variation toward one Target Color within the processed range. | When one object needs tighter color consistency, especially after Qualifier/Window isolation. |
| Color Stabilizer ↗ | Analyzes color/brightness change over time and compensates temporal drift toward a reference state. | When the problem changes frame-to-frame over time rather than being spatial variation inside one frame. |
| Qualifier | Builds an H/S/L matte for selective correction; it does not perform color compression by itself. | When you need to define where Color Compressor or another secondary correction is allowed to operate. |
| Color Warper / Curves | Provide more manual remapping of hue/saturation relationships and art-directed control over the transform shape. | When you need controlled redistribution of color ranges rather than convergence toward one target point. |
06DIAGNOSE THE FAILURE MODE
Most bad results come from selection ownership, an unrepresentative target, or compressing the wrong axis.
01Background or another object changes color too+
Color Compressor is not a built-in color key. Isolate the intended object with a Qualifier/Window in this node or upstream, then reassess Target Color and Compress.
02The object has become a flat, uniform patch+
One or more axes are over-compressed. Back off Hue, Saturation, and Luminance one at a time to identify which one is erasing useful variation; be especially cautious with Luminance.
03Compress Saturation made color stronger rather than weaker+
Compression moves toward the saturation component of Target Color, not always downward. If the target is more saturated than part of the source region, those values can be pulled upward. Check the swatch.
04Hue is consistent but the product still looks uneven+
Check whether the remaining problem is Saturation or Luminance. The three axes are independent; fixing hue does not automatically fix patchy saturation or lighting variation.
05Skin lost natural variation and blush+
Reduce Compress Hue/Saturation and inspect the matte. Skin rarely benefits from complete convergence toward one target point; the goal is to reduce the defect, not erase all variation.
06Shot matching requires a completely new target on every shot+
Check whether the product/wardrobe reference and isolation logic are consistent. Across a shot series, it is usually better to keep a consistent target/logic and correct upstream balance than to turn the compressor into a different creative grade on every shot.
Scopes validate; they do not choose the target for you
Vectorscope helps verify that hue/saturation spread is tightening, and waveform helps judge Compress Luminance. But the target should come from the object reference, skin tone, or creative/brand intent, not from making the graph look tidy.
Bypass checks the correction; Highlight checks the isolation
Compare node bypass to see the actual contribution of compression, and separately inspect Highlight/matte to confirm the correction is restricted to the intended region. These are different checks.
Studio-only belongs in the production checklist
Blackmagic marks Color Compressor as Studio Version Only. When moving projects between systems, verify Studio availability and Resolve version in advance so the node-level intent reproduces as expected.
07BEFORE YOU DELIVER
Verify the matte and the target before you celebrate a tighter vectorscope cluster.
The checklist is a workflow reminder, not automated grading certification. The actual shot, brand/skin reference, monitoring chain, and deliverable remain authoritative.
08QUESTIONS THAT MATTER
Keep destination, selection, compression, and temporal stabilization as separate concepts.
Does Target Color automatically select similar colors?
No. Blackmagic describes Color Compressor as compressing the processed range toward Target Color and says it works best when similarly colored regions have already been isolated with a secondary qualifier or window. Target Color is the destination H/S/L, not a built-in key.
Does Compress Saturation always reduce saturation?
No. It compresses the source range toward the saturation component of Target Color. Areas below the target can become more saturated, while areas above it can become less saturated.
Can I use only Compress Hue?
Yes. The three axes are independent. If the problem is only hue variation, it is sensible to leave Saturation and Luminance at zero so you do not change more than necessary.
How is Color Compressor different from Color Stabilizer?
Color Compressor works on the spatial range of colors in the current image and pulls it toward Target Color. Color Stabilizer analyzes temporal brightness/white-balance drift across frames relative to a reference state.
Do I always need a Qualifier?
Not necessarily if the node is already restricted to the intended region or the whole frame genuinely should participate. But the manual explicitly says the effect works best on similarly colored regions isolated with a qualifier/window; for product or skin work that is usually the right starting point.
Which should I set first: Target Color or Compress?
Set isolation and Target Color first. The Compress sliders only make sense relative to the target they converge toward. Changing the target after fine-tuning the three axes usually means reassessing the whole result.
Is Color Compressor available in the free version of Resolve?
Blackmagic marks Color Compressor as Studio Version Only. If a project needs to move between different systems, account for that requirement in advance.
Sources and the scope of this guide
Visible control names were checked against the four actual DaVinci Resolve captures in the site archive. Behavior and workflow semantics were cross-checked against the Resolve 21 reference description. The interactive HSL cloud is an independent teaching model and does not reproduce Resolve OFX code or pixel output.
The four exercises were not certified by a live Resolve render during this web-editing pass. Production acceptance still requires the installed Resolve build, real media, scopes, and the intended display/reference environment.