FAIRLIGHT / 01 / Foundations and clip editing
Audio clip editing
Clean edits. Intentional levels.
A rough boundary, a lost consonant or a loud breath does not call for processing the entire track. Learn to edit the specific passage and verify it before reaching for a shared effect chain.
- 01Level, not display scale
- 02Transitions that preserve words
- 03Intentional normalization scope
Move the controls to reshape envelopes and the overlap.
Change level, not the performance↗
Fixed gain shifts the entire clip’s level. It does not compress the difference between quiet words and a loud breath.
Listen with the adjacent phrases.Change the controls to explore the diagram. No audio playback, native DSP or connection to Resolve.
Reference scope · reviewed 6 October 2026
Text and control names checked on 6 October 2026 against public sources and the site’s existing captures. The complete current Reference Manual and every expanded mode menu were not read in this pass; verify build-specific differences in the application. Live audio processing is not certified.
Read the source notes ↓On this page
01 / UNDERSTAND & APPLY
Before editing: selection, video links and source handles
Work on a timeline copy. Select the intended audio clip and inspect linked items, track lock and the active tool. A mouse movement should not unexpectedly shift picture or the neighbouring phrase.
Trimming changes the used source range; moving changes its timeline position; ripple also shifts the edit. Decide whether later material should move before shortening a pause. Verify synchronization afterwards, not just the local cut.
Handles are unused source material beyond the clip edges. Missing handles cannot be fixed by raising volume. Adjust transition placement or length, expose suitable source material, or use a deliberate two-track edit.
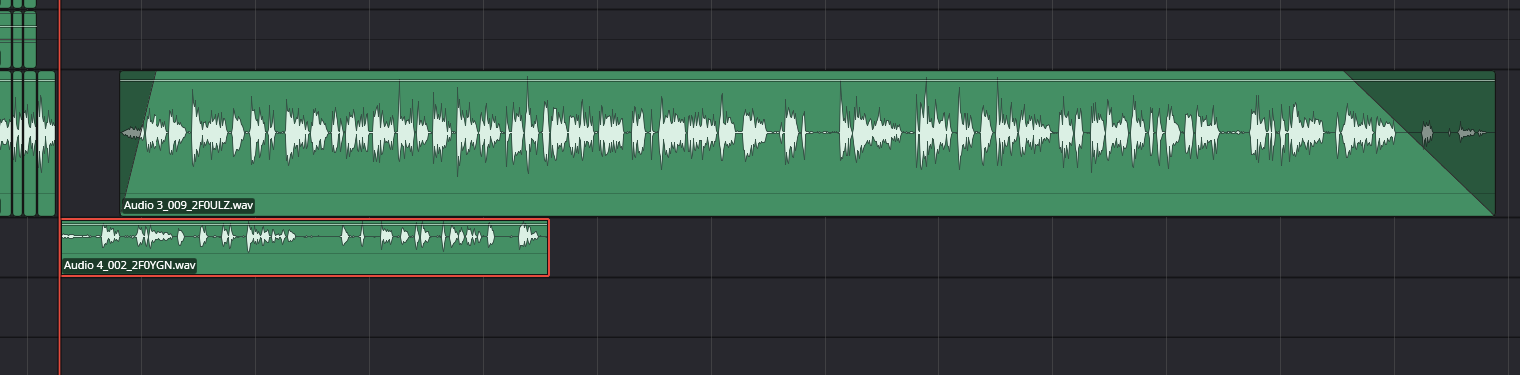
Clips on the timeline
Check selection and track first. Waveform height is a navigation aid, not a measurement of intelligibility or programme loudness.
Reference: Blackmagic Design — Fairlight · Videomontazher — published Resolve interface captures
02 / UNDERSTAND & APPLY
Clip Volume, keyframes and waveform scale
Select the clip and drag its horizontal level line or set Volume in the Inspector. These are ways to control clip level, not two mandatory serial gain stages. Compare the value and listen before and after.
For a local envelope, place control points on both sides of the problem. Leave smooth entry and exit ramps to avoid creating another abrupt change. The official macOS example uses Option-click; Windows commonly uses Alt-click. Verify your mapping and edit mode before using it on a long recording.
| Control | What it does | When to use it |
|---|---|---|
| Clip Volume / gain | Changes the selected clip’s level by a fixed amount. | An entire phrase is mismatched against its neighbours. |
| Volume-line keyframes | Change clip level over time. | A breath needs a local dip or a word ending needs a lift. |
| Waveform display scale | Changes the visual display, not the signal itself. | The waveform is too small to inspect. |
| Mixer channel fader | Changes the track or bus channel level. | Overall balance, not one instance, needs attention. |
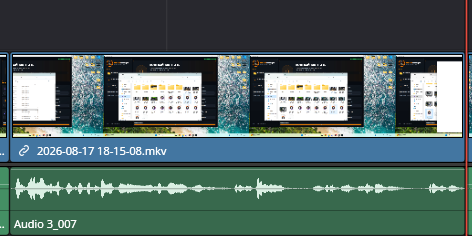
The clip volume line
The line controls clip level. Vertical waveform display scaling is a separate operation and does not itself amplify audio.
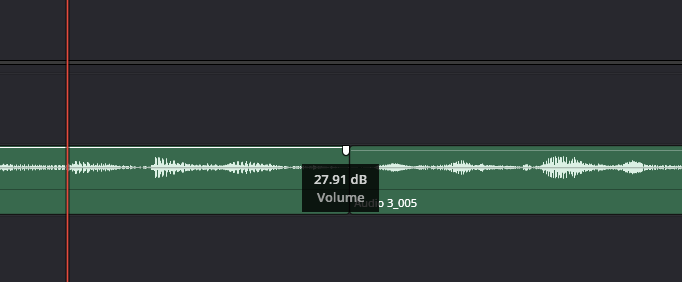
Level adjustment in dB
Compare the before and after values. A fixed gain move raises both speech and recorded background noise.
Reference: Blackmagic Design — Fairlight · Videomontazher — published Resolve interface captures
03 / UNDERSTAND & APPLY
Edge fades: remove the click, not the word onset
Fading a single clip to silence is not the same as blending two ambience beds. Removing natural room tone from every pause can make dialogue choppy even without digital clicks. Preserve the required ambience or build a deliberate bed.
Locate the useful sound
Zoom into the beginning or end and listen. Do not identify the word onset only by waveform height; a quiet consonant may matter.
Drag the fade handle
Use the clip’s upper corner handle. Start with a short fade on practice material and adjust to the audible result, not a universal frame count.
Check shape and context
Compare with the original. Preserve the attack at the start and the word ending and intended room decay at the end. Then bring neighbouring tracks back in.
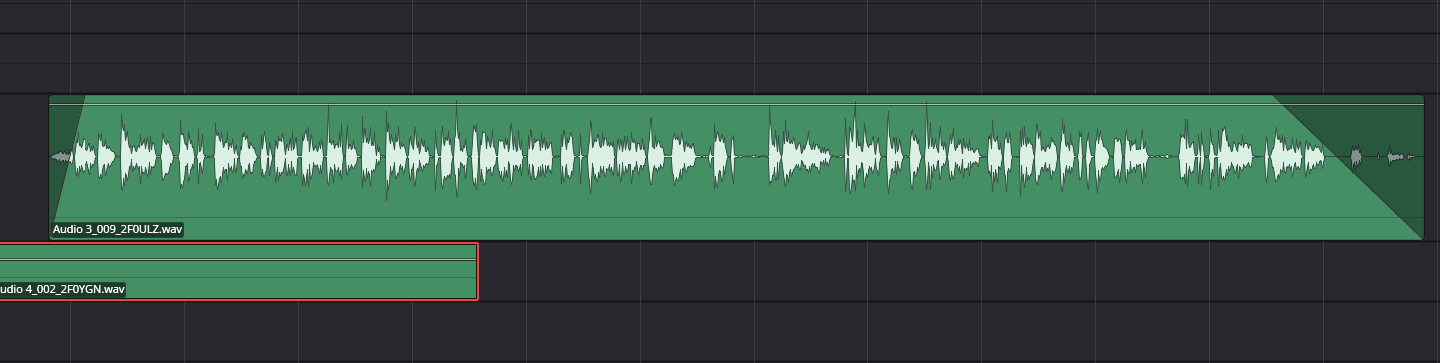
Fade handles at clip edges
Use the upper corner rather than the trim edge. Listen to the first consonant and the end of the word after changing it.
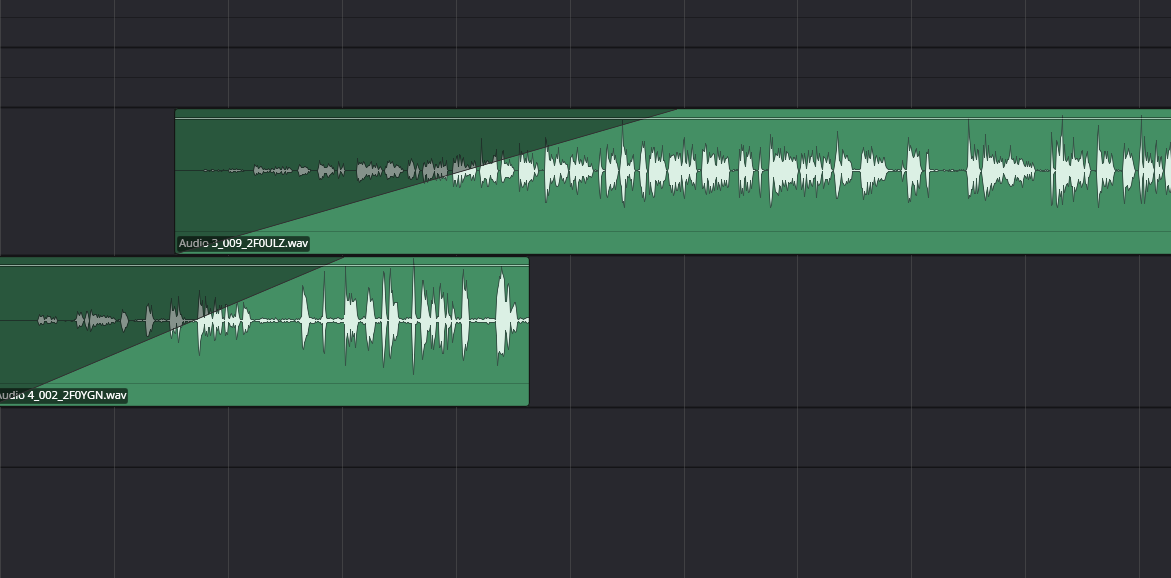
Two fade-ins with different durations
This capture shows two fade-ins, not an entrance and an exit together. Choose duration by listening: a useful attack can disappear along with a click.
Reference: Blackmagic Design — Fairlight · Videomontazher — published Resolve interface captures
04 / UNDERSTAND & APPLY
Crossfades: two sources, one audible transition
Check source handles and listen to the overlap first. A repeated word onset, a breath from another take or incompatible ambience can become more obvious with a long transition. A curve cannot fix an editorial error.
Apply an audio transition at the intended edit, or build overlapping fades on two tracks. With the second method, check routing, levels and accidental duplication of surrounding material separately.
Duration, Alignment and the two transition sides were additionally checked in chapter 44, page 838 of the Resolve 18 primary manual, available as a text mirror. This is parameter reference, not proof of an unchanged Resolve 21 interface; inspect the current control list in your installation.
Duration
Select the transition and inspect its duration in the Inspector. A short blend may leave the join exposed; a long one may reveal an unwanted syllable. Frame count is not a substitute for listening.
Alignment
End on Edit, Center on Edit and Begin on Edit position the transition around the cut. This changes which parts of the adjacent sources are needed; check handles on both sides.
Incoming and outgoing shapes
The documented Cross Fade separates its style from the Fade In / Fade Out sides. For an asymmetrical blend, compare the two sides rather than changing whole-clip gain blindly. Check the labels in your installed Inspector.
| Option | Curve intention | Listen for |
|---|---|---|
| Cross Fade 0 dB | A linear exchange of levels. | The midpoint may sound quieter with unrelated signals. |
| Cross Fade +3 dB | A raised curve to compensate for a possible dip. | Closely related or matching signals may produce a bump. |
| Cross Fade −3 dB | A more attenuated transition midpoint. | Do not treat it as a mandatory preset for all dialogue. |
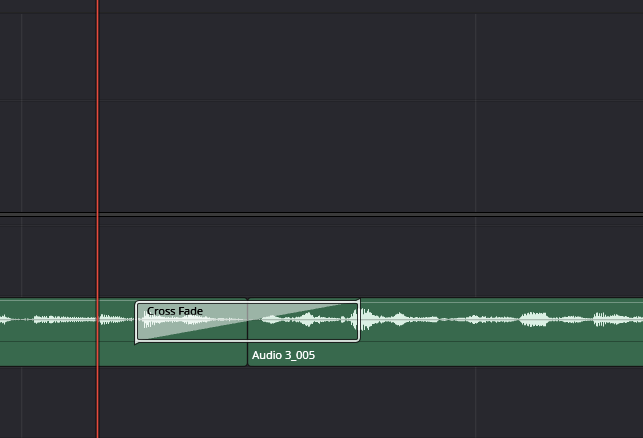
A transition between clips
The capture shows a transition. It does not prove phase compatibility or sufficient source handles in another project.
Reference: Blackmagic Design — The Beginner’s Guide to DaVinci Resolve 20 · Videomontazher — published Resolve interface captures · Blackmagic — Resolve 18 Reference Manual, chapter 44, page 838 (text mirror)
05 / UNDERSTAND & APPLY
Normalize Audio Levels: choose the measure and scope first
Normalization calculates a gain adjustment against a selected target. It is not a compressor continuously reacting to dynamics, nor a noise-removal tool. Quiet words and a loud clap within the clip can retain their previous relationship.
Select an audio clip or an intentional group and open Normalize Audio Levels from the context menu. Make sure linked items have not expanded the selection unexpectedly. Choose a measurement method, target and, for a group, how the selection is treated.
| Parameter / mode | Meaning | Do not confuse it with |
|---|---|---|
| Sample Peak Program | Uses maximum sample values; the target is in dBFS. | Perceived speech loudness or whole-programme loudness. |
| True Peak | Uses estimated inter-sample peaks; the target relates to dBTP. | Only the maximum discrete sample value. |
| Loudness modes | Use the chosen standard and its loudness/peak fields. Inspect the available set in your dialog. | A guarantee of a finished master after processing one clip. |
| Target Level | A target in the chosen measurement’s units. The capture’s −9 dBFS is only an example. | A universal delivery requirement. |
| Relative | One shared gain adjustment preserves differences within the group. In the sample-peak example the highest peak determines the adjustment. | Individually matching every clip to the target. |
| Independent | Each clip gets its own calculated gain. Original clip-to-clip differences can change. | Leveling every word within the clip. |
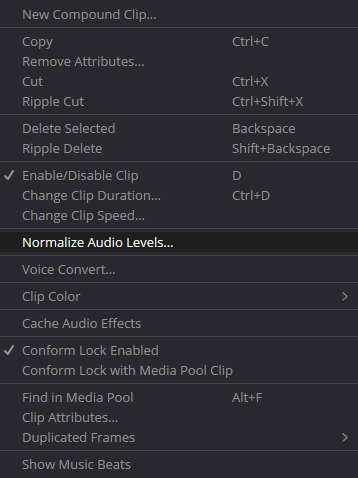
Normalize Audio Levels command
This is an audio clip context menu. Multiple selection changes the operation’s scope; inspect the whole selection first.
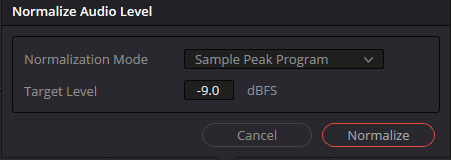
Sample Peak Program: example dialog
−9.0 dBFS is the value in this existing capture, not a universal recommendation. The menu is closed; it does not show every mode or the group-processing selector.
Reference: Blackmagic Design — Fairlight · DaVinciResolveScript.pyi — NormalizeAudioOptions / NormalizeAudioSetLevelMode · Videomontazher — published Resolve interface captures
06 / UNDERSTAND & APPLY
Calculate the difference between Relative and Independent
Two entered sample peaks, one target. This is educational arithmetic, not audio-file analysis or a LUFS measurement.
Example: one clip peaks at −18 dBFS, the other at −8 dBFS, with a −9 dBFS target. Relative applies −1 dB to both, producing −19 and −9 dBFS. Independent uses +9 and −1 dB, bringing both peaks to −9 dBFS. This models fixed gain without later processing.
If the first clip contains a loud click and quiet speech, the click can determine peak normalization. Equal output peaks do not fix the editorial balance. Nor can an absent signal be replaced with an arbitrary −120 dBFS: complete silence has no finite peak for this calculation.
Enter sample peaks in dBFS. Silence (−∞) cannot be normalized with this finite-gain model.
Model limits: peaks −120…0; target −60…0 dBFS. Decimal point or comma. These limits are not Resolve control limits.
ONE SHARED ADJUSTMENT
Gain: -1.0 dB
Gain: -1.0 dB
G = target − max(peak A, peak B)Display values are rounded to six decimal places. The model predicts sample peaks after fixed gain only. It does not predict perceived loudness, later processing, clipping repair or output loudness compliance.
The component uses only the values entered here. It opens no files, connects to no application and neither uploads nor automatically stores your input.
Reference: DaVinciResolveScript.pyi — NormalizeAudioOptions / NormalizeAudioSetLevelMode
07 / UNDERSTAND & APPLY
The Inspector complements the timeline, not the whole Mixer
For a selected audio clip, the Inspector provides numerical access to Volume, Pan, Pitch and EQ. Use numbers for an exact repeatable adjustment. Inspect keyframes and envelopes for changes over time. Track-wide processing is a different scope.
Resolve 21 Clip EQ has six bands. That is not a reason to apply EQ when a fade or gain change solves the issue. Pitch, AI sections and speed changes are not mandatory clip-editing steps either.
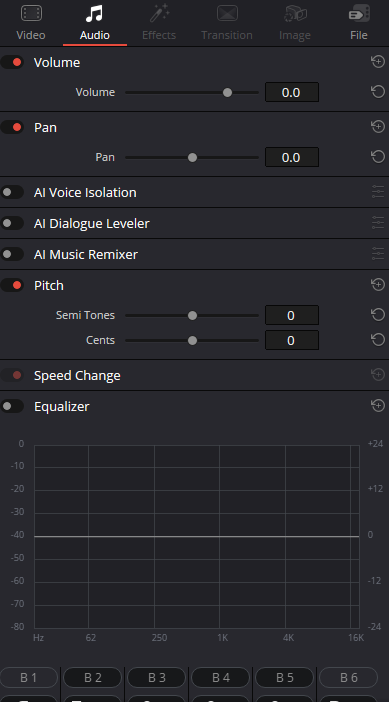
Inspector → Audio
This capture shows the selected clip, not a Mixer channel. An AI section in a screenshot does not guarantee availability in your Resolve edition.
Reference: Blackmagic Design — Fairlight · Blackmagic Design — What’s New in Resolve 21 · Videomontazher — published Resolve interface captures
08 / UNDERSTAND & APPLY
Common errors and a useful next step
| Symptom | Check | Next step |
|---|---|---|
| A consonant disappeared after a fade | Useful signal onset and fade-in duration. | Shorten or reposition the fade and replay the whole word. |
| The transition is louder than the clips | Summation of related material, curve shape and duplicate active clips. | Compare another curve and check source selection. |
| A dip occurs at the transition midpoint | Duration, curve, phase and handles. | Try a different edit position or shape instead of raising the whole track. |
| Speech still varies after Normalize | Look for a dominant transient or variation within the phrase. | Use a local envelope or intentional dynamics processing. |
| Noise became louder after gain | Recorded noise rose with the useful signal. | Inspect the source and treat restoration as a separate task. |
| Synchronization was lost after editing | Linked selection, ripple and moved boundaries. | Compare the control copy and choose the correct scope. |
PRACTICE / NO AUTOPILOT
A small task. A checkable result.
Work in a test copy, listen before and after, and write down what you actually observed. The checklist contains no pre-approved results.
Material
Use two passages of your own speech at different levels, preserving room tone. Keep an unchanged control copy. Do not use a client’s only source as a practice asset.
Edit
Build the edit, adjust fixed gain and add only the necessary edge fades. Compare Cross Fade variants. Try Relative and Independent on separate copies of the same pair.
Verify
Words are neither repeated nor clipped; the edit has no unintended dip or bump; synchronization is preserved. Compare at a consistent monitoring level and restore music/ambience from solo.
Record your decision
Record the mode and scope you chose, why a single peak target was insufficient and where additional processing is needed. Calculator output is not proof that real files were measured.
FAQ / BEFORE THE NEXT MOVE
Questions that matter in practice
Does clip gain change the source file?
This guide concerns a timeline instance’s parameters, not overwriting the source. Bounce, external processing and file export are separate operations and should not be confused with a Volume adjustment.
Reference: Blackmagic Design — Fairlight
Can I always use Cross Fade +3 dB?
No. One curve sums different signals differently. Compare transitions on the same edit and check ambience, phase changes and repeated sounds. A name does not guarantee a transparent edit.
Reference: Blackmagic Design — The Beginner’s Guide to DaVinci Resolve 20
Will Independent level every word?
No. It calculates a separate adjustment for each selected clip. Variation within a clip needs a local envelope, a different edit or appropriate dynamics processing.
Reference: DaVinciResolveScript.pyi — NormalizeAudioOptions / NormalizeAudioSetLevelMode
Why does my dialog not show Relative/Independent?
Check the number of selected audio clips, page and version first. The existing site capture shows a simple dialog without that group; it does not illustrate every variant. Do not substitute an unrelated control in another window.
Reference: Videomontazher — published Resolve interface captures · DaVinciResolveScript.pyi — NormalizeAudioOptions / NormalizeAudioSetLevelMode
Does normalization replace compression or a loudness check?
No. A fixed clip adjustment, dynamic processing and measuring the finished programme solve different problems. Later processing and summation can change the final readings.
Does the calculator process my audio?
No. It uses only entered numbers, opens no files, measures no LUFS and does not control Resolve. Its JSON explicitly states that no media were analysed.
REFERENCES / 2026-10-06
What this guide is based on
Text and control names checked on 6 October 2026 against public sources and the site’s existing captures. The complete current Reference Manual and every expanded mode menu were not read in this pass; verify build-specific differences in the application. Live audio processing is not certified.
Blackmagic Design — Fairlight ↗
Clip Adjustments, Waveform Editing, Smart Edit Tools, Mixer and Channel Mapping; manufacturer page checked 6 October 2026.
Blackmagic Design — What’s New in Resolve 21 ↗
Confirms track folders, 6 Band Clip EQ and Chain FX. Not a live test report for a specific build.
Blackmagic Design — Official Training ↗
The official page still offers the Resolve 20 Fairlight Audio Guide. The full PDF could not be read during this pass; it is not presented as a verified current interface reference.
Videomontazher — published Resolve interface captures ↗
Existing encyclopedia images, inspected on the public site. The resolve21 filename comes from the original publication; the exact build cannot be established from these captures. Original paths are preserved.
DaVinciResolveScript.pyi — NormalizeAudioOptions / NormalizeAudioSetLevelMode ↗
Public copy of the primary interface stub on third-party hosting: Relative/Independent modes and normalization fields. Does not verify every expanded GUI menu; compare with your installation.
Blackmagic Design — The Beginner’s Guide to DaVinci Resolve 20 ↗
The manufacturer’s indexed excerpt confirms Cross Fade +3 dB and compensation for a dip at the transition midpoint. Full PDF was not retrieved. Not evidence of the exact Resolve fade equation.
Blackmagic — Resolve 18 Reference Manual, chapter 44, page 838 (text mirror) ↗
Primary Blackmagic text on a third-party mirror. Used only for Duration, Alignment and Cross Fade 0 / +3 / −3 dB shapes. Version 18 is not presented as the full Resolve 21 interface; its outdated four-band clip EQ description is not carried into this guide.