FAIRLIGHT / 01 / Foundations and clip editing
Fairlight basics
Understand first. Then build the mix.
Do not start with a compressor and a stack of plug-ins. Find the right clip, follow its signal and choose the right scope: one phrase, a track or a shared bus.
- 01Find the right control
- 02Choose the right scope
- 03Trace the signal
Clip, track or bus: choose the scope and move the fader.
One phrase, one local adjustment↗
Use the Inspector or volume line to adjust a particular clip. The neighbouring phrase should not change its own gain merely because you edited this one.
Check: the intended audio clip is selected.Change the controls to explore the diagram. No audio playback, native DSP or connection to Resolve.
Reference scope · reviewed 6 October 2026
Content checked against public Blackmagic material and the site’s existing captures on 6 October 2026. No new interface capture or live Resolve exercise was performed in this pass.
Read the source notes ↓On this page
01 / UNDERSTAND & APPLY
The workspace without memorising every button
Look at what is selected, not just where a control sits. Edit and Fairlight work on the same timeline within the project.
Timeline
This holds clip instances, boundaries, fades and tracks. Zoom into a passage instead of moving it just to inspect it. Track names and colours organise the session; they do not route sound.
Inspector → Audio
Shows properties of the selected audio clip, such as Volume and Pan. Selecting a source in the Media Pool, a timeline instance or a Mixer channel is not equivalent. Check the selection before editing.
Mixer
Track and bus channels, levels, processing and assignments. Find the channel by name before changing an entire track. Do not use a bus as a workaround for one loud word.
Media Pool / Index / Meters
The Media Pool references sources, the Index helps navigate the timeline, and meters show signal at particular points. None of these panels alone certifies a finished mix.
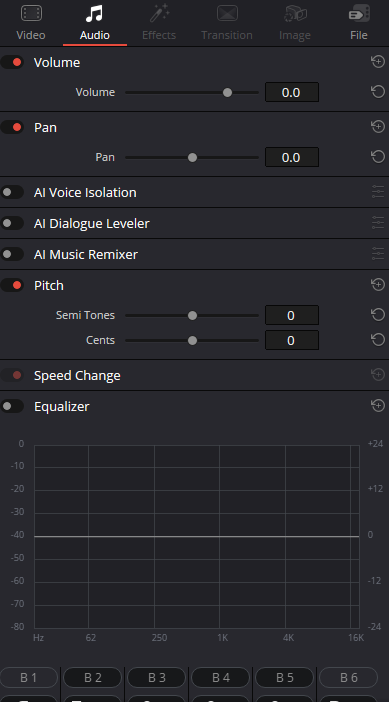
Inspector → Audio
This capture shows the selected clip, not a Mixer channel. An AI section in a screenshot does not guarantee availability in your Resolve edition.
Reference: Blackmagic Design — Fairlight · Videomontazher — published Resolve interface captures
02 / UNDERSTAND & APPLY
Clip, track and bus are three different scopes
The same file may appear several times on a timeline. Editing an instance addresses a local issue. Track processing affects material passing through that channel. On a bus, the result depends on which sources are routed there.
This is a map of responsibility, not a detailed diagram of every internal processing point. Effect order, automation, sends and pre/post-fader behaviour require a separate project-specific check.
| Situation | First place to look | Check |
|---|---|---|
| One phrase is quieter than its neighbours | Clip Volume | Compare the phrase in context without moving the whole track. |
| All material from one microphone needs correction | Track channel | Make sure the track does not contain unrelated sources. |
| Music and effects are too loud as a group | An intentional group / bus | Confirm routing first, then change the group level. |
| Headphones are quiet while meters are active | Monitoring and output device | Do not raise the mix before checking the monitoring path. |
Reference: Blackmagic Design — Fairlight
03 / UNDERSTAND & APPLY
Waveforms, meters and listening answer different questions
A waveform reveals amplitude structure: pauses, attacks and differences between passages. A large waveform does not imply intelligible speech. Changing its display scale does not change playback level; the Clip Volume line is a separate control.
A peak meter helps identify high levels at its measurement point. Loudness is a different measurement over a meaningful programme segment. Two phrases with identical peaks need not sound equally loud.
Fairlight can zoom down to individual samples. This can help with a local click, but manually redrawing the waveform is not the first remedy for every noise problem. Start by listening, choosing a suitable edit and trying a short fade.
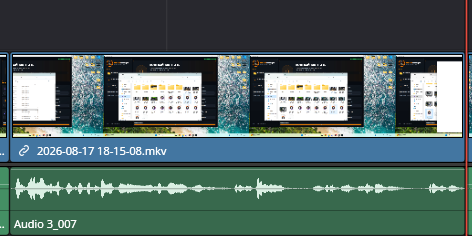
The clip volume line
The line controls clip level. Vertical waveform display scaling is a separate operation and does not itself amplify audio.
Reference: Blackmagic Design — Fairlight · Videomontazher — published Resolve interface captures
04 / UNDERSTAND & APPLY
Identify what each source channel contains first
A two-channel file is not necessarily a stereo recording of one scene.
One microphone and an empty channel
Audition the channels separately. Volume and Pan do not replace a missing signal caused by incorrect channel assignment. Inspect Clip Attributes and mapping first.
Two different microphones
Treat them intentionally: they may be two mono sources rather than the left and right sides of a finished stereo recording. Listen to each; do not blindly sum incompatible recordings.
Genuine stereo or multichannel
Preserve the intended channel arrangement. Track type, source mapping and panning solve different problems. The channel-mapping article covers them in detail.
Reference: Blackmagic Design — Fairlight
05 / UNDERSTAND & APPLY
A first pass: from media to an intentional mix
Prepare a copy and a short passage
Use two dialogue clips and background music. Save the project and make a separate practice timeline. Do not test bulk changes on the only working version.
Name and separate tracks
For example: Dialogue, Music and Room tone. Names describe a role; they do not automatically create buses. Check mono/stereo formats and which channels actually play.
Clean edits and local level differences
Preserve word beginnings and endings, inspect fades and adjust individual phrases. Do not normalize everything simply to make waveforms look alike.
Build a balance and verify the path
Return relevant tracks from solo and listen to speech with music. Check track and output-bus signals, then listen through the selected device.
Record the result and remaining problems
Mark passages that need EQ, dynamics or repair. Do not enable AI processing by default. Save a check export and listen to the actual file.
06 / UNDERSTAND & APPLY
Waveform visible, no sound: find where the signal stops
| Observation | What to inspect | Avoid |
|---|---|---|
| The clip is not heard on its track | Offline media, disabled clip, channel mapping, local level and mute/solo. | Do not boost an unidentified problem to maximum. |
| Track signal exists, intended bus has none | Output assignments, sends, bus state and processing. | Do not add a plug-in to repair routing. |
| The bus shows signal but the device is silent | Monitor source, system output device and its level. | Do not rebuild the mix to compensate for a headphone control. |
| One ear is silent | File channels, track format, panning and physical connection. | Do not conclude that mono is broken. |
Reference: Blackmagic Design — Fairlight
07 / UNDERSTAND & APPLY
Version-sensitive details in Resolve 21
Blackmagic confirms track folders and six-band Clip EQ in Resolve 21. A folder organises track display; do not assume it creates a summing bus. Clip EQ and channel EQ remain different processing scopes.
These basic exercises do not require applying AI tools. Available features depend on edition, version and platform. Captures may show Studio tools; that does not promise their availability in Free.
Keyboard mappings can also differ. This guide identifies controls by purpose; verify command bindings in your installation’s Keyboard Customization.
Reference: Blackmagic Design — What’s New in Resolve 21 · Blackmagic Design — Fairlight · Videomontazher — published Resolve interface captures
PRACTICE / NO AUTOPILOT
A small task. A checkable result.
Work in a test copy, listen before and after, and write down what you actually observed. The checklist contains no pre-approved results.
Task
Place two phrases on Dialogue and music on Music in a practice copy. Lower one phrase using fixed Clip Volume, then restore the balance without changing its neighbour.
Scope check
Record which control fixes the phrase, which changes the whole track and which bus receives both tracks. These should be three intentional answers, not three randomly chosen faders.
Completion criterion
The dialogue edit sounds natural, music does not mask words, unintended solo is off, channels behave as intended and the export has been auditioned. Waveform size alone is not acceptance.
FAQ / BEFORE THE NEXT MOVE
Questions that matter in practice
Do I need to rebuild my timeline for Fairlight?
No. Edit and Fairlight are pages in the same project. Changing pages does not create an independent audio edit. Make a separate timeline copy intentionally for experiments.
Reference: Blackmagic Design — Fairlight
Should I use Clip Volume or the track fader?
Define the problem’s scope first. Start with the clip for an isolated mismatch and the track for the channel’s overall balance. Both can be useful for different jobs.
Reference: Blackmagic Design — Fairlight
Do matching peaks mean matching loudness?
No. A peak describes a maximum level, not the entire sound. Pauses, speech density, transients and tone can differ. Listen across adjacent phrases after technical adjustment.
What level should every clip use?
There is no single value. Clip level, mix placement and final programme requirements are separate jobs. Do not turn an educational −9 dBFS example into a rule for every source and deliverable.
Why do some panels differ from the captures?
Version, edition, active page and selection can differ. These are the site’s existing captures, not proof of an exact build. Confirm that an audio clip is selected before comparing parameters.
Reference: Videomontazher — published Resolve interface captures
REFERENCES / 2026-10-06
What this guide is based on
Content checked against public Blackmagic material and the site’s existing captures on 6 October 2026. No new interface capture or live Resolve exercise was performed in this pass.
Blackmagic Design — Fairlight ↗
Clip Adjustments, Waveform Editing, Smart Edit Tools, Mixer and Channel Mapping; manufacturer page checked 6 October 2026.
Blackmagic Design — What’s New in Resolve 21 ↗
Confirms track folders, 6 Band Clip EQ and Chain FX. Not a live test report for a specific build.
Blackmagic Design — Official Training ↗
The official page still offers the Resolve 20 Fairlight Audio Guide. The full PDF could not be read during this pass; it is not presented as a verified current interface reference.
Videomontazher — published Resolve interface captures ↗
Existing encyclopedia images, inspected on the public site. The resolve21 filename comes from the original publication; the exact build cannot be established from these captures. Original paths are preserved.