FAIRLIGHT / 02 / SOURCE → CLIP → TRACK
Channel Mapping in Fairlight
The right channel. In the right place.
One file can contain several microphones, and they are not necessarily a left/right pair. First establish what each channel contains. Then choose the clip interpretation and the receiving track format. EQ and pan cannot fix the choice of the wrong source.
- 01Separate a channel number from a microphone’s role
- 02Choose mono, dual mono or stereo for the task
- 03Verify the mapping before processing
Assign source channels; the connections change directly in the diagram.
A channel number is not a microphone label↗
CH 1 and CH 2 identify recordings in a file. Audition them separately: they might be two people, a main and safety recording, or an actual stereo pair.
Check: identify the role of every channel you use.Change the controls to explore the diagram. No audio playback, native DSP or connection to Resolve.
Reference scope · reviewed 6 October 2026
Checked against the public Blackmagic Design Fairlight page and the encyclopedia’s existing interface captures on 6 October 2026. The images were inspected again; a resolve21 filename does not establish the exact build. The full current Reference Manual was unavailable in this pass; unverified menus have not been invented. The examples are teaching procedures, not a live Resolve test report. English interface names are retained; the placement and availability of individual controls depend on version, edition and selection context.
Read the source notes ↓On this page
01 / UNDERSTAND & APPLY
Four scopes that should not be confused
Channel, clip, track and bus describe different objects, each with a different check.
Source-file channel
An Embedded Channel belongs to the decoded media file, not to the microphone input currently connected to the interface. Available channels depend on the source.
Clip interpretation
Clip Attributes determines which source feeds a Mono, Left, Right or other format slot. Two mono clips and one stereo clip are different editing representations of the same source.
Track format
The timeline track receives and processes clips in its own format. Changing its type does not add a microphone to the file or replace the Source Channel check.
Bus and output
Matching the clip and track does not guarantee the output. After mapping, check pan, bus assignments, monitoring and the exported file’s channels.
Reference: Blackmagic Design — Fairlight · Videomontazher — Clip Attributes / source-channel captures
02 / UNDERSTAND & APPLY
Clip Attributes: reading the Audio tab
Open one clip’s context menu → Clip Attributes → Audio. For restructuring before editing, begin in the Media Pool. Some controls for creating new audio tracks may be unavailable on a timeline clip: the upper Format, Tracks and Add controls are dimmed in the capture. That does not mean all remapping is unavailable.
Use a project copy and record the original assignments. Changing interpretation in the Media Pool and changing a selected timeline instance have different scopes. A duplicate timeline alone should not be treated as isolation for shared source items; inspect other uses of the media.
| Control | Purpose | What to check |
|---|---|---|
| Format | The clip audio-track format and its slots. | Mono has one slot; Stereo has Left and Right. It does not change the file codec. |
| Tracks / Add | Add audio tracks to the interpretation where the controls are available. | This is not a command to create A1/A2 tracks in the current timeline. |
| Source Channel | Source for one particular slot. | Embedded Channel N or <none>. The available list belongs to the selected clip. |
| Track | The audio-channel group within this interpretation. | Audio 1/Audio 2 here do not identify the timeline A-track that holds the clip. |
| Channel in Track | The slot’s role in the selected format. | Left/Right for stereo. Source number and slot role are different things. |
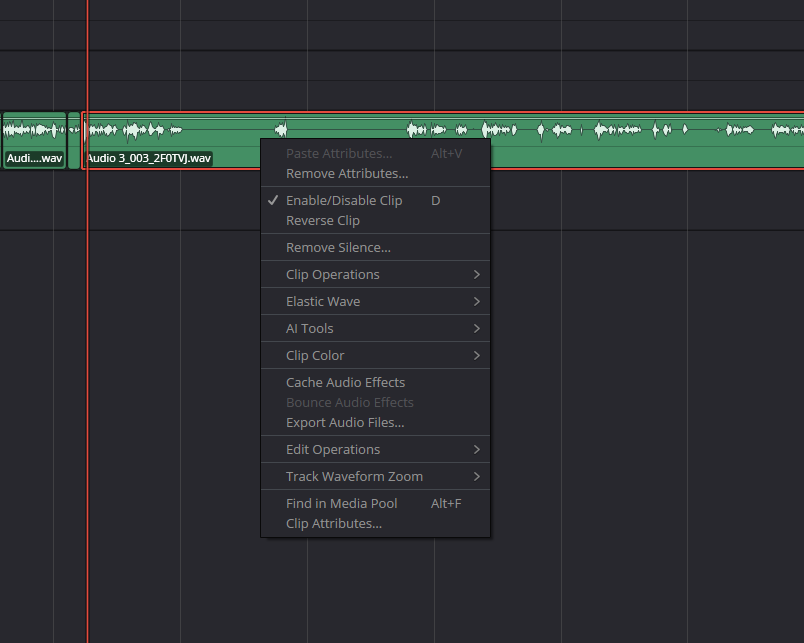
Clip context menu: Clip Attributes
Clip Attributes appears near the bottom of this selected-clip menu; it is not the track-header menu.
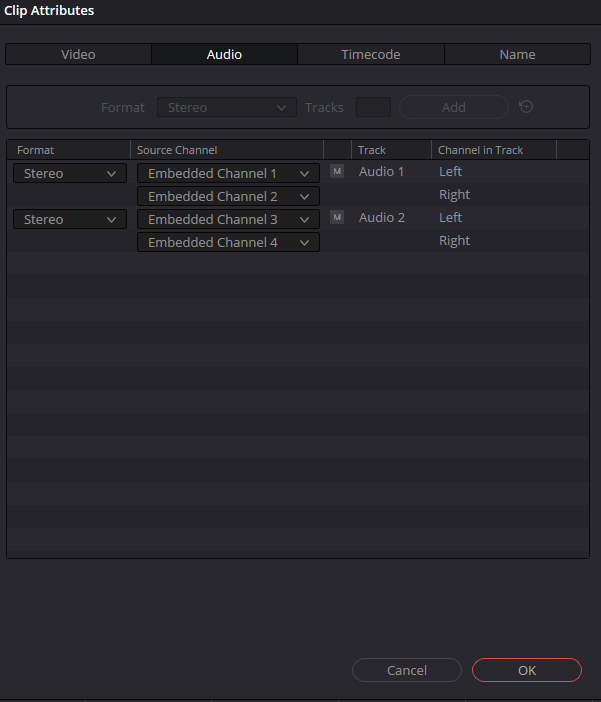
Audio: four sources, two stereo pairs
Embedded Channels 1/2 feed Left/Right of Audio 1, and 3/4 feed Audio 2. The upper track-creation controls are unavailable in this capture.
Reference: Videomontazher — Clip Attributes / source-channel captures
03 / UNDERSTAND & APPLY
Format and Source Channel: two different choices
The visible part of the Format menu includes Mono, Stereo, LRC, LCR, LRCS, LCRS, Quad, 5.0, 5.0 Film and 5.1. A scrollbar means this is not the complete catalog. Choose a format for its intended channel roles, not because it offers more channels.
Even LRC and LCR distinguish the order of channel roles. For multichannel material, compare each row with the recording documentation and audition it. “Dialogue is always channel three” is not a safe mapping rule; establish the actual order and content.
Source Channel selects the source for a slot rather than automatically mixing every source together. <none> leaves the slot without a source. Assigning the same channel to Left and Right duplicates the selected recording; it does not create independent spatial information.
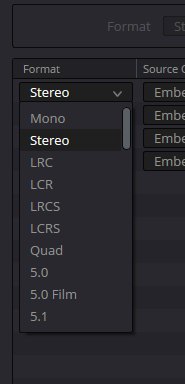
Visible portion of the Format menu
The menu scrolls. This crop shows options from Mono to 5.1, including LRC/LCR orders; it is not the complete version-specific format list.
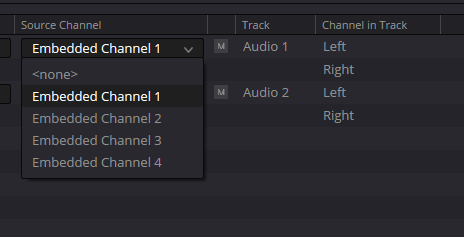
Source Channel and <none>
This example offers four Embedded Channels and <none>. It is the selected source’s list, not a catalog of hardware interface inputs.
Reference: Videomontazher — Clip Attributes / source-channel captures · Blackmagic Design — Fairlight
04 / UNDERSTAND & APPLY
Choose a layout for the actual recording
One useful microphone
In a two-channel file, CH 1 could be camera sound and CH 2 a lavalier. After checking, choose Mono and the intended source. Do not automatically sum the main and safety recordings.
Two independent speakers
Represent them as two mono audio tracks, map each to its own Embedded Channel and use separate timeline tracks. One speaker can then be edited and processed independently.
An actual stereo pair
For music or a spatial recording, preserve Left/Right and a stereo track unless the task requires something else. Splitting to mono is possible, but independent gain and processing can change the pair’s balance.
Multichannel material
First document channel roles and order. Adaptive accommodates nonstandard layouts, but it does not infer their meaning or replace an explicit surround or delivery plan.
Reference: Blackmagic Design — Fairlight · Videomontazher — Clip Attributes / source-channel captures
05 / UNDERSTAND & APPLY
Walkthrough: two microphones in one file
Identify the content
In a test project, audition channels 1 and 2 separately using a passage where the speakers alternate. Record who is on each channel. Do not apply this workflow blindly to a stereo pair.
Define two mono audio tracks
In the Media Pool Audio tab of Clip Attributes, use the available controls to form two Mono audio tracks. Assign Embedded Channel 1 to the first and Embedded Channel 2 to the second. Inspect the resulting rows before OK.
Place and label them
Place the checked material on two mono tracks in a test timeline. Name the tracks for the real sources rather than Left and Right. Do not assume every pre-existing edit will be restructured automatically.
Verify independently
Audition each track, then the full mix with Solo cleared. Check synchronization, the intended voice, pan and the absence of an accidental extra instance of the same recording.
Reference: Blackmagic Design — Fairlight · Videomontazher — Clip Attributes / source-channel captures
06 / UNDERSTAND & APPLY
Track format: Add Track versus Change Track Type
To create a track, use the track-header menu and Add Track → Mono or Stereo as planned. For an existing track, use Change Track Type to. Changing a shared track’s format can affect playback of every clip on it, so inspect its contents first.
A track type is not a source-file converter. When a stereo clip meets a mono track, do not assume which channels will be heard or how they will be adapted. Match the formats explicitly for a predictable teaching example.
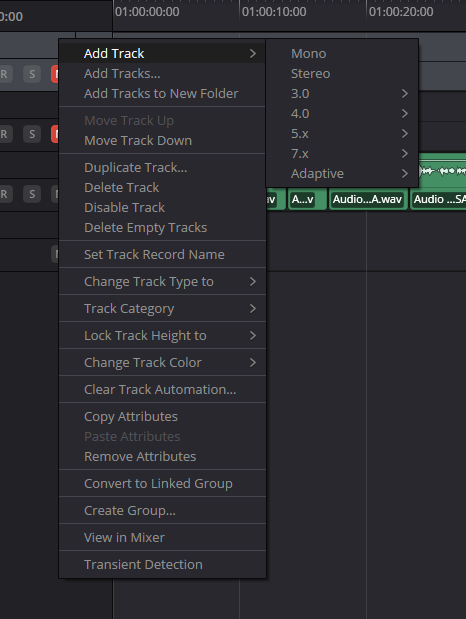
Add Track is expanded, not Change Track Type
The filename is preserved and the caption corrected after reinspection. Change Track Type to is visible lower down, but its submenu is closed.
Reference: Videomontazher — Add Track menu capture · Blackmagic Design — Fairlight
07 / UNDERSTAND & APPLY
Build a mapping without changing the project
Choose the source-channel count and assign sources to slots. The model exposes duplicate assignments, unassigned slots and references to a source that is not in the declared set.
Model a one-to-one assignment: a slot reads one source channel or none. This is not a downmix or an audio analyzer.
SOURCE → CLIP SLOT
Not used in this mapping (not deleted from the file): 3, 4.
Verify actual content by listening. Channel numbers do not identify the microphones.
Your input stays in this component and is not saved automatically. The JSON is a teaching plan, not a Resolve preset or a test certificate. No network requests, file inspection, channel summing, pan law or loudness measurement.
Reference: Blackmagic Design — Fairlight
08 / UNDERSTAND & APPLY
Inspector Audio does not replace source selection
Volume, Pan, Pitch and Equalizer in the Audio tab operate on the selected sound. Raising Volume cannot retrieve a voice from another Embedded Channel. Pan places the available signal; it does not select another microphone.
Do not claim that the whole Inspector only handles processing: Blackmagic also identifies its File tab as a route to changing the clip format. This section concerns the Audio Inspector specifically. The AI blocks in the capture do not establish availability in every edition.
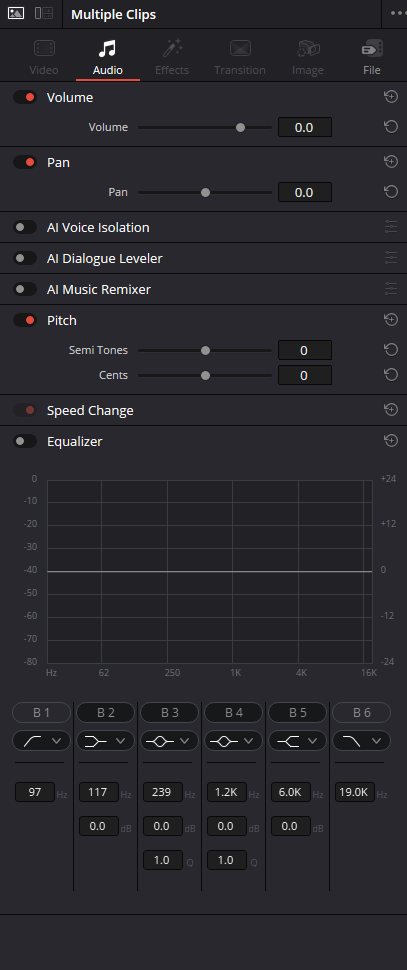
Audio Inspector with multiple clips selected
The header says Multiple Clips. Volume, Pan, AI blocks, Pitch and a six-band Equalizer are visible. The image does not describe the File tab or certify Free-edition availability.
Reference: Blackmagic Design — Fairlight · Videomontazher — Clip Attributes / source-channel captures
09 / UNDERSTAND & APPLY
When the result is not what you expected
| Symptom | Check first | Avoid |
|---|---|---|
| Voice on one side only | Slot source, clip/track format, pan and output bus. | Do not duplicate all channels to L/R without listening. |
| Same person on both tracks | Check whether both rows select Embedded Channel 1. | Two strips do not prove that two microphones were assigned. |
| Expected Embedded Channel is absent | Check the file’s channel count and the selected clip. | Do not invent a channel or compensate with gain. |
| Existing instances change after OK | Inspect the edit scope and shared source items. | Do not rely on a duplicate timeline alone for isolation. |
| The exported file differs from playback | Check the bus/track selected in Deliver and its channel layout. | Do not remap the source before checking the export source. |
Reference: Blackmagic Design — Fairlight · Videomontazher — Clip Attributes / source-channel captures
PRACTICE / NO AUTOPILOT
A small task. A checkable result.
Work in a test copy, listen before and after, and write down what you actually observed. The checklist contains no pre-approved results.
Record the environment
Record the Resolve version and edition, source file, channel count and whether you are changing the Media Pool item or an instance.
Document the starting map
Use a short passage to identify each channel. Record Format and Source Channel before changing anything.
Test one assignment
On a project copy, map one intended microphone as Mono. Audition it alone and in the mix. Do not use processing to hide an assignment error.
Compare a second layout
Use two mono tracks for genuinely independent microphones; preserve stereo for a real pair. Write down the reason.
Verify the output
Clear Solo, check pan and the intended bus, and audition the channels of a short test export. Do content, synchronization and channel roles match?
FAQ / BEFORE THE NEXT MOVE
Questions that matter in practice
Does mono mean sound in one ear only?
No. Mono describes one source or track channel, which can be centered in a stereo bus. One-sided playback calls for checking mapping, formats, pan and outputs rather than automatically duplicating channels.
Reference: Blackmagic Design — Fairlight
Is every two-channel file stereo?
No. They may be independent microphones, a main and safety feed, or an actual stereo pair. Choose the layout after establishing their roles and content by listening.
Reference: Blackmagic Design — Fairlight · Videomontazher — Clip Attributes / source-channel captures
Can one Embedded Channel feed both Left and Right?
That assignment repeats one source in two slots; it does not create another microphone or genuine stereo information. A mono track with deliberate panning is usually clearer for a single voice.
Reference: Videomontazher — Clip Attributes / source-channel captures
Why are Tracks and Add unavailable?
Availability depends on selection context. The saved timeline capture shows the creation controls dimmed. To prepare the structure before editing, start with one Media Pool source and inspect the available controls rather than blindly changing a batch.
Reference: Videomontazher — Clip Attributes / source-channel captures
Can Pan or EQ repair mapping?
No: those controls process and place the signal already selected. Choose the microphone with Source Channel and the layout with clip interpretation and track type. The Inspector has several tabs; do not confuse Audio with File.
Reference: Blackmagic Design — Fairlight
Can the downloaded JSON be imported into Resolve?
No. It is a teaching map of the entered assignments, not a file analysis, microphone verification, application configuration or preset.
REFERENCES / 2026-10-06
What this guide is based on
Checked against the public Blackmagic Design Fairlight page and the encyclopedia’s existing interface captures on 6 October 2026. The images were inspected again; a resolve21 filename does not establish the exact build. The full current Reference Manual was unavailable in this pass; unverified menus have not been invented. The examples are teaching procedures, not a live Resolve test report. English interface names are retained; the placement and availability of individual controls depend on version, edition and selection context.
Blackmagic Design — Fairlight ↗
Clip Adjustments, Waveform Editing, Smart Edit Tools, Mixer and Channel Mapping; manufacturer page checked 6 October 2026.
Videomontazher — Clip Attributes / source-channel captures ↗
Existing Clip Attributes, Format/Source Channel menus and Audio Inspector captures inspected on 6 October 2026. Four channels and two stereo pairs belong to this example, not the full version catalog.
Videomontazher — Add Track menu capture ↗
Reinspection shows Add Track expanded. Change Track Type to is visible but its submenu is closed. The old filename is not a reliable caption.