FAIRLIGHT / AUTOMATION / METERING · 10
Automation
Shape the moment. Preserve the rest of the mix.
Lower music under a line, move a sound with the picture or gradually change its space. Understand read and write states, define the scope of a change and edit the curve while preserving the balance of neighbouring scenes.
- 01Separate Read, Preview and recording
- 02Choose boundaries and a curve operation
- 03Carry changes through edits and check the mix
Change position and target level in a 12-second teaching window. Compare the original curve with the range command result.
Read a change over time.↗
Move the playhead along the teaching curve. A parameter’s value at one moment and the shape of an entire pass answer different questions.
Check: identify the passage that needs to change.Change the controls to explore the diagram. No audio playback, native DSP or connection to Resolve.
Sources and scope · 9 October 2026
Reviewed on 9 October 2026 against the DaVinci Resolve 21 Reference Manual: Chapter 178, Mix Automation, pages 4048–4055 and 4060–4070. PDF and printed page numbers match. Text and interface pages were checked. Write To is additionally supported by Blackmagic’s official Resolve 18.1 announcement; the Auto Punch pass is described in the Fairlight Desktop Console Operation Manual, page 51. Five original Resolve 21 captures show the menus and working context. The browser graphs and exercises are authored teaching models: they do not connect to Resolve, record sound or reproduce its internal processing and complete automation state system.
Read the source notes ↓On this page
01 / UNDERSTAND & APPLY
What mix automation stores
Automation stores parameter changes over time. It can control a track or bus fader, pan, Mute, sends, EQ, Dynamics and supported plugin parameters. Playback places those changes back at the same events in the scene.
You can draw a curve with keyframes or record it by moving controls during playback. Drawing suits precise boundaries and transitions you can already describe. Recording lets you perform a change to picture. Both results can be viewed and refined afterwards.
Music under dialogue
Separate the track’s overall balance from a local reduction during a line. Listen to the first word, the pause and the return of the music.
Movement in a scene
Pan can follow an object in the picture. Its trajectory and level should support the event’s apparent movement.
A changing space
Automate a send or effect parameter when the perspective moves between spaces. Listen to the transition and the effect tail.
Reference: Blackmagic Design — DaVinci Resolve 21 Reference Manual · Mix Automation
02 / UNDERSTAND & APPLY
Read the menu and prepare the right parameters
Toggle Automation enables automation recording and playback. A parameter selector appears in each track header. None keeps the track in Clips View; choosing Fader, Pan or another parameter displays that curve.
Automation Controls opens the toolbar containing recording modes and Enables. Enable the parameter groups you intend to record. This also matters for Copy, Paste and Erase: their scope is governed by Enables and selected channels, rather than by the displayed curve alone.
Fairlight → Automation brings together state changes, range operations, data editing and Mix List. Open Automation Controls to choose Touch, On Stop and Preview on the separate toolbar.
| Command or setting | Meaning in a session |
|---|---|
| All Read | Returns parameters in Write or Trim to Read. Existing curves remain available for playback. |
| Follows Edit | Determines whether automation travels with the time range of an edited clip. |
| Punch In / Punch Out | Change recording states according to Preview, Enables and channel selection. |
| Active Range / Write To | Set a write restriction or the direction in which current values are extended. These are separate decisions. |
| Fill / Glide / Copy / Paste / Erase | Edit automation values and passages. Check the range and parameter set first. |
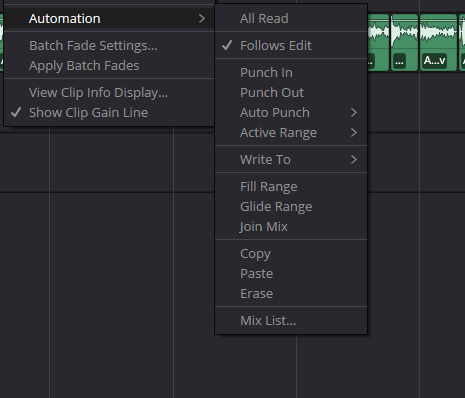
Fairlight → Automation · Resolve 21
Original Automation menu capture. It records the command names; their meaning and conditions were checked against the manual, including modes accessed through a separate toolbar.
Reference: Blackmagic Design — DaVinci Resolve 21 Reference Manual · Mix Automation · Blackmagic Design — DaVinci Resolve Studio 18.1 release · Automation command updates
03 / UNDERSTAND & APPLY
Choose how recording and stopping behave
Write records absolute control positions over existing data. Trim makes relative changes to existing automation. Decide whether you need a new shape or an adjustment to a useful existing move, then choose Touch and On Stop behaviour.
Preview lets you audition settings while its parameters are released from the recorded curve. Auditioning does not commit a new pass. Parameters in Preview have blue indicators; Punch In can put them into recording, and Fill or Glide can apply their values to a range. Preview remains active across transport stops.
| Group | Mode | Behaviour |
|---|---|---|
| Touch | Off | Ordinary control movements do not record automation. An individually armed channel can still record in Latch with Touch set to Off. |
| Touch | Latch | Recording starts when a control is moved and continues after release until the transport stops. |
| Touch | Snap | After release, the control glides back to existing automation. Recording ends when the return finishes, until the control is moved again. |
| Touch | Snap Latch | Faders use Snap while other controls use Latch. |
| On Stop | Event | The last recorded value continues until the next existing automation event. |
| On Stop | Hold | The final value continues for the rest of the track; previously recorded data after the pass is deleted. |
| On Stop | Return | The final recorded value transitions back to the previous automation. |
Reference: Blackmagic Design — DaVinci Resolve 21 Reference Manual · Mix Automation
04 / UNDERSTAND & APPLY
Active Range: restrict automation recording
Set Active In and Active Out in Fairlight → Automation → Active Range, then check Enable. The enabled area permits automation writing only within its boundaries; surrounding data is protected from that pass.
If playback starts before Active In, control changes initially take place in Preview automatically. Recording begins within the area and is automatically punched out at Active Out. Parameters in Read continue to follow their recorded curves regardless of Active Range.
Ordinary timeline In/Out points define an editing selection for Fill, Glide and clipboard operations. Active Range defines where writing is allowed. Both can matter to one task, but check their purposes separately: seeing one selection does not establish the other’s state.
Punch In
With Preview enabled, moves parameters currently in Preview to Write or Trim. Without Preview, it puts Automation-enabled parameters on selected channels into Write or Trim.
Punch Out
With Preview enabled, returns parameters in Write, Trim or Preview to Read. Without Preview, it returns Automation-enabled parameters on selected channels to Read.
Auto Punch
Automates entry and exit at the range boundaries. The Desktop Console guide describes a pass with pre-roll, punching in at In and out at Out.
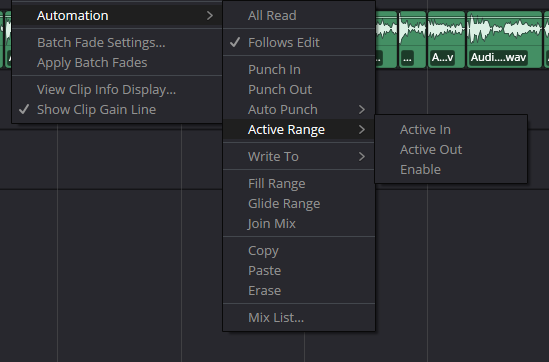
Active Range · menu
Original Active Range controls. Establish both boundaries, then check whether the writing restriction is enabled.
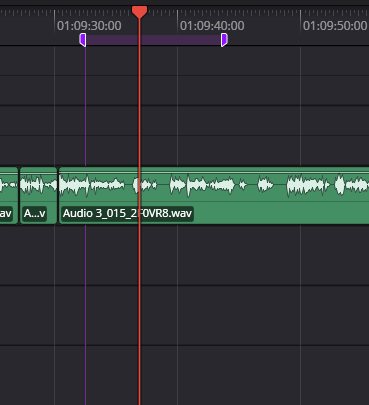
Active Range · timeline
Original timeline range capture. Its purpose is to restrict automation writing; check the ordinary Fill and Glide selection separately.
Reference: Blackmagic Design — DaVinci Resolve 21 Reference Manual · Mix Automation · Blackmagic Design — Fairlight Desktop Console Operation Manual · Auto Punch and range commands
05 / UNDERSTAND & APPLY
Write To: extend current values across the timeline
Write To uses current automation values. Blackmagic’s official description identifies Start, End and All as the start, end or full length of the timeline. This is useful for establishing a steady mix state without performing a continuous fader pass.
Park at the intended position and check the current parameter values first. Consider the scale of the command: setting a state for the whole programme is a broader decision than changing one line. After applying it, inspect the curve on both sides of the position from which you worked.
| Write To | Direction | Example task |
|---|---|---|
| Start | Extend current values towards the timeline start. | Establish a steady state before the chosen moment. |
| End | Extend current values towards the timeline end. | Continue a chosen state through the remaining programme. |
| All | Write current values across the whole timeline. | Create a constant starting state for later local changes. |
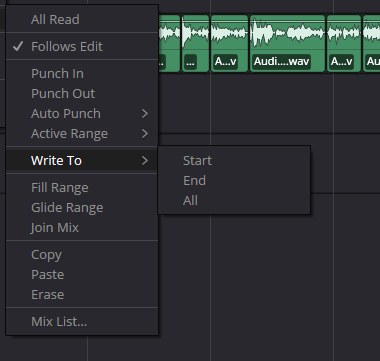
Write To → Start / End / All
Original Write To capture. Blackmagic’s description identifies the targets as the start, end and full length of the timeline.
Reference: Blackmagic Design — DaVinci Resolve Studio 18.1 release · Automation command updates
06 / UNDERSTAND & APPLY
Fill and Glide: a constant value or a transition
Define an ordinary timeline In/Out range and prepare the required Preview values. Fill Range writes the current values of all parameters in Preview throughout that range. It suits a scene state change or a steady reduction in a music bed.
Glide Range creates a transition from each parameter’s existing value at In to its Preview value at Out. The starting value comes from the recorded curve. Moving the playhead does not, by itself, make its position the beginning of the glide.
Glide is a specific operation between two boundaries, rather than a general repair for every uneven part of a curve. If the selection already contains useful movement, decide whether you intend to replace it with one transition.
| Operation | Range start | Range end | Check |
|---|---|---|---|
| Fill Range | The current Preview value. | The same Preview value. | Whether the whole scene needs a constant value and how it meets neighbouring passages. |
| Glide Range | The existing value at In. | The current Preview value. | Whether the direction, duration and destination fit the scene. |
Define the task
Place In/Out around the event and choose the parameters to change. Confirm that the required values are actually in Preview.
Choose the shape
Use Fill for one steady state and Glide for a transition from the entry value. Inspect the existing curve inside the selection first.
Listen across the join
Start before In and continue after Out. Check jumps, words at the boundaries, musical phrasing and effect tails.
Reference: Blackmagic Design — DaVinci Resolve 21 Reference Manual · Mix Automation
07 / UNDERSTAND & APPLY
Move and edit data with the picture
Follows Edit is enabled by default. Moving, copying or editing a clip carries automation for its time range with the edit. A recurring sound effect can therefore carry its pan movement into another scene. With the setting disabled, automation stays at its existing timeline positions.
Before restructuring a scene, decide whether a move belongs to an event or to the programme’s timing. A passing car’s pan usually belongs with a copied car clip; a broad music transition may belong at a fixed programme position. Check both boundaries after the edit.
For direct editing, choose the required parameter in the track header. Keyframes define changes, with transitions between points. Adjusting a selected range creates bounding keyframes to preserve values at the edges. Zoom in enough to distinguish an individual point from an adjustment to the whole line.
| Automation menu command | With an In/Out range | Without a range |
|---|---|---|
| Copy | Copies data in the range for selected channels and parameters allowed by Enables. | Copies a snapshot of values at the playhead. |
| Paste | Fills the destination range with clipboard data; a snapshot supplies constant values. | Pastes the entire clipboard. Check the destination time and selected channels. |
| Erase | Deletes data inside the range on selected channels, obeying Enables. | Changes nothing: this command requires a range. |
Reference: Blackmagic Design — DaVinci Resolve 21 Reference Manual · Mix Automation
08 / UNDERSTAND & APPLY
Resume a pass and keep mix versions
Join Mix manually resumes Latch recording from the current level so you can continue the move. Use it to refine a pass after checking the parameter states and the intended entry point.
Mix List stores mix versions for a single timeline. A version includes automation and mixer setup: routing, plugins, track groups and other settings. Loading it can therefore change more than the shape of a Fader curve.
Use Save Mix to keep a reference, name each new version clearly and record the purpose of the revision. Mix List belongs to that timeline and cannot be shared between projects as a general preset library.
| Action | Result |
|---|---|
| Save Mix | Stores the current mixer setup and automation as a named version with notes. |
| Load a version | Recalls the saved mix state. Check routing, effects and the audible result after loading. |
| New Mix → Write All | Establishes a baseline snapshot by writing current control values to their automation curves. |
| New Mix → Empty Mix | Clears automation while retaining assignments, routing, track group enables and the underlying mixer setup. |
Reference: Blackmagic Design — DaVinci Resolve 21 Reference Manual · Mix Automation
09 / UNDERSTAND & APPLY
Clip Gain: correct one clip’s level
Clip Gain Line keyframes belong to an individual audio clip. They are useful for a loud syllable, balancing two takes or shaping an envelope within one event. Track fader automation belongs to the track’s mix over time and can span several clips.
Choose the scope from the problem. Start with clip level when the issue sits inside one take. Track automation provides the appropriate time context when music must make room for a whole scene or a send needs to change across an edit.
Automation View edits the displayed curve: cut, copy, paste and delete address automation keyframes. Timeline clip gain keyframes cannot be adjusted in this view, although the clip’s overall Volume remains available in the Inspector. Return to Clips View to work on the clip’s gain line.
| Scope | What owns the change | Working example |
|---|---|---|
| Clip Gain Line | The selected clip and its internal gain keyframes. | Reduce one word without altering the rest of the track. |
| Track / Bus Automation | A track or bus parameter over mix time. | Balance music against several lines or change a scene’s shared send. |
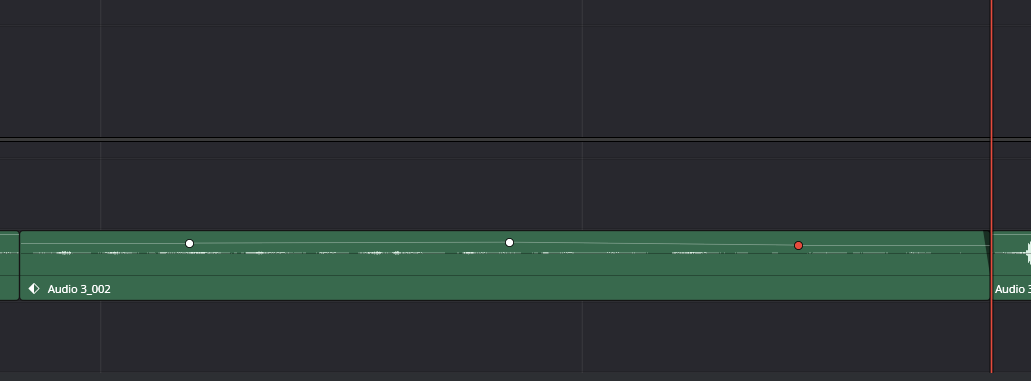
Clip Gain Line · keyframes
Original clip envelope capture. The points belong to this clip’s level; a track’s Fader curve is edited through Automation View.
Reference: Blackmagic Design — DaVinci Resolve 21 Reference Manual · Mix Automation
10 / UNDERSTAND & APPLY
Teaching curve: apply a change and inspect its boundaries
The lab uses an authored level curve in a 0–12 second window. Choose a playhead position, a Preview target and ordinary In/Out points. Inspect the proposed Fill or Glide result, then apply it. Undo restores the preceding edit; Reset restores the original example.
The default Fill/Glide selection is 3–9 seconds. A separate Active Range illustration shows where a hypothetical pass may record. It explains Preview → writing → punch out at the boundaries without changing the selection used by Fill/Glide.
This is a mathematical parameter curve, not an audio signal. Its dB value is a teaching parameter, not a dBFS measurement of your recording. The model preserves data outside the edit and may show abrupt joins at its boundaries. It does not fully model Resolve’s native bounding keyframes, transition behaviour, Undo history or all channel states.
| Action | Question to answer |
|---|---|
| Move the playhead | What value does the current curve have at this moment? |
| Change the Preview target | What would the Fill plateau or Glide destination look like? |
| Change In/Out | How do duration and the existing value at In affect the result? |
| Compare the original curve | Which moves were replaced and what remains outside the selection? |
| Inspect Active Range | Where would an illustrative pass leave Preview, start writing and punch out? |
Preview the interval. Then write the change.
Choose ordinary timeline In/Out, set the volume Preview value and compare Fill Range with Glide Range. Apply changes the saved teaching curve; Undo restores the previous edit. The separate Active Range strip illustrates a recording gate at the playhead.
0 saved edits. Fill Range is a preview until you press Apply. Moving the playhead only inspects the drawing.
Fill Range sets the whole In/Out interval to −8 dB, the current Preview value.
Assume a parameter is ready for a write pass. Before 2 s the example is in Preview; from 2 s to just before 10 s it writes; at 10 s it punches out. Turning this gate off removes that restriction. No pass is being recorded, and Read is not disabled by these boundaries.
Values outside the selected In/Out remain the same function, including after overlapping edits. The diagram can have a jump at either boundary: no native boundary-keyframe or smoothing algorithm is being simulated.
Reference curve and exact rules
The reference linearly joins these authored (seconds: dB) points:
0: −18 · 1.5: −18 · 3: −12 · 4.5: −12 · 6: −6 · 7.5: −6 · 9: −15 · 10.5: −15 · 12: −9
Fill replaces the closed interval [In, Out] with the Preview value. Glide uses the pre-operation curve at In and a straight line to Preview at Out. Edits are layered in order; Undo removes the most recent effective edit. Reset restores every control and the original reference. These commands represent one volume parameter in this example.
The fixed 2–10 s Active Range pass is a separate comparison scenario, not a second simultaneous timeline selection. Its gate labels are illustrative; no native time resolution, transport, Touch/Latch transition, or live automation is reproduced.
Reference: Blackmagic Design — DaVinci Resolve 21 Reference Manual · Mix Automation
11 / UNDERSTAND & APPLY
Take one change from intention to verification
Start with a short, clear task: music should make room for a line and return afterwards. Write down the event that starts the change and the event that ends it. This gives the curve a purpose within the scene.
Include material before and after the correction in your check. One good playhead position is insufficient: listen to the entry, steady section, exit and following passage. Then inspect the level at the appropriate measurement point.
Keep a reference
Create a test copy or save a Mix List version. Name the task and the parameter you intend to change.
Prepare the channel
Select the track or bus, display its curve and check Enables. For a recorded pass, choose Write/Trim, Touch and On Stop.
Define the boundaries
Check In/Out for a range edit. For a restricted recording pass, separately check Active Range and Enable.
Make one change
Draw a move, record a pass or apply Fill/Glide. Compare with the reference before making the next decision.
Return to listening
Return writing parameters to Read, check the scene and listen to a short export. Record the observation and save a useful version.
12 / UNDERSTAND & APPLY
Trace an unexpected result to its cause
Start with the edit’s destination: clip or track, channel, displayed parameter, range and recording state. Compare behaviour while moving a control, after release and after Stop. Those three moments help distinguish a recording mode from an unwanted curve shape.
For a large unexpected change, return to a saved version and repeat one short step. A missing selection, an extra enabled parameter group or an unsuitable On Stop mode can explain the result without rewriting the whole scene.
| Observation | Check | Next step |
|---|---|---|
| The required curve is missing | Toggle Automation, the track header parameter selector and track height. | Display the required curve; a supported control’s context menu can also reveal it. |
| The fader returns to its old value | Whether existing automation is being read and Preview is needed for auditioning. | Choose Preview, Write/Trim or Read deliberately and repeat a short comparison. |
| Writing continues after release | Touch Latch and the channel’s automation arm state. | Check Snap, Punch Out and Active Range against the task. |
| Stopping changed a long section afterwards | On Stop: Event, Hold or Return. | Inspect the later data, restore a version and repeat with the intended ending behaviour. |
| A transition is misplaced after moving a clip | Follows Edit and whether the move belongs to the event or programme time. | Inspect both edit boundaries and choose the required follow behaviour. |
| Erase did nothing | In/Out, selected channels and Enables. | Set the required range and check the parameters before trying again. |
| Clip Gain points cannot be adjusted | Whether the track is in Automation View. | Return to Clips View or use the clip’s overall Volume in the Inspector. |
Reference: Blackmagic Design — DaVinci Resolve 21 Reference Manual · Mix Automation
PRACTICE / NO AUTOPILOT
A small task. A checkable result.
Work in a test copy, listen before and after, and write down what you actually observed. The checklist contains no pre-approved results.
1 · Name the edit scope
Choose 10–15 seconds of a scene. Pick one event and decide whether it needs Clip Gain, a track parameter or a bus parameter. Record what should change and what should remain intact.
2 · Compare Fill and Glide
In the lab, keep In/Out at 3–9 seconds and choose one Preview target. Apply Fill, undo it and apply Glide. Record the difference in starting value, shape and boundaries.
3 · Check the writing restriction
In a Resolve test copy, set Active Range and perform a short pass. Start before In, finish after Out and inspect both sides. Record Touch and On Stop.
4 · Check an edit and a mix version
Save a Mix List version. Move a test clip with Follows Edit, compare the result, then restore the edit. Note which automation should belong with the event.
5 · Confirm the result
Return to automation reading and listen to the entire passage with its neighbours. Check the level and a short export. Record the actual result and the saved mix version’s name.
FAQ / BEFORE THE NEXT MOVE
Questions that matter in practice
Does All Read turn automation off?
It returns parameters in Write and Trim to Read. Recorded curves remain and play back. Toggle Automation separately controls global automation recording and playback.
Reference: Blackmagic Design — DaVinci Resolve 21 Reference Manual · Mix Automation
Does Resolve 21 have Preview and Latch?
Yes. The Mix Automation chapter describes Preview and the Touch modes Off, Latch, Snap and Snap Latch. They are accessed through Automation Controls. One open-menu capture cannot show every available mode.
Reference: Blackmagic Design — DaVinci Resolve 21 Reference Manual · Mix Automation
How is Active Range different from ordinary In/Out?
Active Range restricts where a running pass writes automation. Ordinary In/Out defines the selection for Fill, Glide, Copy and related editing operations. Check both areas separately; parameters in Read continue reading regardless of Active Range.
Reference: Blackmagic Design — DaVinci Resolve 21 Reference Manual · Mix Automation
Does Glide start at the Preview value?
Its starting value comes from existing automation at In. The Preview value defines its destination at Out. Fill instead writes the current Preview value throughout the selected range.
Reference: Blackmagic Design — DaVinci Resolve 21 Reference Manual · Mix Automation
Do Write To All and Fill Range do the same job?
They have different scopes and contexts. Write To All extends current values across the whole timeline. Fill Range writes the values of parameters in Preview across the defined In/Out range.
Reference: Blackmagic Design — DaVinci Resolve 21 Reference Manual · Mix Automation · Blackmagic Design — DaVinci Resolve Studio 18.1 release · Automation command updates
Does Follows Edit turn track automation into Clip Gain?
No. It controls how a clip’s time-range automation travels during an edit. Track parameter data remains mix automation; Clip Gain Line still belongs to an individual clip’s level.
Reference: Blackmagic Design — DaVinci Resolve 21 Reference Manual · Mix Automation
Does Mix List store only fader moves?
It also stores routing, plugins, groups and other mixer settings for one timeline. Loading a version can change the wider mix setup, so inspect more than the level curve.
Reference: Blackmagic Design — DaVinci Resolve 21 Reference Manual · Mix Automation
Can I copy the lab values as finished settings?
They are teaching values for comparing shapes and operation scope. The lab does not analyse audio or approve a mix. Check the level, duration and boundary transitions against your own material in Resolve.
REFERENCES / 2026-10-09
What this guide is based on
Reviewed on 9 October 2026 against the DaVinci Resolve 21 Reference Manual: Chapter 178, Mix Automation, pages 4048–4055 and 4060–4070. PDF and printed page numbers match. Text and interface pages were checked. Write To is additionally supported by Blackmagic’s official Resolve 18.1 announcement; the Auto Punch pass is described in the Fairlight Desktop Console Operation Manual, page 51. Five original Resolve 21 captures show the menus and working context. The browser graphs and exercises are authored teaching models: they do not connect to Resolve, record sound or reproduce its internal processing and complete automation state system.
Blackmagic Design — DaVinci Resolve 21 Reference Manual · Mix Automation ↗
Official full PDF, chapter 178 Mix Automation, pages 4050–4070. Text and illustrations checked for modes and Preview, Active Range (4064), Follows Edit (4066), All Read/Punch/Fill Range/Glide Range/Join Mix (4068), and Mix List (4069–4070). Timeline In/Out and the separate Active Range serve different purposes. Reviewed on 9 October 2026; no native application or audio processing was exercised.
Blackmagic Design — DaVinci Resolve Studio 18.1 release · Automation command updates ↗
The official 18.1 release announcement documents Write To Start/End/All: writing current automation values toward the start, the end, or across the full timeline. This historical primary source supports command semantics; the Resolve 21 menu path is preserved from the original article. Active Range is not substituted for the timeline boundaries.
Blackmagic Design — Fairlight Desktop Console Operation Manual · Auto Punch and range commands ↗
Additional primary source: printed pages 51–52 describe Auto Punch and Fill/Glide in the Desktop Console context. It clarifies the automatic pass; hardware buttons are not presented as additional on-screen controls. The main modes and command semantics are checked against the full Reference Manual 21.