FAIRLIGHT / NAVIGATION / INDEX
Timeline Index in Fairlight
Find the right item. Keep the context.
A large session becomes easier to navigate when each question has the right list: a clip instance, a track state or a review note. Read the three Index views against real captures and build a checkable route from the row back to the edit.
- 01Distinguish three kinds of records
- 02Read source and record timing separately
- 03Hand off notes with usable context
Selection and filtering are different actions. Try both in the teaching list.
An instance, not just a filename↗
One source can appear several times. Check the track, record position and source range.
Matching names do not identify the intended instance.Change the controls to explore the diagram. No audio playback, native DSP or connection to Resolve.
Reference scope · reviewed 6 October 2026
Reviewed on 6 October 2026 against Blackmagic’s public page and eight existing Index captures. Tab names and visible fields were checked visually; operations were not executed in an installed Resolve. The resolve21 filename is preserved from the publication, but the exact build cannot be established from these crops. Closed menus, unverified shortcuts and marker-to-ADR conversion are not invented.
Read the source notes ↓On this page
01 / UNDERSTAND & APPLY
Three questions, three views
Open Fairlight → Index and first decide what you need to locate.
Edit Index
Clip-instance rows: useful for checking source portions and their positions in an edit revision.
Tracks
Tracks and buses: names, visibility and state. Not a file list or a complete mixer-routing diagram.
Markers
Timed notes: listening points, replacement tasks and SFX references. Picture and text provide complementary context.
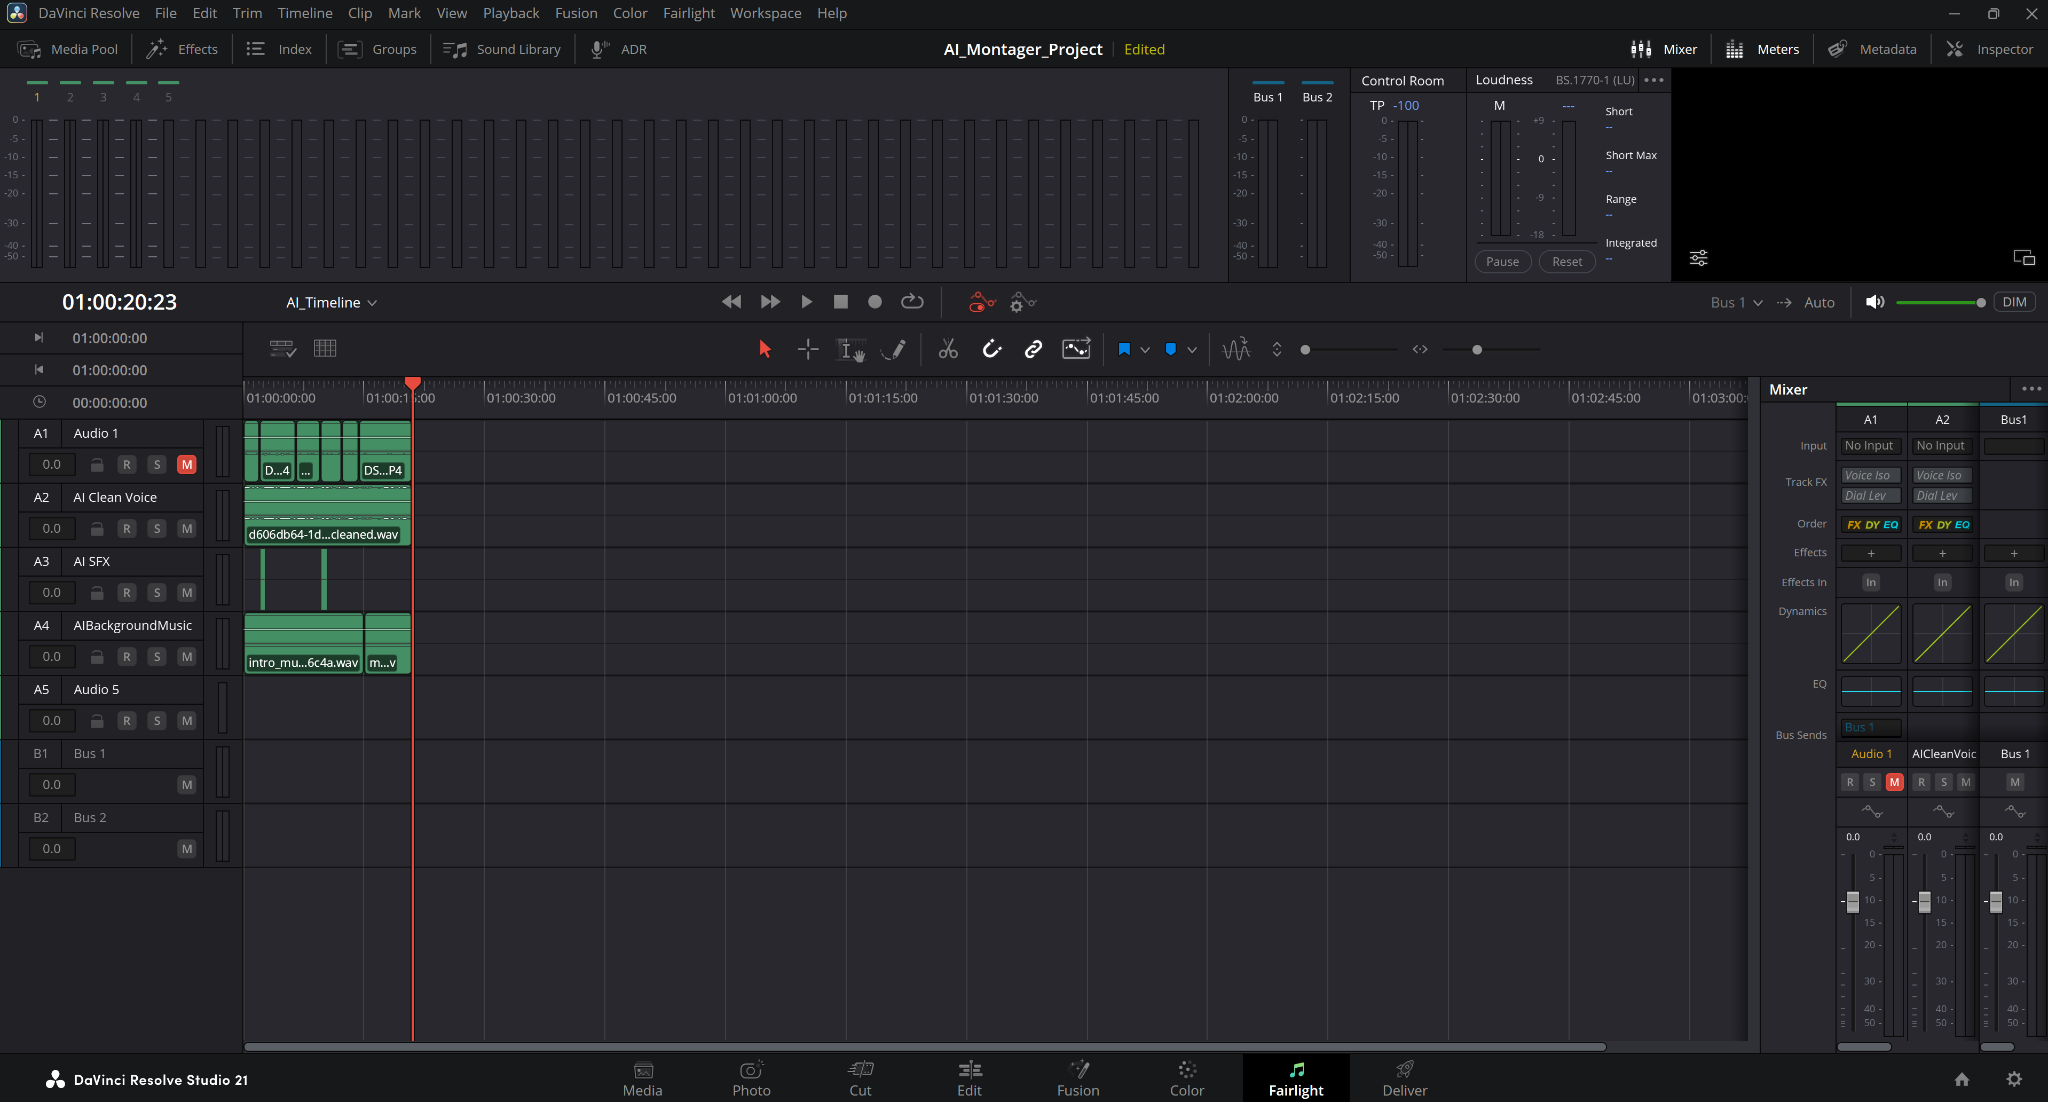
Index in the workspace
The Index button is in the top toolbar. A1 has a red M; that is this project’s state, not a recommended setting. Audibility cannot be checked from a capture.
Reference: Blackmagic Design — Multi-Purpose Timeline Index · Videomontazher — eight original Timeline Index captures
02 / UNDERSTAND & APPLY
Reading source and record timing
The source position and timeline position can differ by hours. That alone is not a synchronization error.
The capture contains several DSCF5207 rows. Check the combination of name, track, source in/out and record in rather than the first name match. This helps avoid replacing a neighboring take or another use of the same file.
Do not infer frame rate from field width or rounded labels. Timecode conversion needs the actual timeline parameters. Speed changes, nested items and source behavior warrant checking the item itself instead of treating the table as a universal time converter.
| Field | What to check | What not to infer |
|---|---|---|
| Name | Name plus track and position | Same name means one object |
| Source In / Out | The used source portion | These are timeline coordinates |
| Record In / Out | Placement in the current edit | This is the source-file start |
| Record Duration | Duration of this instance | The entire source has this duration |
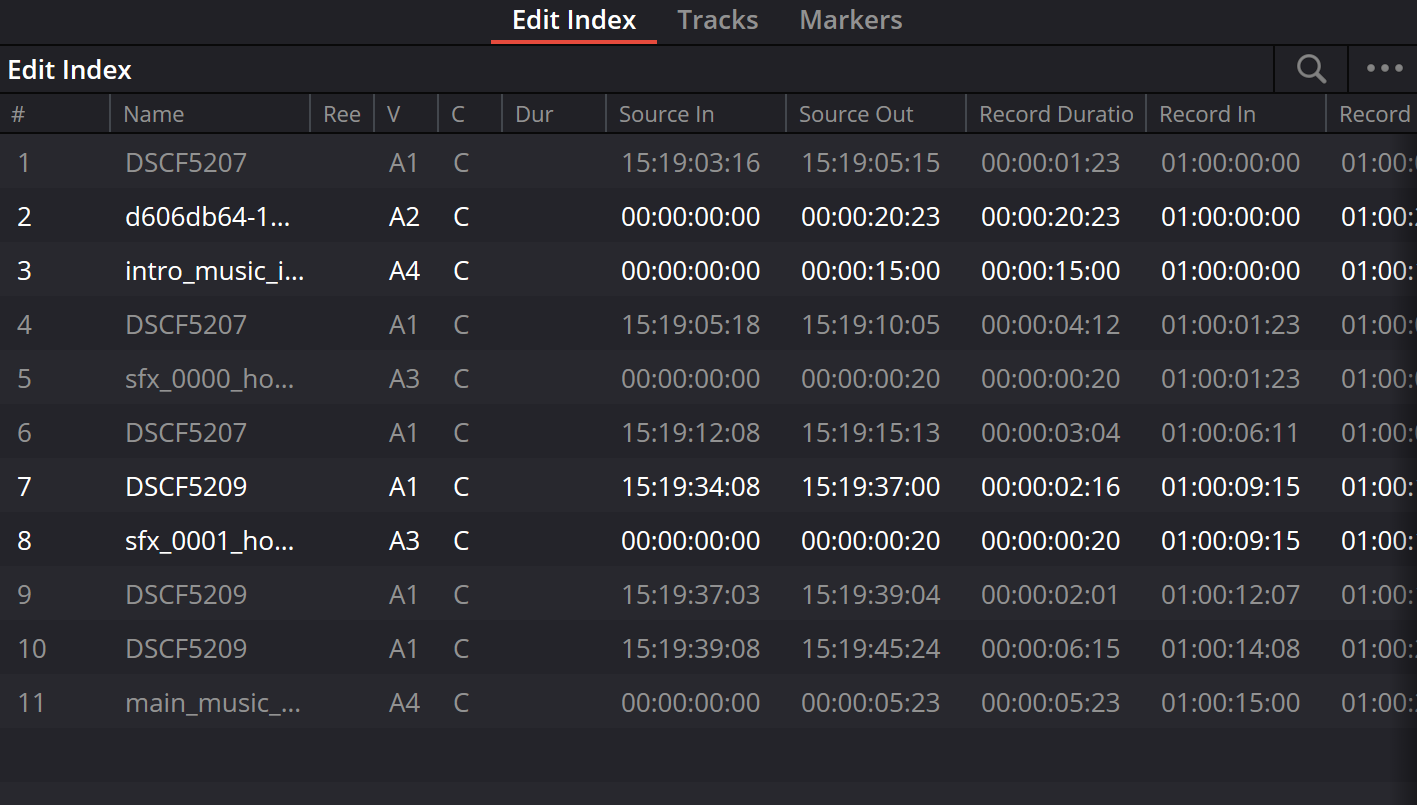
Repeated instances of one source
DSCF5207 appears in several rows with different boundaries. These are separate instances, not automatically detected duplicates. The abbreviated Dur heading and right-edge crops are not filled in with assumptions.
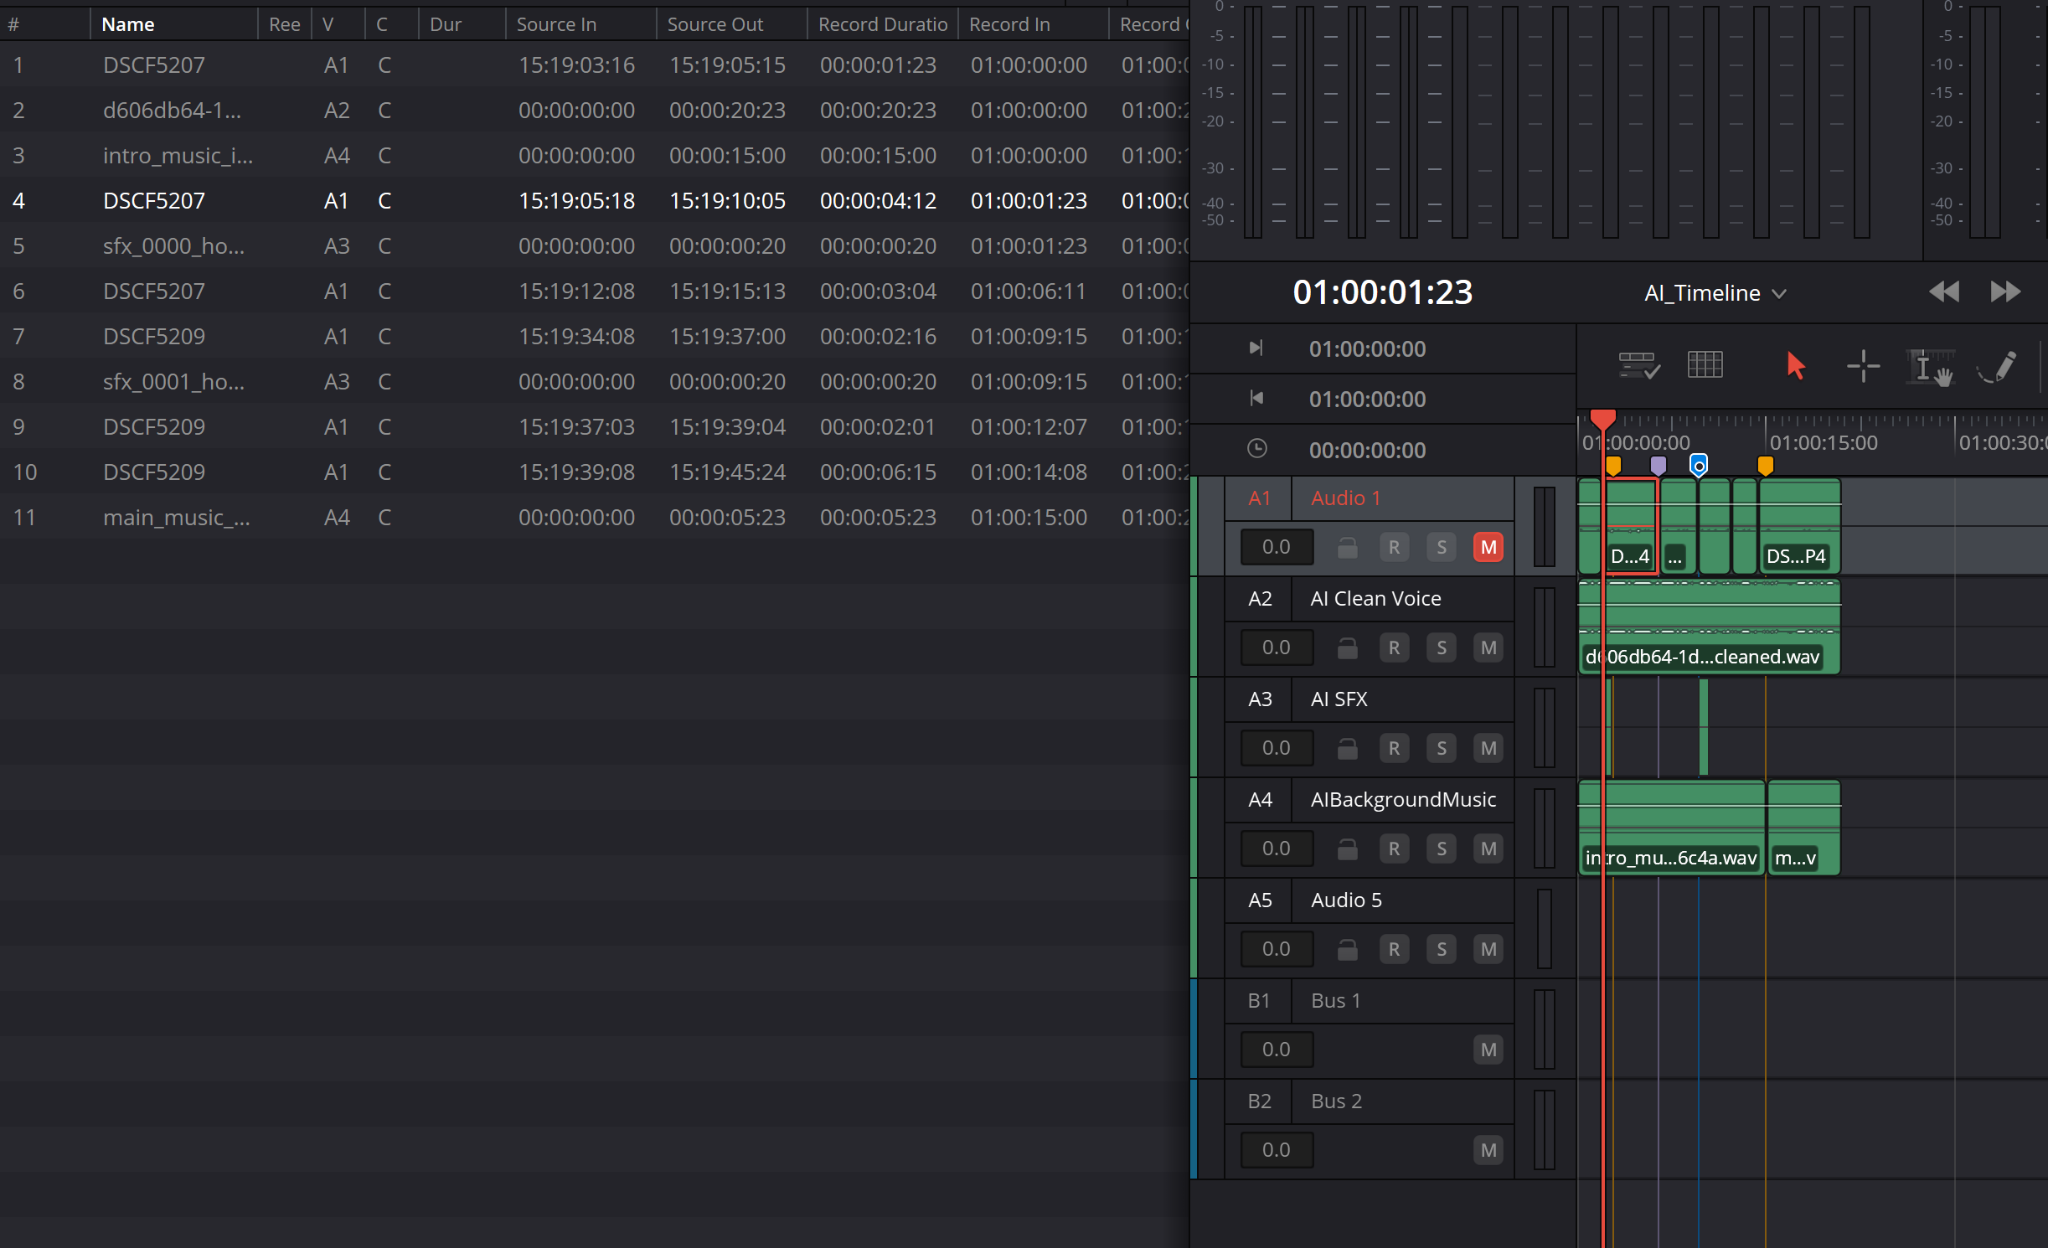
List and editorial context
The selected instance has Record In 01:00:01:23, matching the visible playhead time. The crop demonstrates that state, not the gesture used to reach it.
Reference: Videomontazher — Edit Index / source and record timing
03 / UNDERSTAND & APPLY
Tracks: inspection and modification are different
Nearby controls make inspection convenient—and make unintended bulk toggling easy to overlook.
Blackmagic also describes track renaming and drag reordering in the Index. Reordering changes session structure, not merely how text is displayed. Recheck the intended track afterward; an old A1/A2 position is not permanent identity.
Bus rows in the capture do not have the full audio-track R/S/M set. Do not apply one instruction to every row. Monitor/ADC/VCA fields do not replace a separate check of monitoring, delay compensation and control grouping in their respective workflows.
| Element | Purpose | Check |
|---|---|---|
| Eye / visibility | Show or hide the track representation | Do not use as Mute |
| Lock | Guard against unintended track edits | Do not expect playback to turn off |
| R | Arm a track for recording | Not needed for navigation; verify the input separately |
| S / M | Solo / Mute affect what is heard | Restore the agreed state after a check |
| Name / Format | Identification and row format | A5 1.0 and A1 2.0 are different captured states |
| Category / Monitor / ADC / VCA | Separate technical fields visible in this interface | Do not toggle them blindly to find a clip |
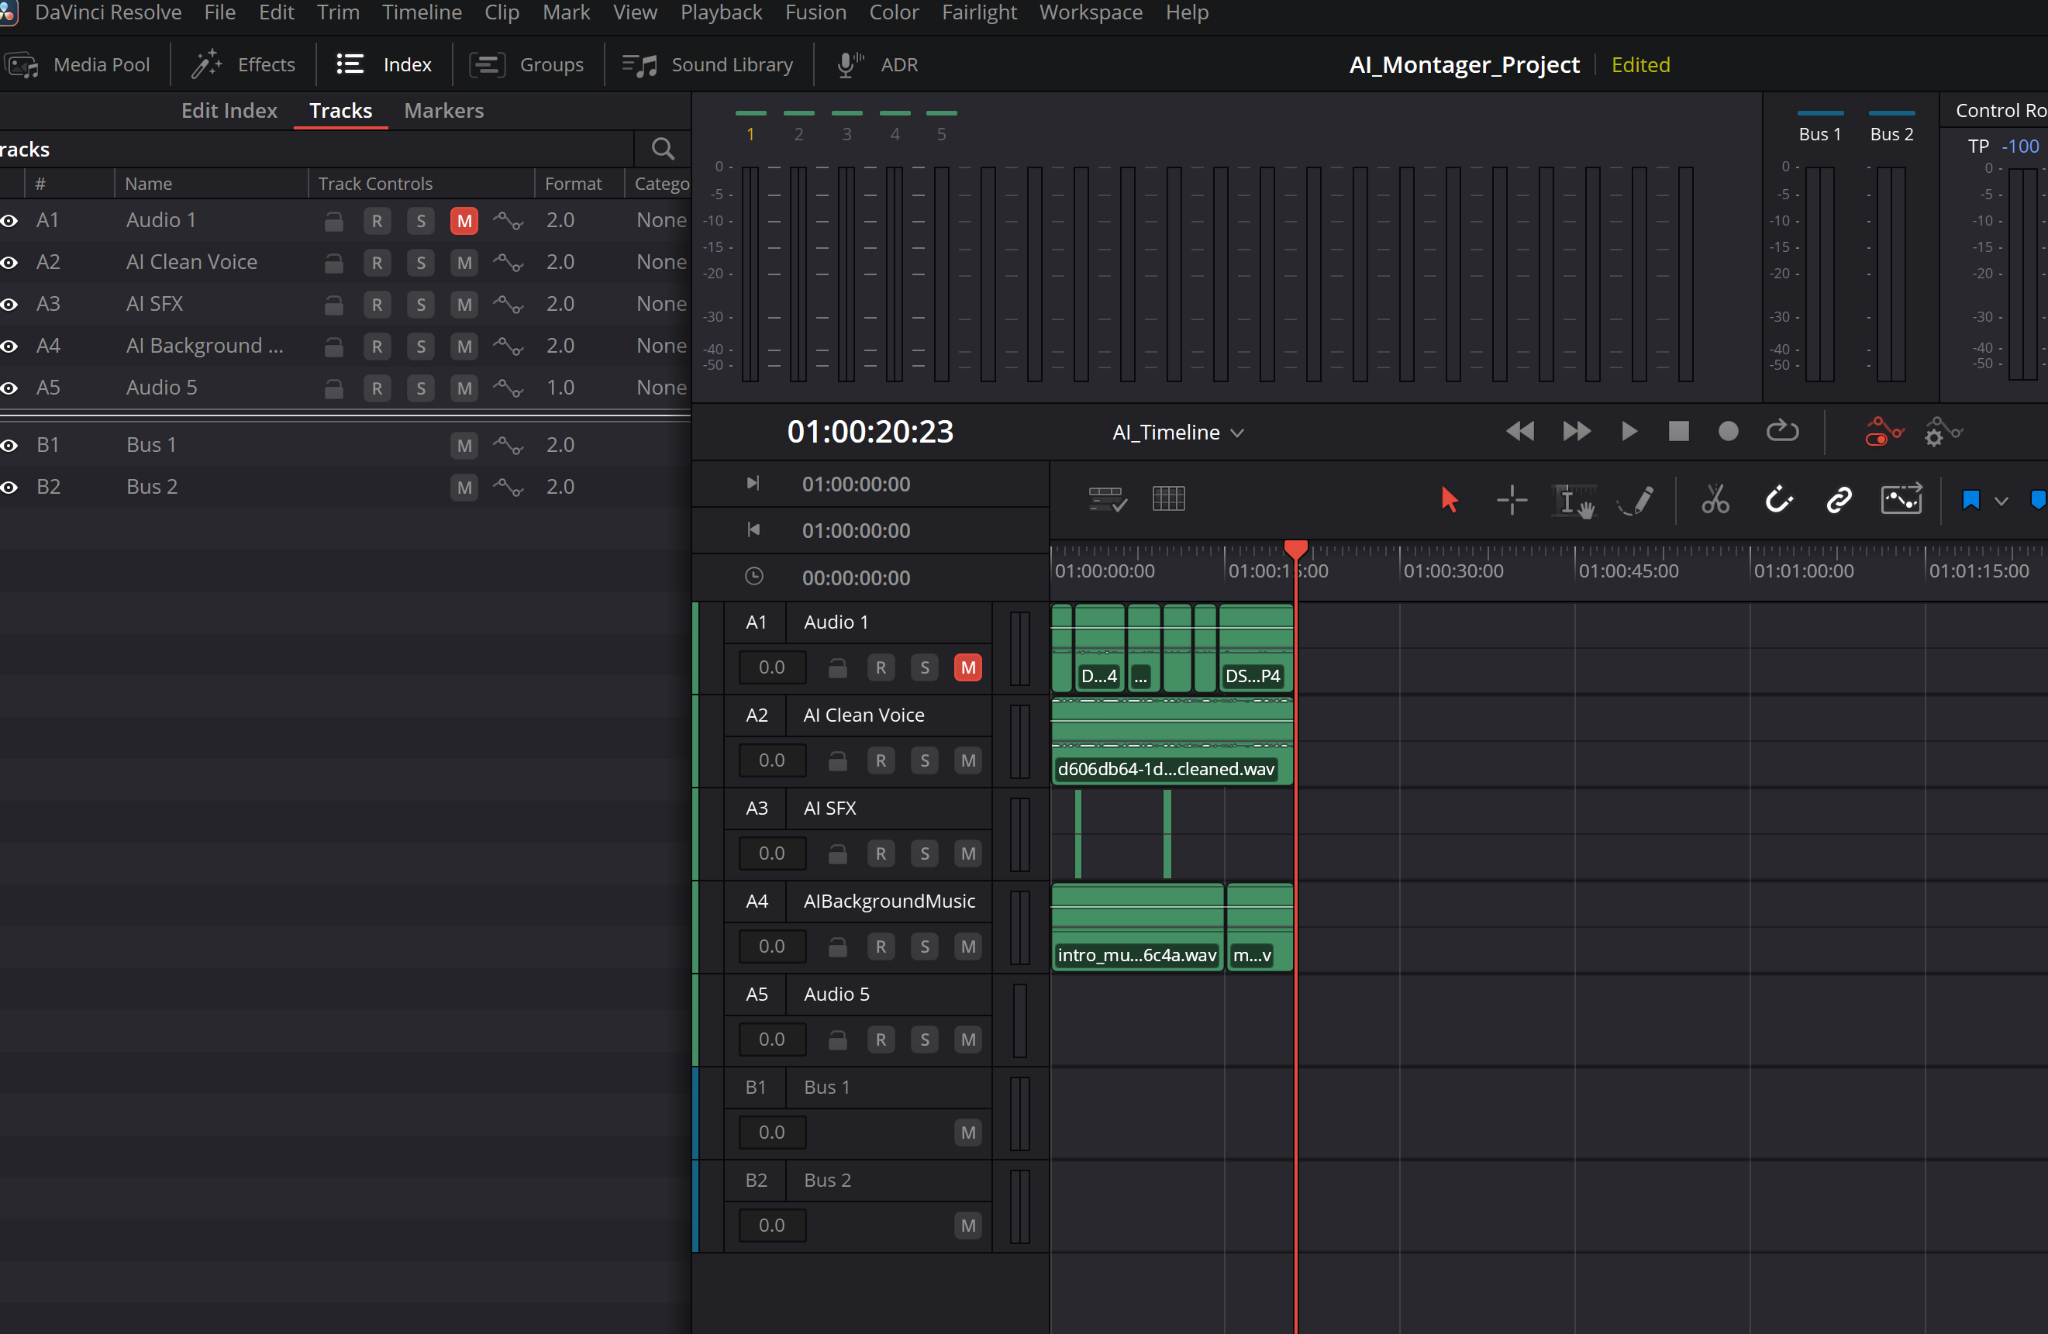
Tracks alongside the timeline
The table shows five audio tracks and two buses. B1/B2 do not become two additional audio tracks simply because they share the list.
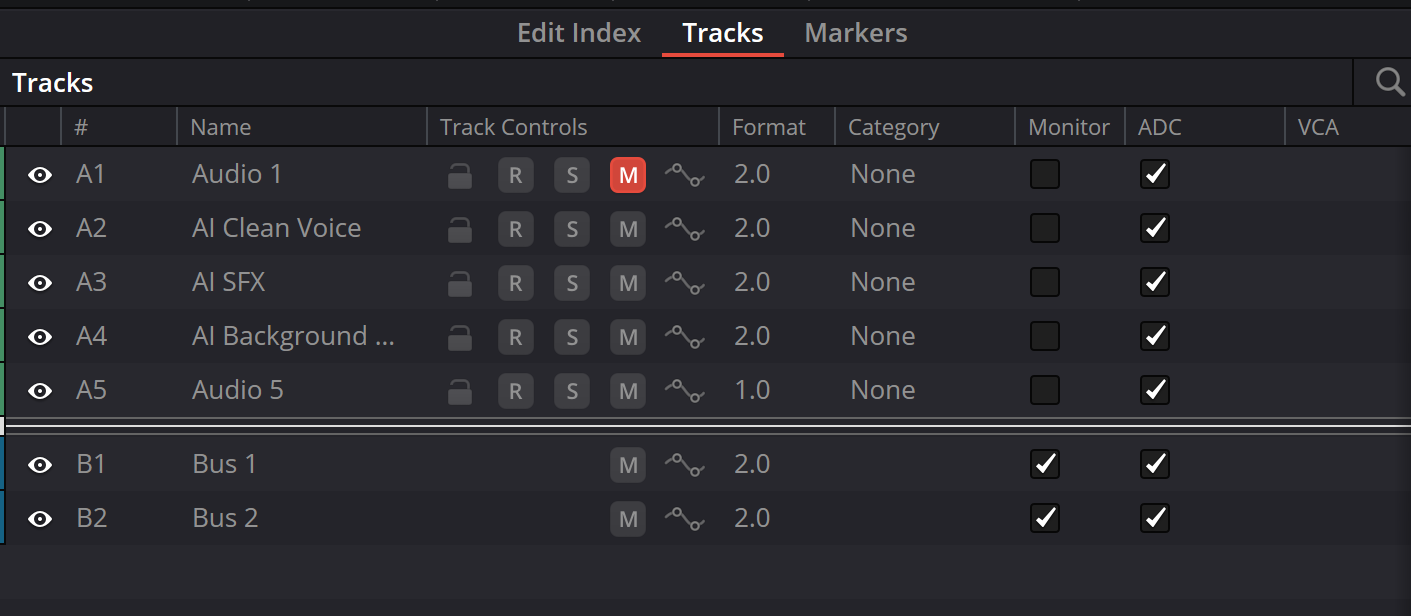
Track state: read before toggling
A1 has M enabled. A5 is 1.0; A1–A4 are 2.0. Bus rows have a different set of controls. Monitor and ADC have checkboxes and VCA is blank; the capture proves neither zero latency nor a completed monitoring route.
Reference: Blackmagic Design — Multi-Purpose Timeline Index · Videomontazher — Tracks controls close-up
04 / UNDERSTAND & APPLY
Markers: locating the note
Use a marker to record where and what to review, not as evidence of an automatically detected error.
Name
A short recognizable task: “Dialogue join”, “Door contact”, “Music entry”.
Keyword and color
Agree on categories within the team. Without a legend, one color can mean different things to different people.
Notes
Describe what you heard and the expected action rather than just “bad”. Include the track and edit revision where necessary.
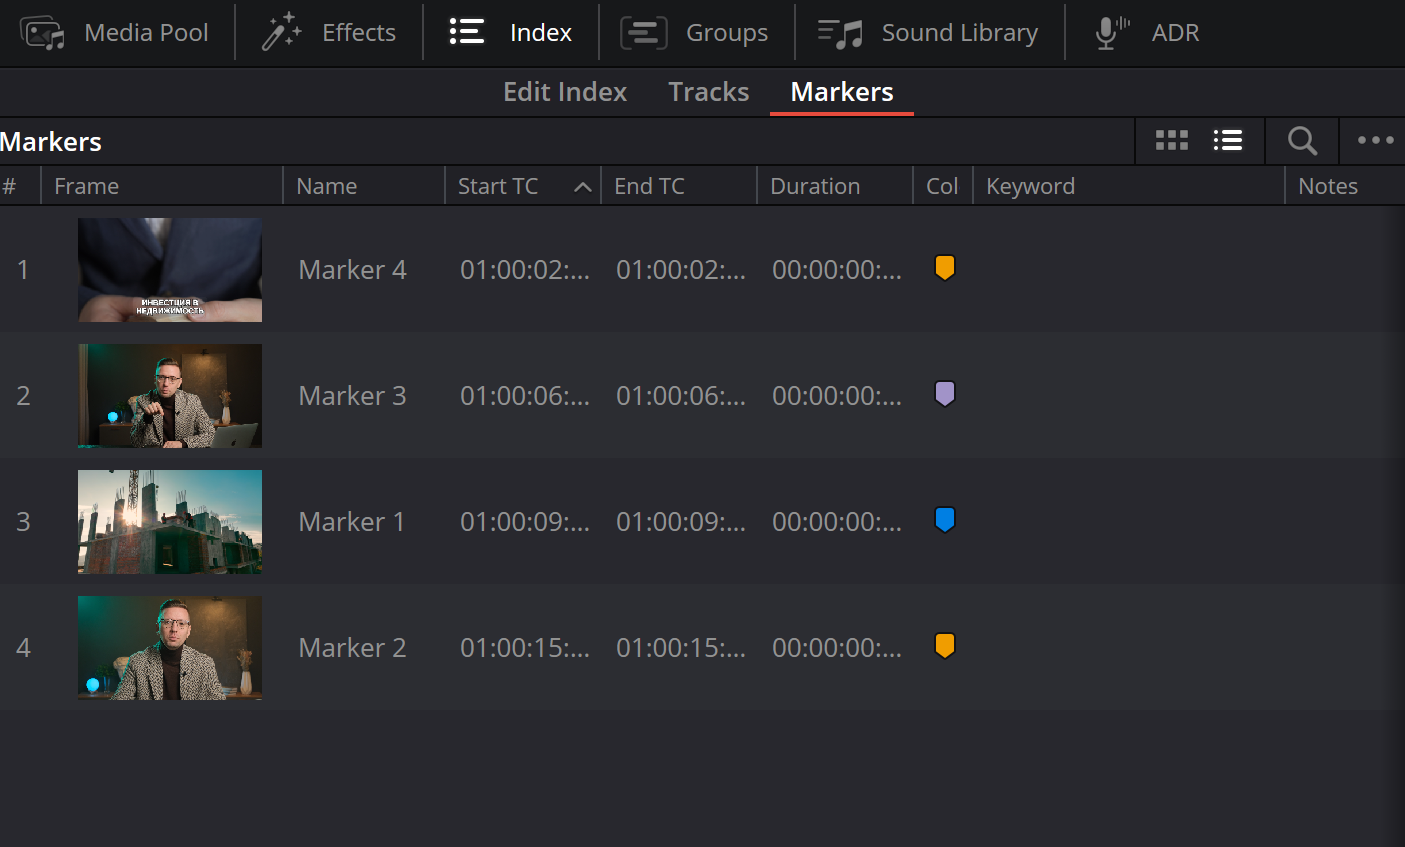
Four markers in the list
Thumbnails and timing columns are visible. Several values are truncated with ellipses; Keyword/Notes are still empty. Full timecodes and durations cannot be recovered from this crop.
Reference: Blackmagic Design — Multi-Purpose Timeline Index · Videomontazher — marker editor, list and saved note
05 / UNDERSTAND & APPLY
Write the note, then reread it
The real editor capture shows Time, Duration, Name, Notes, Keyword, Color, Remove Marker and Done.
Establish context
Stop at the intended event and check the timeline. Confirm that you are editing the intended marker, not one with a similar name.
Separate observation and action
Name: “Click at join”. Notes: “A2, after the word …; compare the adjoining edges and consider a short transition”. This is a task example, not a preset fade duration.
Check the saved text
After Done, inspect the row and reopen the note. “Add notes here…” in the original capture is a placeholder, not a saved comment.
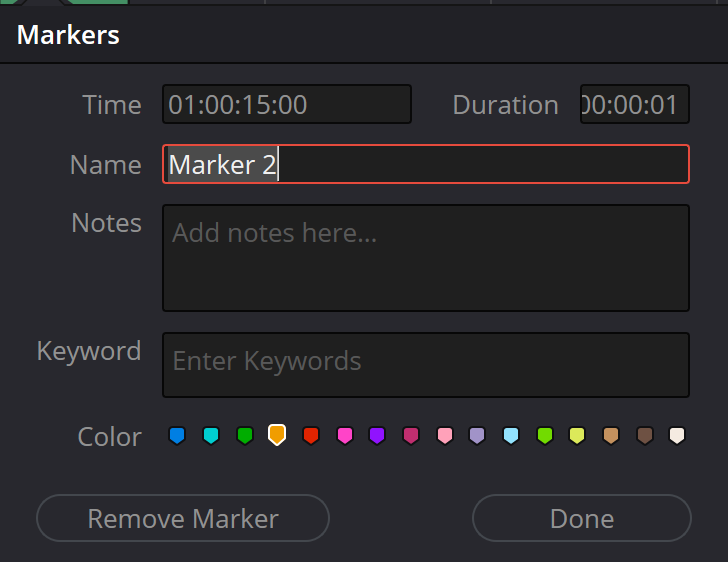
Marker editor
Time reads 01:00:15:00. Notes and Keyword contain placeholders, not saved descriptions. Duration is shown in a narrow field: do not assign units or reconstruct hidden digits by guessing.

Name and action are different fields
The original Russian name means “Noise”; the note says “Replace the line”. This is a filled-in task, not proof that it is complete or that a particular replacement method is required.
Reference: Videomontazher — marker editor, list and saved note
06 / UNDERSTAND & APPLY
A useful spotting list
A useful handoff needs a reproducible editorial location and a checkable instruction.
A minimum record identifies the project and timeline revision, record-time reference, track/line, observation, next action and listening result. Do not put personal data or confidential client details in a website demonstration.
Example: “Revision v07, A2, 01:02:14:08. A brief click precedes the answer. Inspect the clip edges and compare before/after at matched playback level. Status: not checked.” These are invented example coordinates, not locations in another project.
Reference: Videomontazher — marker editor, list and saved note
08 / UNDERSTAND & APPLY
When the list misleads
Start with the view, filter, timeline revision and selected object.
| Symptom | Check | Avoid |
|---|---|---|
| Nothing found | Current view and active search | Deleting an allegedly empty project structure |
| Several identical names | Track, source and record data for each instance | Keeping only the first match |
| Sound is present but the row is hidden | Visibility separately from mute and routing | Raising gain blindly |
| R changed the state | Record-arm state | Recording just to inspect |
| Note points elsewhere after editing | Timeline revision and the actual line | Assuming an old reference is still correct |
Reference: Blackmagic Design — Multi-Purpose Timeline Index · Videomontazher — Edit Index / source and record timing · Videomontazher — Tracks controls close-up
09 / UNDERSTAND & APPLY
From a list to audio work
Index helps establish the target; choose the repair tool after listening.
Line and take
Locate the precise instance before inspecting layers and wording. A “Replace” marker does not choose the best take.
Picture and onset
For a contact or clap, use Sync Scrollers. Match the event before planning a shift.
Grouping and routing
Folder Tracks simplifies the view; Mixer/FlexBus establishes routing. A marker color cannot do either job.
PRACTICE / NO AUTOPILOT
A small task. A checkable result.
Work in a test copy, listen before and after, and write down what you actually observed. The checklist contains no pre-approved results.
Prepare a test copy
Choose a short sequence using one source twice; record the timeline name and revision.
Find both instances
Compare source and record data in Edit Index and locate both instances on the timeline. A name match is not sufficient.
Inspect Tracks
Record one track’s visibility, lock and R/S/M states. There is no need to change format, arm it or rebuild buses.
Write a note
Write Name and Notes for one event you heard; after Done, reread the saved record and check its location.
Record the outcome
Accept when the intended instance is found, the note is reproducible and unrelated states are unchanged. Rows alone do not verify sound quality.
FAQ / BEFORE THE NEXT MOVE
Questions that matter in practice
Is the Index read-only?
No. Tracks exposes state changes and reordering. Separate inspecting the list from modifying the session.
Does hiding a track mute it?
Do not use visibility as Mute. Check audibility through states and routing, not whether a row fits on screen.
Why does one file appear several times?
The edit can contain several portions of one source. Distinguish instances by track, source and record data.
Reference: Videomontazher — Edit Index / source and record timing
Does marker color define a repair operation?
It can be a team convention, but color neither performs a repair nor verifies its outcome. Put the instruction in Name/Notes.
Reference: Videomontazher — marker editor, list and saved note
Does the captured Duration mean seconds?
The narrow field does not reliably reveal hidden digits and units. Check the full value in your installation; this guide does not infer a specific duration from the crop.
Reference: Videomontazher — marker editor, list and saved note
Can the model JSON be imported into Resolve?
No. It records the website’s teaching model: filter, selection and sample rows. It is not EDL, an Index export or a preset.
REFERENCES / 2026-10-06
What this guide is based on
Reviewed on 6 October 2026 against Blackmagic’s public page and eight existing Index captures. Tab names and visible fields were checked visually; operations were not executed in an installed Resolve. The resolve21 filename is preserved from the publication, but the exact build cannot be established from these crops. Closed menus, unverified shortcuts and marker-to-ADR conversion are not invented.
Blackmagic Design — Multi-Purpose Timeline Index ↗
Multi-Purpose Timeline Index reviewed 6 October 2026: clips/tracks/markers, states, visibility, names and reordering. Manufacturer overview, not a live operation report.
Videomontazher — eight original Timeline Index captures ↗
All eight original captures inspected. Filenames and public paths retained. Exact build is not inferred; HTML dimensions are layout values, not verified intrinsic metadata. PNG bytes are absent from the ZIP baseline.
Videomontazher — Tracks controls close-up ↗
Shows A1–A5, B1–B2, eye, lock, R/S/M, Format, Category, Monitor, ADC and VCA. A1 has red M; A5 is 1.0. Running monitoring and delay compensation cannot be established from the static crop.
Videomontazher — Edit Index / source and record timing ↗
Repeated DSCF5207 instances and visible Source In/Out, Record Duration and Record In. The combined Index/timeline crop with 01:00:01:23 was also inspected. Navigation gesture, frame rate and cropped fields are not guessed.
Videomontazher — marker editor, list and saved note ↗
Time 01:00:15:00; Name, Notes, Keyword, Color, Remove Marker/Done. Duration is partly visible: no specific duration is claimed. Notes/Keyword in the editor are empty; the filled “Noise / Replace the line” row was checked separately.