FAIRLIGHT / CAPTURE / RECORDING
Recording audio in Fairlight
Find the source. Capture a take. Verify it.
A red recording button does not prove that the intended microphone was captured. Build a clear path from a hardware input to a new clip and file, keep monitoring separate, and verify one short take before recording the whole script.
- 01Choose a specific input and destination
- 02Separate input, monitoring and capture
- 03Verify the take, not just a moving meter
Change the window position and length in the teaching scene only.
Make the assignment explicit↗
One microphone, a known hardware channel and an intended track. Stereo does not repair an incorrect mono assignment.
Speak a test phrase into the intended microphone.Change the controls to explore the diagram. No audio playback, native DSP or connection to Resolve.
Reference scope · reviewed 6 October 2026
Reviewed on 6 October 2026 against Blackmagic’s Fairlight overview, the Resolve 20 New Features Guide (pp. 50–51 and 92–93) and eight existing website captures. Source/version boundaries are stated per section; a filename containing resolve21 does not identify the exact build. These are documentation and image checks, not microphone, driver, recording or playback tests in Resolve. The full Fairlight Audio Guide was not accessible in this environment. Check menus, edition, supported languages and audio hardware in your installation.
Read the source notes ↓On this page
01 / UNDERSTAND & APPLY
Three different recording workflows
A normal Fairlight track is enough for a first recording. Voiceover and ADR are alternative workflows, not extra mandatory switches.
Blackmagic describes the Fairlight path as Mixer Input → choose a source and Patch → arm the track with R → use the transport Record button. Stop from the transport; the overview also documents Space, but key mappings and keyboard focus can affect shortcuts.
Start in a test timeline with a new track. Do not experiment over the only approved version of an edit.
| Workflow | Use it for | Check |
|---|---|---|
| Normal Fairlight recording | One or more explicitly assigned inputs | Input / Patch, R, transport and the new clip |
| Record Voiceover on Edit/Cut | A quick narration track | Input, filename and Record Track in the dedicated tool |
| ADR in Fairlight | Replacing particular lines against picture | Setup, List, Record and an auditioned take for each cue |
Reference: Blackmagic Design — Fairlight / VO and Multi Track Recording · Blackmagic Design — Resolve 20 New Features Guide · pp. 50–51
02 / UNDERSTAND & APPLY
Before Patch: device, channel and track
Write down which microphone feeds which input. The name of the entire interface is not necessarily an individual hardware channel.
Check the source before Resolve
Speak at normal and louder performance levels. Check the device meter and its settings. An absent signal here is not fixed by pressing R in Resolve.
Prepare the channel format
For one microphone, start with one source and a mono track. A stereo pair needs two coordinated channels; independent microphones are easier to test and record separately.
Check the environment
Confirm the audio device selected in Resolve, application microphone access and driver compatibility with your OS. Do not copy Windows driver labels into Linux or macOS instructions.
Choose a safe destination
Name the track, disarm unrelated tracks and check the intended timeline position. Use headphones at a modest monitoring level for the exercise.
Reference: Blackmagic Design — Fairlight / VO and Multi Track Recording
03 / UNDERSTAND & APPLY
Audio Inputs → Track Input
The source and destination are selected independently. Highlighting a destination does not mean that an input is selected.
Choose Source
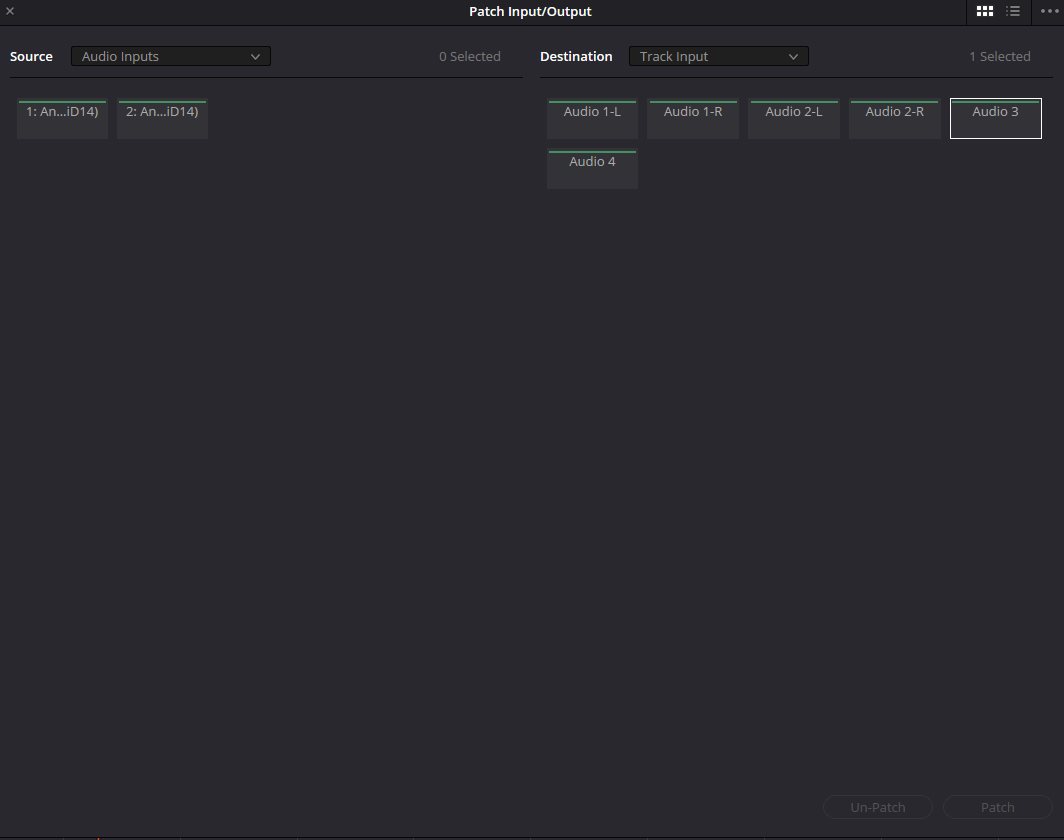
In Patch Input/Output, choose Audio Inputs and the actual channel you intend to record.
Choose Destination
Select Track Input and the channel of the prepared track. Do not substitute a bus or speaker output.
Apply and verify
Click Patch, return to the intended track and verify its response to your source. Test microphones one at a time to reveal swapped assignments.
Patch: no source selected
Source is Audio Inputs, Destination is Track Input. The left side says 0 Selected; Audio 3 is selected on the right. Patch is disabled. This is a setup state, not proof of an established connection.
Mixer before a recording check
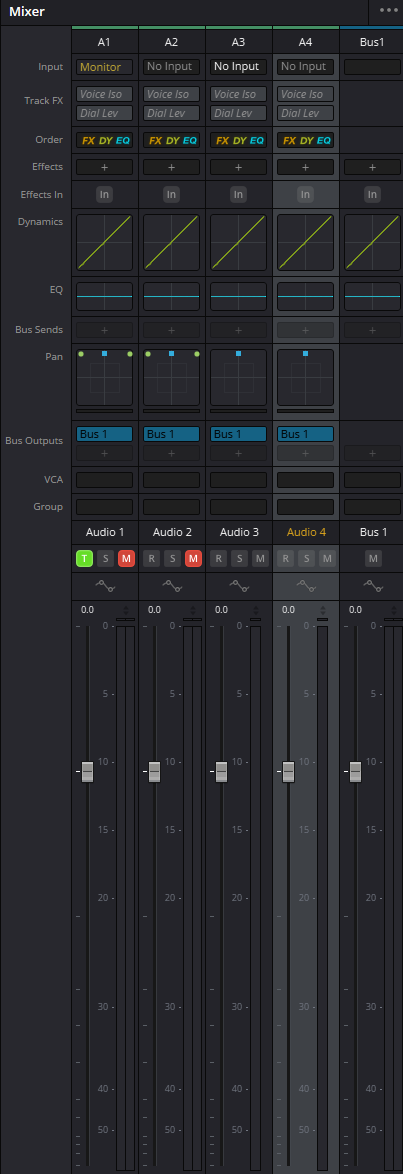
A1 shows Monitor in its Input row; A2–A4 show No Input. A1 and A2 have red M buttons; all four tracks route to Bus 1. This project state is not a recording-ready template. A bus output does not assign a microphone to a track input.
Reference: Blackmagic Design — Fairlight / VO and Multi Track Recording · Videomontazher — original recording and ADR captures
04 / UNDERSTAND & APPLY
Hearing yourself is not the same as capturing yourself
Separate the path to recording from the path to headphones. Verify both independently.
Direct and software monitoring together can produce a doubled or coloured voice. For diagnosis, keep one path; the way to disable the other depends on your interface and application settings.
Do not turn up speakers near an open microphone in response to unexplained silence. Check the route in headphones first.
| What you hear | What it establishes | Next check |
|---|---|---|
| Interface direct monitoring | An input is audible before the Resolve recording path | Record a test: this alone does not verify Patch |
| Software monitoring | Audio passes through the application | Check latency and avoid a second parallel monitoring path |
| Playback of the new clip | Previously captured material is playing | Remove the live input from your audition |
| Monitor / No Source in the capture | A particular input-processing instance | Do not infer every hardware assignment from it |
Monitor is not proof of an input patch
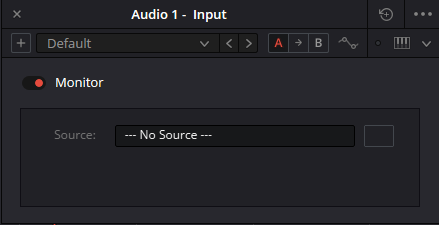
The “Audio 1 - Input” window contains Monitor and Source: --- No Source ---. This is a particular input-processing instance. Its field does not establish a hardware patch, arming or disk recording. Check the input assignment and a short take separately.
Reference: Blackmagic Design — Fairlight / VO and Multi Track Recording · Videomontazher — original recording and ADR captures
05 / UNDERSTAND & APPLY
Record Voiceover: the Edit/Cut shortcut
The simplified panel belongs to recording on the editing pages. It is not ADR Setup.
For Edit, the Resolve 20 guide documents Timeline → Record Voiceover or the microphone icon on the timeline toolbar. Set File Name, Audio Input and Record Track; position the playhead, record a test, stop and listen.
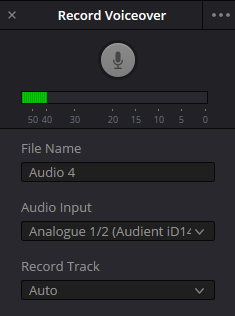
Auto lets Resolve choose a track according to the current layout. Use an explicit destination for this exercise. Audio 4 in File Name does not select track Audio 4.
| Edit 20 option | Purpose | Practical qualification |
|---|---|---|
| Input Monitoring | Listen to the input; exposes Mic Monitor Level | This changes listening level, not proof of the level in the file |
| Enable 3 Seconds Countdown | Visual lead-in before recording | The Edit 20 guide explicitly describes no audio beep |
| Mute Timeline Audio While Recording | Silence timeline material during capture | Do not confuse this with a missing microphone input |
| Stereo Input | Capture a corresponding stereo source | Not a universal solution to silence |
| Hide Options | Hide the panel fields | Hiding does not reset their values |
Record Voiceover: check Auto
The panel shows File Name: Audio 4, Audio Input: Analogue 1/2 and Record Track: Auto. A filename does not select track Audio 4; Auto is not an explicit destination. This is the simplified Edit/Cut tool, not the ADR panel.
Reference: Blackmagic Design — Resolve 20 New Features Guide · pp. 50–51 · Videomontazher — original recording and ADR captures
06 / UNDERSTAND & APPLY
One short test before a whole recording session
Say an identifiable phrase, leave a little silence, stop and audition the entire new clip. No single indicator replaces this check.
The panel below is a record of your own observations. Yes means that you report a check; the website cannot read your microphone, files or project. Do not enter client names, secrets or private paths.
| Observation | What to check | Avoid |
|---|---|---|
| Device responds but track does not | The selected hardware channel and input assignment | Blindly switching mono/stereo |
| Track responds but no new clip appears | R, transport capture and intended destination | Treating monitoring as recording |
| Clip exists but playback is silent | The exact clip, layers, Mute/Solo and its output route | Raising every fader at once |
| Clip plays but file is not located | Identify its real location and backup coverage | Assuming saving the project copies the audio |
Where does the evidence stop?
Begin with Unchecked. These are your reports, not device measurements. A later Yes does not erase an earlier No.
Next check
Check the intended microphone’s signal at the device.
Reported Yes: 0/6 · No: 0 · Unchecked: 6
USER-REPORTED / NOT VERIFIED. No microphone, file access, recording, playback or automatic storage. This is a work record, not a Resolve preset or permission to start capture.
Reference: Blackmagic Design — Fairlight / VO and Multi Track Recording
07 / UNDERSTAND & APPLY
Takes, layers and the chosen phrase
Normal Fairlight recording supports further takes on separate layers of one track. Showing those layers reveals alternatives; it does not approve them.
Open View → Show Audio Track Layers and check where the second take appeared. Label or note the recordings so they are distinguishable by content and sequence, not only by creation time.
After choosing a phrase, check its first word, breath, ending, background and neighbouring edit. Keep unselected sources while the project may need rebuilding. Detailed comping and alignment are covered in Track Layers and Sync Scrollers.

An overview is not take acceptance
This existing wide capture shows edited material and a playhead. It cannot establish the content of a new take, its exact input or sound quality. Open and audition the particular new clip for verification.
Reference: Blackmagic Design — Fairlight / VO and Multi Track Recording
08 / UNDERSTAND & APPLY
The recorded file is part of the project too
The new clip must be available as source media, not merely visible on the timeline.
After the test, locate the generated file using the clip or Media Pool information available in your installation. Confirm the actual filesystem location; this guide does not prescribe one universal folder for every recording mode.
The simplified tool and project storage settings can expose different destination choices. Check write access, available space and whether new recordings are included in your backup procedure.
Saving a project and copying its media are separate outcomes. After transfer, open the project with the recorded sources included and audition the chosen take again.
Identify it
Take name, track, timeline position and file must describe the same recording.
Keep alternatives
An editing decision should not silently remove unused source takes.
Test the transfer
Make sure Resolve is not accidentally reading the old copy from the previous drive.
Reference: Blackmagic Design — Fairlight / VO and Multi Track Recording · Blackmagic Design — Resolve 20 New Features Guide · pp. 50–51
09 / UNDERSTAND & APPLY
When to move on to ADR
For replacing specific lines, a good input is only the start: you also need a reviewed task list, boundaries, character and repeatable cues.
Carry the verified input setup into ADR rather than reassigning it by guesswork. Create one cue, check Setup, rehearse, record a take and compare it against picture.
The next guide covers Guide Track, pre/post-roll, visual prompts, List/Record and the difference between a created cue and an accepted take. Basic capture does not require AI voice generation or automatic transcription.
PRACTICE / NO AUTOPILOT
A small task. A checkable result.
Work in a test copy, listen before and after, and write down what you actually observed. The checklist contains no pre-approved results.
Create a test destination
Record project, timeline, track and the real hardware input. Disarm unrelated tracks.
Check before capture
Verify the source and Patch with a test phrase; establish one clear listening path.
Record one short take
Speak a sentence, stop the transport and disarm the track when the test is over.
Audition the result
Without a mixed-in live input, check the exact new clip: beginning, ending, words, background and obvious distortion.
Identify the file
Note the clip name and location, actual file and the result of reopening. Do not mark untested items as passed.
FAQ / BEFORE THE NEXT MOVE
Questions that matter in practice
Do I need AI features just to record a voice?
No AI step is part of this basic route. Check ordinary Input → Patch → R → Record in your edition and build. A supported input device and a correct route are required independently of optional processing.
Reference: Blackmagic Design — Fairlight / VO and Multi Track Recording
Why can I hear myself but the clip is silent?
You may be hearing direct interface monitoring rather than recorded audio. Check the input assignment, track response, capture start and the new clip without the live input mixed in.
Reference: Blackmagic Design — Fairlight / VO and Multi Track Recording
Should one microphone use mono or stereo?
Start with one correctly assigned source and a mono track. Stereo does not repair a wrong hardware channel. A genuine stereo pair requires verifying both channels.
Reference: Blackmagic Design — Fairlight / VO and Multi Track Recording
Does R already start recording?
R arms the track. In the normal Fairlight workflow, the transport Record button starts capture. An armed state alone does not demonstrate file creation.
Reference: Blackmagic Design — Fairlight / VO and Multi Track Recording
Where are earlier Record Voiceover takes?
The Edit 20 guide describes the new take replacing the previous timeline clip while earlier recordings remain in the Media Pool. Do not generalize this to all capture modes; test your build.
Reference: Blackmagic Design — Resolve 20 New Features Guide · pp. 50–51
Is saving the project enough before transfer?
Recorded media must also be transferred. Check its real paths, include the required sources and reopen without relying on the old drive.
Reference: Blackmagic Design — Fairlight / VO and Multi Track Recording
REFERENCES / 2026-10-06
What this guide is based on
Reviewed on 6 October 2026 against Blackmagic’s Fairlight overview, the Resolve 20 New Features Guide (pp. 50–51 and 92–93) and eight existing website captures. Source/version boundaries are stated per section; a filename containing resolve21 does not identify the exact build. These are documentation and image checks, not microphone, driver, recording or playback tests in Resolve. The full Fairlight Audio Guide was not accessible in this environment. Check menus, edition, supported languages and audio hardware in your installation.
Blackmagic Design — Fairlight / VO and Multi Track Recording ↗
Reviewed recording section: Input, Patch, R, transport, stopping and further takes on layers. Also checked layers and Elastic Wave. A workflow reference, not proof of microphone or OS compatibility.
Blackmagic Design — Fairlight / Professional ADR ↗
Checked Setup, List, Record, characters, text, prompts and take ratings. The overview does not establish all collapsed parameters or continuous recording modes.
Blackmagic Design — Resolve 20 New Features Guide · pp. 50–51 ↗
Text and pages 50–51 visually inspected: Edit Record Voiceover, Auto, Input Monitoring, visual countdown without a beep, Mute Timeline, Stereo Input, Hide Options and retention of prior takes in the Media Pool. A version-20 document, not a test of every version-21 build.
Videomontazher — original recording and ADR captures ↗
All eight original PNGs inspected on 6 October 2026. Captions corrected: unapplied Patch, Monitor not proving a hardware route, filename not selecting Auto’s destination, None in Setup, empty List and Record. Original paths retained; PNG bytes are absent from the ZIP baseline.