FAIRLIGHT / CREATIVE / FX · 09
Flanger
Move through the tone.
Turn a static layer into a long sweep, metallic accent or moving musical texture. Understand LFO shape, Rate, Depth and signed Feedback, then check width, gain and the effect’s place in the edit.
- 01Connect delay time to moving notches
- 02Separate rate, depth and feedback
- 03Fit the sweep to the scene
Change the rate and depth of a short delay. Follow the comb response of the authored teaching chain.
Let a short delay move.↗
Rate sets the pace; Depth sets the movement range. Start with a restrained blend so the effect stays connected to its source.
Check: the motion supports the event.Change the controls to explore the diagram. No audio playback, native DSP or connection to Resolve.
Sources and scope · 9 October 2026
Reviewed 9 October 2026 against the DaVinci Resolve 21 Reference Manual, Chapter 181, Flanger, printed and PDF pages 4110–4111. Both the text and the panel were inspected. Native labels and visible ranges come from that reference. Workflows and browser models are authored teaching material; the models do not reproduce Blackmagic DSP or process your recording.
Read the source notes ↓On this page
01 / UNDERSTAND & APPLY
Why a short delay changes timbre
Mixing a source with a short delayed copy reinforces some frequencies and weakens others. The result is a comb-shaped response: a sequence of peaks and notches. As the delay changes, that pattern moves across frequency, producing the characteristic Flanger sweep.
Feedback adds repeated passes through the delay to that colour. The speed of movement, its range and the strength of resonance are therefore separate choices. Decide what the scene needs first: subtle animation, a musical texture or an overt mechanical sound.
Sweep
A moving pattern can support transitions, machines and sustained synthetic events.
Musical texture
Guitar, pads and percussion can gain motion. Check rhythm and the stability of important attacks.
Resonant colour
More Feedback makes the effect more pronounced. Set it in a context where you can hear its effect on other sounds.
Reference: Blackmagic Design — DaVinci Resolve 21 Reference Manual · Chorus, Flanger, Pitch and Distortion
02 / UNDERSTAND & APPLY
Separate the native panel from the teaching model
The native Flanger panel contains Modulation, Width, Feedback and Output. Its upper graphs show L/R timing differences and the frequency-response character. The displayed values are an example setting; this panel has no manual Delay Time control.
Apply Flanger to the intended clip or Mixer channel through Fairlight FX and check the object named in the window. On a multichannel track, Input Format selects the input. Checking the finished stereo mix in mono is a separate operation.
| Input Format | Effect input |
|---|---|
| Stereo | Separate left and right channels. |
| Mono | The sum of L and R is sent to both channels. |
| Left | Only the original left channel. |
| Right | Only the original right channel. |
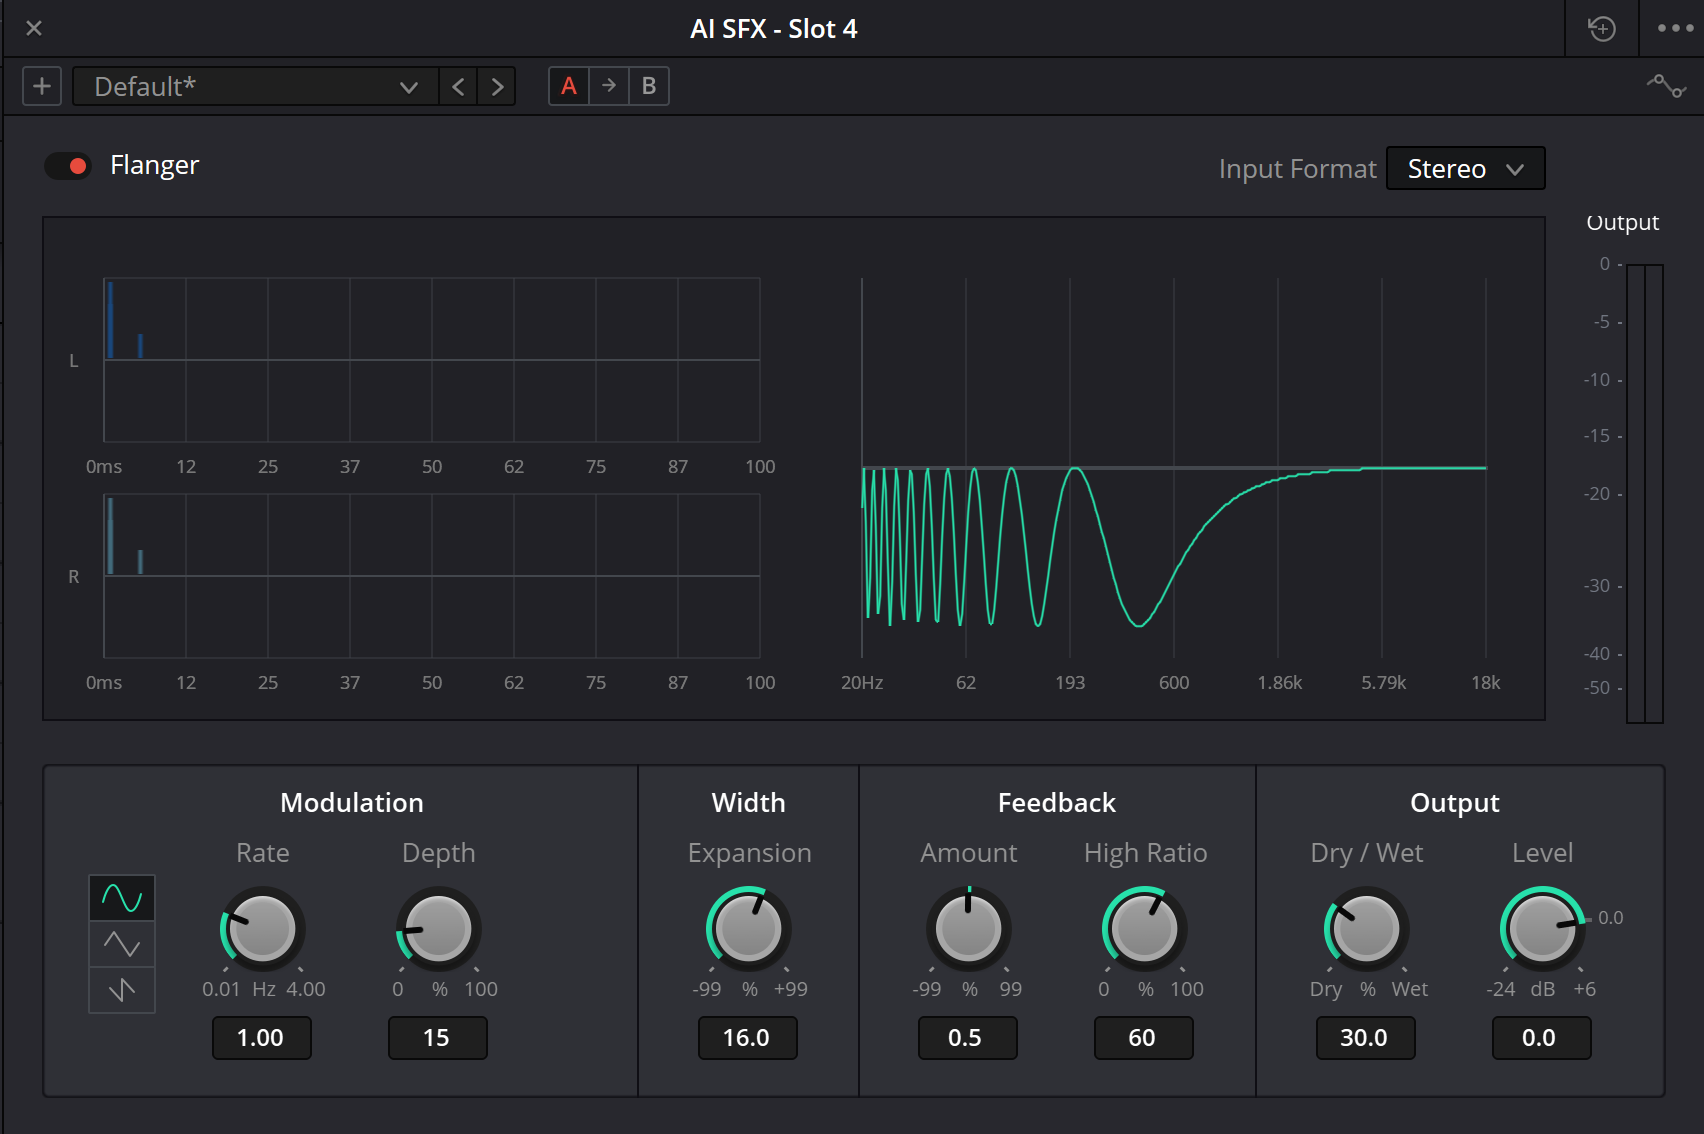
Flanger · Resolve 21
The original Resolve 21 Flanger capture. Labels and ranges are cross-checked against the reference-manual panel; the values shown are an example state, not a recommended preset.
Reference: Blackmagic Design — DaVinci Resolve 21 Reference Manual · Chorus, Flanger, Pitch and Distortion · Blackmagic Design — Fairlight / FX, plug-ins and FlexBus
03 / UNDERSTAND & APPLY
Give each native control its own job
These ranges are visible on the Resolve 21 reference-manual panel. Rate changes LFO speed; Depth changes modulation depth. Width Expansion adds L/R timing differences and modulator phase offsets, while Feedback controls recirculation. Avoid treating all of those changes as one generic increase in intensity.
The ends of a scale describe available control, not recommended settings. Compare small changes on one passage: a useful musical colour and an intentional noise effect can require very different balances.
| Control | Panel range | Purpose |
|---|---|---|
| Rate | 0.01–4 Hz | Low-frequency oscillator speed. |
| Depth | 0–100% | The depth of modulation movement. |
| Width Expansion | −99…+99% | L/R timing differences and modulator phase offsets. |
| Feedback Amount | −99…+99% | Amount and polarity of feedback. |
| High Ratio | 0–100% | Attenuation of echoes over time; part of the Feedback section. |
| Dry/Wet | 0–100% | Original/processed output balance. |
| Output Level | −24…+6 dB | Overall plugin output gain. |
Reference: Blackmagic Design — DaVinci Resolve 21 Reference Manual · Chorus, Flanger, Pitch and Distortion
04 / UNDERSTAND & APPLY
Three movement shapes: Sine, Triangle and Sawtooth
The reference text confirms all three button names. Sine has rounded turns, Triangle has linear sections with a defined change of direction, and Sawtooth includes an abrupt return. Keep Rate and Depth fixed when comparing shapes so that the pattern is the variable.
Period is 1 / Rate. At 0.5 Hz, a cycle takes two seconds; at 1 Hz it takes one. This helps estimate the pace, but matching a period to a shot length does not guarantee the desired phase at the cut. Listen from the intended playback start through the transition.
Rate
Set cycle duration. Faster movement does not mean a larger excursion.
Depth
Set modulation excursion. Little movement can still leave an audible static colour.
| Shape | What changes | Listening check |
|---|---|---|
| Sine | Smooth travel and rounded turns. | Does slow movement draw too much attention under speech? |
| Triangle | More even travel between extremes. | Does the defined change of direction support the rhythm? |
| Sawtooth | Gradual travel with an abrupt return. | Does the return become an unwanted extra accent? |
Reference: Blackmagic Design — DaVinci Resolve 21 Reference Manual · Chorus, Flanger, Pitch and Distortion
05 / UNDERSTAND & APPLY
Feedback sign changes the loop; zero leaves the delay
Feedback sends some delayed signal back into the delay line. With negative Amount, that return uses the opposite polarity. Compare equal positive and negative magnitudes: the resonant pattern changes, not just the amount of loudness.
Amount at zero removes recirculation, but the original and delayed signals may still interfere. Comb-filter colour at zero Feedback therefore does not show that the control is broken. Dry/Wet decides how those paths meet at the output.
At 100% wet, the direct source is removed from the output blend. This does not guarantee that all colour disappears: the processed path may still contain a feedback loop. Evaluate High Ratio after choosing an Amount that makes the returns clear enough to compare.
Magnitude and sign first
Find a restrained Amount, then compare equal positive and negative settings at the same Dry/Wet balance.
Then High Ratio
Listen to the returns changing on the same passage. The native percentage scale is not a cutoff-frequency readout.
Level last
After changing resonance, restore a similar bypass listening level. Otherwise the louder version can appear more useful simply because it is louder.
Reference: Blackmagic Design — DaVinci Resolve 21 Reference Manual · Chorus, Flanger, Pitch and Distortion
06 / UNDERSTAND & APPLY
Check width at the finished stereo output
Flanger Width Expansion has both negative and positive values. It affects L/R delay differences and modulator phase offsets. Its sign should not be interpreted as ordinary left/right panning.
Check how the centre moves and whether important attacks remain stable. Folding down to mono may reveal a different balance of peaks and notches. This matters particularly when the effect covers a complete music track or a prominent voice.
Fix the basic movement
Choose Rate, Depth and Feedback first. Compare Width on the same passage without changing those settings.
Listen to both formats
Assess stereo output, then its mono fold-down through monitoring. Changing Input Format is a different operation.
Restore a clear anchor
If an important sound weakens, reduce Width or Dry/Wet and compare again. Processing a separate layer may be more useful.
Reference: Blackmagic Design — DaVinci Resolve 21 Reference Manual · Chorus, Flanger, Pitch and Distortion
07 / UNDERSTAND & APPLY
Build a sweep and place it in the edit
Define the action
Choose an event: a scene change, machine movement or musical accent. Leave a few seconds before and after it.
Choose shape and pace
With little Feedback, compare Sine, Triangle and Sawtooth. Set Rate and listen to the complete passage.
Set the excursion
Increase Depth until the sweep is sufficiently clear. Check whether the timbral movement competes with the next word or hit.
Add resonance and stereo
Compare Amount signs and set High Ratio and Width. Check the centre, mono and output level.
Control the effect in time
Set Dry/Wet or automate the relevant parameter around the action. Match Level and listen into the following event.
08 / UNDERSTAND & APPLY
Teaching model: delay, feedback and moving notches
One LFO moves an authored delay around 4 ms in this lab. At 100% Depth it travels from 1 to 7 ms; at zero it stays constant. Those times explain a comb filter and do not represent a hidden native Flanger scale.
The frequency curve is calculated for the fixed delay in the selected model frame. It includes a direct path, a delayed path and signed feedback. Frame phase selects the teaching LFO position; it is a model-view control that is absent from the native panel shown above.
Change Depth, Feedback sign and Dry/Wet one at a time. With Feedback at zero, compare dry, mixed and fully wet output. The lab does not model Width Expansion, High Ratio or Output Level, process a recording, or show a measured native plugin response.
| In the lab | Authored assumption |
|---|---|
| Rate · 0.1–4 Hz | A narrower teaching window; the native range starts at 0.01 Hz. |
| Depth · 0–100% | Authored delay: 4 ms ± 3 ms × Depth/100. The native percentage mapping is not specified. |
| Feedback · −90…+90% | A teaching limit on recirculation; the native scale is −99…+99%. |
| Dry/Wet · 0–100% | Linear blending of the direct path and the model’s own feedback loop. |
| Frame phase · 0–360° | Selects the LFO position for reading the curve. The start and end of a full cycle may coincide. |
Freeze a short delay. Inspect its comb response.
The LFO moves a short delay around a 4 ms teaching base. The large plot is the exact response of the declared fixed-delay loop at the chosen frame phase. Change the feedback sign and the blend to compare their different effects on peaks and dips.
The drawing follows the controls. It does not generate audio.
At zero feedback and 50% Dry/Wet, the first null is at 1/(2D). Signed feedback changes the loop response; the spacing 1/D alone does not describe the depth or absolute position of every peak.
The display spans −36 to +24 dB. 0 sampled values are outside that drawing range; the numerical response is retained without a simulated limiter.
How this teaching model is defined
D = 4 ms + 3 ms × Depth/100 × LFO. At the selected phase, H(ω) = (1 − m) + m × exp(−jωD)/(1 − g × exp(−jωD)), where m = Dry/Wet/100 and g = Feedback/100. The plotted magnitude is 20 log10 |H|. The 4 ms base and 3 ms excursion are authored conditions, not documented native delay limits.
The study limits Rate to 0.1–4 Hz and Feedback to ±90%; native controls reach 0.01 Hz and ±99%. Width Expansion, High Ratio, stereo routing and output trim are omitted. In particular, no percentage-to-Hz law is invented for High Ratio. The response assumes a frozen delay and does not calculate the spectrum of the moving system.
Reference: Blackmagic Design — DaVinci Resolve 21 Reference Manual · Chorus, Flanger, Pitch and Distortion
09 / UNDERSTAND & APPLY
Check movement, resonance and routing separately
| Observation | Possible cause | Next comparison |
|---|---|---|
| The result is too metallic | Strong Feedback or too much wet signal. | Amount closer to zero first, then less Dry/Wet. |
| Movement competes with the rhythm | Unsuitable Rate, shape or Depth. | Cycle pace at fixed Feedback, then a smaller Depth. |
| The mono result lost weight | Direct/wet interaction and L/R differences. | Width, wet amount and processing a separate layer. |
| Zero Depth did not remove the colour | A static delay and possibly feedback remain. | Depth separately from Feedback, Dry/Wet and bypass. |
| The effect is barely audible | Little wet signal, small Depth or a poor comparison passage. | A sustained spectrally rich sound, then the original material in the mix. |
| The output level jumped | Resonance and summing changed the output. | Output Level and bypass on the same passage. |
10 / UNDERSTAND & APPLY
When to choose Flanger or a neighbouring tool
Choose Flanger when the moving comb-filter colour itself should be audible. Chorus often serves layering, Delay serves readable repeats, and Reverb serves space. These are starting points for comparison; the scene determines the useful choice.
Machine or transition
Test a pronounced sweep on a synthetic layer and limit it in time so it leaves room for the next event.
Music track
Try a separate instrument first. Processing a full mix also changes its bass, percussion and vocal.
Focused colour
Restrained movement can create a hollow or metallic tone without a long room tail.
Readable dialogue
Establish a creative reason for ordinary speech. Flanger is not a tool for repairing diction or removing noise.
11 / UNDERSTAND & APPLY
Listen to the entrance, ending and complete route
Check the route that will feed the export. With the effect on a track or shared bus, confirm that only the intended material passes through it. Plugin order changes the result: Flanger before another processor receives a different input from Flanger after it.
Replay with context
Start before the event and continue for a few seconds after it. Check the sweep timing and the transition into the next shot.
Match loudness
Compare the effect with bypass on one passage. Watch the output meter and listen for important details in the full mix.
Check channels
Listen to stereo, mono and the intended final bus. Confirm that important elements retain their weight.
Listen to the export
Export a short passage, open it separately and record what you observed about character, level and timing.
Reference: Blackmagic Design — Fairlight / FX, plug-ins and FlexBus
PRACTICE / NO AUTOPILOT
A small task. A checkable result.
Work in a test copy, listen before and after, and write down what you actually observed. The checklist contains no pre-approved results.
1 · Name the task
Choose 10–15 seconds of a transition, machine or musical layer. Write where the movement should be clear and what must remain readable.
2 · Separate Rate from Depth
In the lab, compare speed and excursion separately. Inspect several frame phases and describe the relationship between delay and frequency notches.
3 · Compare Feedback polarity
At one Dry/Wet balance, compare +40%, 0% and −40% in the lab, then separately in Resolve. Matching numbers do not make the two algorithms identical.
4 · Choose the native colour
In Resolve, compare all three shapes, Width and High Ratio on the same material. Check finished stereo in mono and record what happens to the centre.
5 · Fit the effect to the scene
Match Level, control the effect entrance and listen to a short export with context before and after the event. Record the result and remaining issues.
FAQ / BEFORE THE NEXT MOVE
Questions that matter in practice
How does Flanger differ from Chorus?
Flanger is associated with a moving comb-filter pattern that feedback can reinforce. Chorus provides layered voices through short delays, separation and modulation. Compare them against the intended result.
Reference: Blackmagic Design — DaVinci Resolve 21 Reference Manual · Chorus, Flanger, Pitch and Distortion
What are the three waveform buttons called?
The Resolve 21 reference confirms Sine, Triangle and Sawtooth. They select LFO shape; Rate controls its speed separately.
Reference: Blackmagic Design — DaVinci Resolve 21 Reference Manual · Chorus, Flanger, Pitch and Distortion
Does native Flanger have a Delay Time knob?
The inspected panel does not. Millisecond values in the lab describe an authored short-delay model and do not add a native control to the plugin.
Reference: Blackmagic Design — DaVinci Resolve 21 Reference Manual · Chorus, Flanger, Pitch and Distortion
Why does the effect remain at zero Feedback?
Zero removes recirculation, but the original and delayed copy can still be mixed. Their frequency-dependent interaction can produce colour without repeated passes.
Reference: Blackmagic Design — DaVinci Resolve 21 Reference Manual · Chorus, Flanger, Pitch and Distortion
Does negative Feedback move the sound left?
No. The sign refers to feedback polarity in the delay line. Other parameters, including Width Expansion, control differences between the channels.
Reference: Blackmagic Design — DaVinci Resolve 21 Reference Manual · Chorus, Flanger, Pitch and Distortion
Is High Ratio a filter frequency in hertz?
The panel labels it as a percentage and the reference describes echo attenuation. It does not provide an exact percentage-to-frequency mapping. Choose it by the audible result.
Reference: Blackmagic Design — DaVinci Resolve 21 Reference Manual · Chorus, Flanger, Pitch and Distortion
Why does 100% wet not always remove the colour?
The direct source is removed from the output blend, but the wet path may still contain feedback. Feedback and other native settings can continue to shape the result.
Reference: Blackmagic Design — DaVinci Resolve 21 Reference Manual · Chorus, Flanger, Pitch and Distortion
Can the lab predict the exact sound of the plugin?
No. It calculates its own response at a selected LFO position to explain cause and effect. Native Width, High Ratio, filtering and processing of a recording are outside the model.
REFERENCES / 2026-10-09
What this guide is based on
Reviewed 9 October 2026 against the DaVinci Resolve 21 Reference Manual, Chapter 181, Flanger, printed and PDF pages 4110–4111. Both the text and the panel were inspected. Native labels and visible ranges come from that reference. Workflows and browser models are authored teaching material; the models do not reproduce Blackmagic DSP or process your recording.
Blackmagic Design — Fairlight / FX, plug-ins and FlexBus ↗
The manufacturer page confirms clip and track processing, plug-in order, saved chains, automation and FlexBus routing. Exact controls for these four effects are checked against the full Resolve 21 manual rather than inferred from the general product overview.
Blackmagic Design — DaVinci Resolve 21 Reference Manual · Chorus, Flanger, Pitch and Distortion ↗
Official full PDF, chapter 181: Chorus on 4099–4100; Distortion on 4105–4106; Flanger on 4110–4111; Pitch on 4123, with Reverb beginning lower on the same page. Physical and printed page numbers match. Text and panels reviewed on 9 October 2026 for controls, menus and readable scales. The page curves and signals are authored teaching examples, not native Resolve algorithms.