FAIRLIGHT / SPACE / FX · 09
Modulation
One shared cycle. Four domains of movement.
Turn a steady source into an evolving texture. Choose the shared modulator’s shape and speed, adjust frequency, level, filtering and position separately, then coordinate their phases and the overall effect balance.
- 01Understand Shape and Rate
- 02Separate four processing domains
- 03Coordinate depth, phase and overall balance
Change LFO rate and the linked teaching levels for AM / FM. Compare the source, envelope, frequency and ring multiplication.
Choose the character of the movement.↗
Shape defines the cycle and Rate its speed. Compare gradual movement and a faster pulse on the same source.
Check: the chosen speed serves the scene’s purpose.Change the controls to explore the diagram. No audio playback, native DSP or connection to Resolve.
Sources and practice · 8 October 2026
Reviewed on 8 October 2026 against the text and illustration of the official Resolve 21 Reference Manual: chapter 181, pp. 4118–4120; common FX controls on p. 4090; insert scope and order in chapter 180, pp. 4083–4087. Brief comparisons use Chorus, Flanger and Pitch descriptions on pp. 4099, 4110 and 4123. Names, visible scales and Phase marks were checked on the panel. The source does not establish the complete Phase range or a function for additional unlabelled scales; the teaching-view selection is described separately.
Read the source notes ↓On this page
01 / UNDERSTAND & APPLY
Choose the movement your source needs
Modulation combines a shared low-frequency oscillator, frequency and amplitude processing, a moving filter and spatial Rotation. These domains can operate together. The processor suits textures, sustained musical sounds, effects and transitions that need movement.
State the task clearly: add a level pulse, change frequency character, create a tonal sweep or move a sound in space. That decision explains the section choice and gives you a way to judge the result against the original intention.
A steady sound lasting several seconds is useful for the first adjustment. It exposes several cycles and helps separate movement speed, depth and the moment of maximum change. Return to the actual edited scene after that comparison.
Level
For a pulse or changing loudness over time, begin with Amplitude.
Frequency and tone
Compare Frequency and Filter as different ways of developing a texture.
Space
On a multichannel track, examine Rotation separately from the other sections.
Reference: Blackmagic Design — DaVinci Resolve 21 Reference Manual · Spatial and creative Fairlight FX
02 / UNDERSTAND & APPLY
One modulator and four concurrent sections
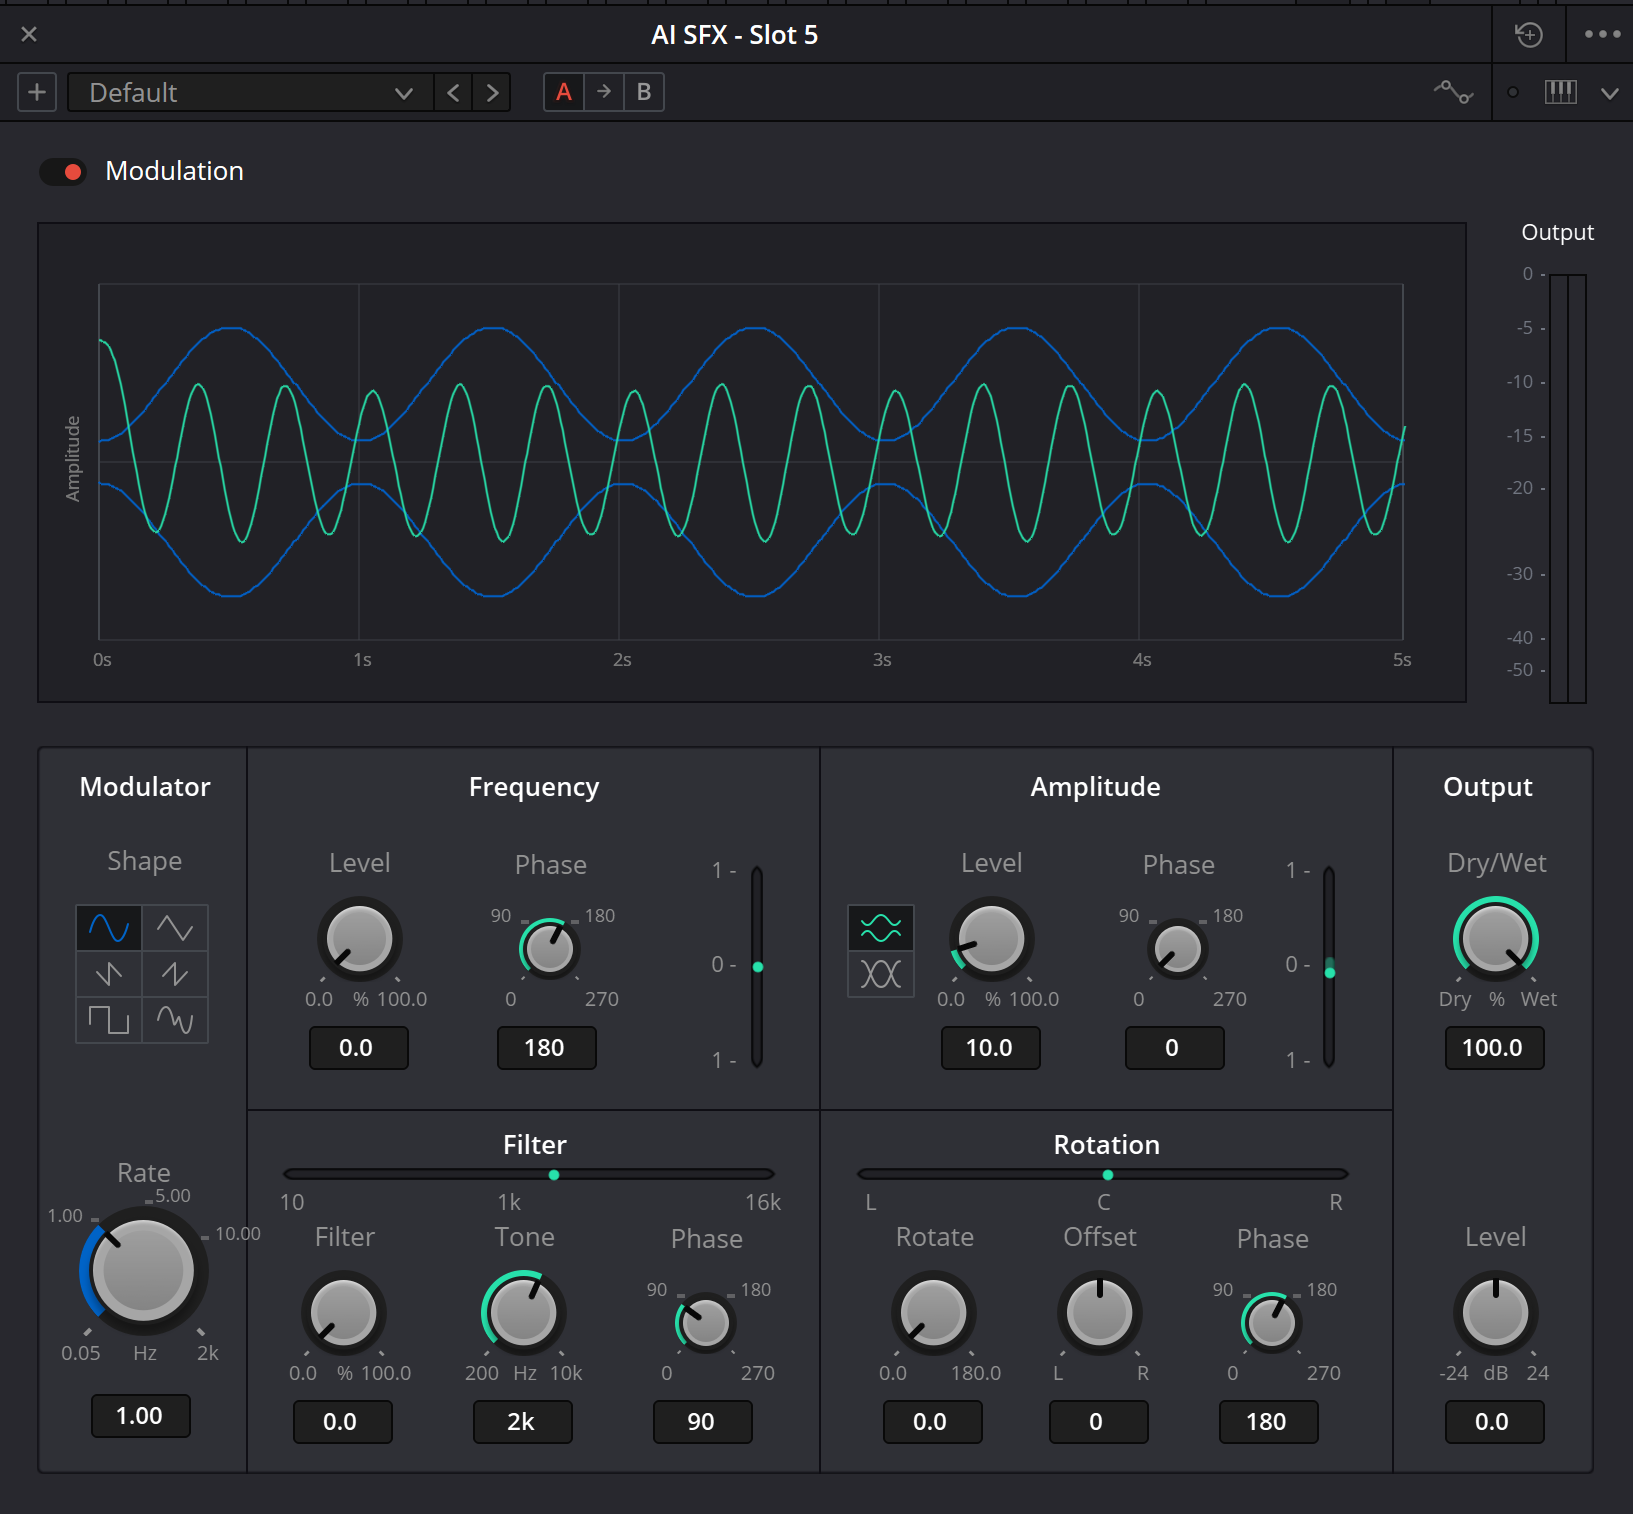
The upper graph shows changes associated with Modulator, Frequency and Amplitude, alongside an Output meter. Beneath it are Modulator, Frequency, Amplitude, Filter, Rotation and overall Output. The graph provides orientation; it does not replace listening to the processed material.
The manual names six LFO shapes: Sine, Triangle, Saw1, Saw2, Square and Random. They are selected with the Shape buttons. These documented names let you discuss movement without guessing from icons alone.
Frequency, Amplitude, Filter and Rotation are not four mutually exclusive choices in a shared menu. Each has its own controls. Amplitude additionally has a documented Ring Modulation Mode; that is separate from choosing a domain to explain or highlight in the teaching diagram.
Modulation: interface reference
Compare the panel labels with the control reference below. The values shown describe one setup; choose working settings from the source, scene and intended effect.
Reference: Blackmagic Design — DaVinci Resolve 21 Reference Manual · Spatial and creative Fairlight FX
03 / UNDERSTAND & APPLY
Names, units and visible scales
The table follows the Resolve 21 text and illustration. A section’s Level percentage concerns its own processing, while final Dry/Wet concerns the whole effect. These controls are not interchangeable.
Rate is measured in Hz. Low rates suit slow movement; the high end can create a pronounced timbral change. That is a different effect from a subtle pulse, so listen progressively as you move between the regions.
| Section and control | Meaning | Verified display |
|---|---|---|
| Modulator · Shape | Shape of the shared controlling cycle. | Sine, Triangle, Saw1, Saw2, Square, Random |
| Modulator · Rate | Modulator speed. | 0.05 Hz–2 kHz in the illustration |
| Frequency · Level | Amount of frequency modulation. | 0–100% |
| Frequency · Phase | Phase offset of this section relative to other movements. | Marks at 0 / 90 / 180 / 270° |
| Amplitude · Level | Amount of amplitude modulation; disabled in Ring Modulation Mode. | 0–100% |
| Amplitude · Phase | Phase offset of the amplitude section. | Marks at 0 / 90 / 180 / 270° |
| Amplitude · Ring Modulation Mode | Enables ring modulation, multiplying the signal by the modulator. | The mode is described in the manual text |
| Filter · Filter | Amount of filter movement. | 0–100% |
| Filter · Tone | Centre frequency of the filter sweep. | 200 Hz–10 kHz |
| Filter · Phase | Filter-cycle position relative to the other sections. | Marks at 0 / 90 / 180 / 270° |
| Rotation · Rotate | Amount of spatial rotation. | 0–180° |
| Rotation · Offset | Initial rotation offset for positioning the signal. | L ↔ R |
| Rotation · Phase | Spatial-cycle position relative to other movement. | Marks at 0 / 90 / 180 / 270° |
| Output · Dry/Wet | Overall original-to-processed balance. | 0–100% |
| Output · Level | Overall output level. | −24 to +24 dB |
Reference: Blackmagic Design — DaVinci Resolve 21 Reference Manual · Spatial and creative Fairlight FX
04 / UNDERSTAND & APPLY
Separate frequency, level, filtering and position
Frequency changes the frequency component of movement; Amplitude changes amplitude. Level controls the amount in each section. In Ring Modulation Mode, Amplitude Level is disabled: start by checking the mode before treating an inactive control as an interface fault.
Filter adds a moving filter, with Tone setting the sweep’s centre frequency. The panel also has a one-dimensional frequency display labelled 10 Hz–16 kHz. Its scale should not be substituted for the Tone control’s range.
Rotation provides Rotate, Offset and Phase. Movement amount and initial offset are separate decisions. An additional L/C/R scale helps you read the spatial part of the window. Check track format and actual channel monitoring to assess the result.
Frequency
Compare frequency character without translating Level into an undocumented number of semitones.
Amplitude
Check the pulse and the survival of quiet source detail. Examine Ring separately.
Filter
Separate sweep amount, tonal centre and movement phase.
Rotation
Check spatial amount and offset, then the mono character.
Reference: Blackmagic Design — DaVinci Resolve 21 Reference Manual · Spatial and creative Fairlight FX
05 / UNDERSTAND & APPLY
Phase coordinates movement; Ring changes the processing
With several sections active, their movements can reinforce or counteract one another. The manual explains the separate Phase controls as a way of managing that interaction. Set one domain, add a second, then change Phase in only one of them.
Listen for a prominent level change coinciding with a tonal or spatial maximum. Identical Phase values are not universally preferable; a useful relationship depends on the source and scene. Check several cycles instead of letting one fortunate moment determine the entire choice.
Ring Modulation is described as multiplying the signal by the modulator. It can create a different timbral result from ordinary Amplitude movement. Compare it separately while preserving the original, remembering that Amplitude Level becomes unavailable. Rate and overall Dry/Wet remain important comparison controls.
Reference: Blackmagic Design — DaVinci Resolve 21 Reference Manual · Spatial and creative Fairlight FX
06 / UNDERSTAND & APPLY
Place the movement at the intended point in the chain
For one source, apply Modulation to a clip from the Effects Library’s Audio FX. For a whole track, add it in the Mixer channel’s Effects section. It can also process a bus; then judge every source feeding that bus, including the channel format required for Rotation.
Plugins process in chain order. Modulation before Echo feeds altered material to the repeat processor; Modulation after Echo receives the result including repeats. Compare both orders on one passage and keep the one that serves the task. Avoid changing order and several parameter values at the same time.
On a serial insert, begin with a modest processed contribution through Dry/Wet. For a separate parallel return, establish the dry route first; a fully processed return is usually easier to regulate independently. In either case, compare final level and account for other active inserts.
Fairlight FX
Choose processing scope and order.
↗Echo
Compare modulation before and after a repeat network.
↗Mixer and routing
Check a separate return and the channel format.
Reference: Blackmagic Design — DaVinci Resolve 21 Reference Manual · Spatial and creative Fairlight FX · Blackmagic Design — Fairlight / FX, plug-ins and FlexBus
07 / UNDERSTAND & APPLY
Build the texture one change at a time
Prepare a steady source
In a duplicate timeline, choose several seconds of sustained sound. Mark where movement should begin and where the source should settle again.
Choose Shape and Rate
Compare two shapes at one rate. Keep the shape, then change Rate. For example, 1 and 2 Hz make an understandable speed comparison; these are teaching values, not a finished setting.
Adjust one domain
For a pulse, begin with Amplitude; for another task, choose the relevant section. Change its Level or amount while keeping other domains neutral.
Add a second domain
Judge its contribution separately first. Then compare the combined movements and alter Phase in only one section. Give Ring its own comparison.
Balance with the source
Set overall Dry/Wet and match listening loudness to bypass with Output. Check useful attacks, quiet detail and recognisability of the original sound.
Return to the scene
Listen to several cycles with the picture. Check mono for spatial processing, automate the intended changes and replay the written result.
Reference: Blackmagic Design — DaVinci Resolve 21 Reference Manual · Spatial and creative Fairlight FX · Blackmagic Design — Fairlight / FX, plug-ins and FlexBus
08 / UNDERSTAND & APPLY
Compare the control cycle and three teaching results
The diagram calculates an LFO, amplitude envelope, frequency pattern and ring multiplication together. AM, FM and Ring buttons only highlight a view; they do not imitate a mutually exclusive native Modulation menu. The shared teaching depth affects AM/FM, while Ring is independent of that control.
The example uses a 10 Hz carrier and a 1.25-second drawing interval. Rate has a teaching window of 0.2–8 Hz. The six named shapes use authored forms, and Random uses a fixed sequence so comparisons can be repeated. Shared Phase at 0–360° belongs to the diagram and does not replace the native sections’ separate Phase controls.
Change Rate, depth, phase and Dry/Wet one at a time. Observe what remains of the source and how ring multiplication differs. Filter, Rotation, native algorithms and audio playback are not modelled here; verify the chosen idea in Resolve on actual material.
One LFO. Three different relationships.
Compare an amplitude envelope, accumulated frequency modulation and a bipolar ring product. All three drawings remain visible. Highlighting AM, FM or Ring selects a teaching view; it is not an exclusive mode of the native plugin.
The drawing follows the controls. It does not generate audio.
Rate changes all three examples. The linked AM/FM control affects those two rows only; Ring remains independent. Native modulation sections can operate together.
How this teaching model is defined
AM uses a unipolar envelope between 1−depth and 1. FM integrates a frequency deviation of up to ±4 Hz around the 10 Hz carrier. Ring uses the signed LFO directly. Dry/Wet is a linear blend in each example. Rate 0.2–8 Hz and the shared 0–360° phase are teaching windows, not native limits or a replacement for separate section Phase controls.
09 / UNDERSTAND & APPLY
Give the movement a reason in the scene
An evolving musical bed
Low-depth treatment on a sustained sound lets you compare an evolving texture with the original. Check that its pulse does not compete with the music’s rhythm or dialogue.
A drone or moving sound effect
Compare Frequency, Filter and Rotation separately. Choose the domain that supports picture movement before adding another.
An accent around an edit
Use automation to limit the contribution or parameter movement to the intended interval. Check entry and exit, especially on a continuous background.
A pronounced timbral change
High Rate settings and Ring deserve a separate comparison with the source. Judge them as designed textures rather than ordinary slow movement.
| Neighbouring task | Compare |
|---|---|
| Layer altered copies for thickness | Chorus: a more specialised treatment built from versions of the source. |
| Create recognisable flanging movement | Flanger: a separate processor with its own delay and modulation controls. |
| Shift pitch without changing clip speed | Pitch: a separate tool; Frequency Level is not a semitone-shift setting. |
| Add repeats or space | Delay, Echo and Reverb address temporal and spatial tasks with other control sets. |
Chorus
Compare layering of altered source versions.
↗Flanger
Shape a dedicated flanging character.
↗Pitch
Work with audio pitch.
↗Automation
Place movement in time.
Reference: Blackmagic Design — DaVinci Resolve 21 Reference Manual · Spatial and creative Fairlight FX · Blackmagic Design — Fairlight / FX, plug-ins and FlexBus
10 / UNDERSTAND & APPLY
Listen to the source inside the movement
Listen to several full cycles and the quiet parts of the source. The effect may suit one position but weaken an important event at another. Check dialogue stability, attacks and the source’s role in the scene.
Disable sections individually when combined movement becomes difficult to understand. Then compare the entire effect with bypass at similar loudness. Check channel summing for the spatial section while retaining the original version.
| Observation | Next check |
|---|---|
| Level pulses too strongly | Amplitude Level, overall Dry/Wet and interaction with Filter/Rotation. |
| Amplitude Level is unavailable | Whether Ring Modulation Mode is enabled. |
| Frequency treatment feels too harsh | Frequency Level, Rate, Shape and Dry/Wet separately. |
| Phase changes without a clear benefit | Whether relevant sections act together and which event is being used to compare their relationship. |
| Rotation is absent or movement is unclear | Track format, insert scope, Rotate, Offset and actual channel monitoring. |
| Filter differs from the expectation set by its upper scale | Compare Filter amount and Tone; the preview scale does not replace their values. |
| The effect loses character in mono | The spatial section, its phase and the overall processed balance. |
| A version only sounds better at a higher level | Match loudness through Output and repeat the comparison in the mix. |
11 / UNDERSTAND & APPLY
Keep the intention and the reference passage
Save a preset and record source, insert scope, channel format, Shape, Rate, active sections, Phase, Ring and overall output. Document the chain if order matters. For automation, note the interval and parameters being changed.
After reopening, replay several cycles and the return to the original state. Check a reference rendered file, including the start and end of the effect. A listening record helps repeat the comparison; it is not a native preset or proof of audio quality.
Reference: Blackmagic Design — DaVinci Resolve 21 Reference Manual · Spatial and creative Fairlight FX · Blackmagic Design — Fairlight / FX, plug-ins and FlexBus
PRACTICE / NO AUTOPILOT
A small task. A checkable result.
Work in a test copy, listen before and after, and write down what you actually observed. The checklist contains no pre-approved results.
Name the intended movement
Choose a steady sound, reference interval and one task: level, frequency, filtering or space.
Separate shape from speed
Compare two shapes at one Rate, then two rates at one Shape. Record each comparison.
Coordinate two domains
Set the first section, add a second and alter Phase in one of them. Compare Ring separately.
Check the overall balance
Set Dry/Wet, match Output to bypass, and listen to several cycles, quiet detail and mono for spatial treatment.
Save and listen again
Record controls and chain order, reopen the project and check the rendered file. Note the benefit and any remaining questions.
FAQ / BEFORE THE NEXT MOVE
Questions that matter in practice
Are Frequency, Amplitude, Filter and Rotation exclusive choices?
They can operate together in native Modulation. Adjusting one section at a time is a useful comparison workflow, not an interface restriction.
Reference: Blackmagic Design — DaVinci Resolve 21 Reference Manual · Spatial and creative Fairlight FX
What are the six Shape names?
The Resolve 21 manual lists Sine, Triangle, Saw1, Saw2, Square and Random. Their forms affect the character of the controlling cycle.
Reference: Blackmagic Design — DaVinci Resolve 21 Reference Manual · Spatial and creative Fairlight FX
Is Rate measured in BPM?
The reviewed window uses Hz, with a pictured 0.05 Hz–2 kHz scale. One Hz means one cycle per second; a separate BPM-synchronisation mode is not described here.
Reference: Blackmagic Design — DaVinci Resolve 21 Reference Manual · Spatial and creative Fairlight FX
Is 270° the maximum Phase?
The illustration does not establish that. Its knobs mark 0, 90, 180 and 270°, but the text does not state the full limit. The teaching diagram’s shared phase is a separate authored control.
Reference: Blackmagic Design — DaVinci Resolve 21 Reference Manual · Spatial and creative Fairlight FX
Why is Amplitude Level inactive?
The manual explicitly disables it in Ring Modulation Mode. Check that mode before changing unrelated settings.
Reference: Blackmagic Design — DaVinci Resolve 21 Reference Manual · Spatial and creative Fairlight FX
Why is Rotation missing on a mono track?
The section is described for a multichannel track. Check format and insert scope; missing spatial controls in mono do not imply an undocumented mode.
Reference: Blackmagic Design — DaVinci Resolve 21 Reference Manual · Spatial and creative Fairlight FX
Are the −1/+1 and 10 Hz–16 kHz scales three more named controls?
The panel includes additional scales, but the manual assigns no separate parameter to the vertical −1/+1 elements. The one-dimensional frequency display is associated with Filter preview; its scale is not the Tone range.
Reference: Blackmagic Design — DaVinci Resolve 21 Reference Manual · Spatial and creative Fairlight FX
Do the lab AM/FM/Ring buttons reproduce native modes?
No. They highlight teaching curves calculated together. The model has an example carrier, its own windows and a shared phase; it does not reproduce Filter, Rotation or native audio.
REFERENCES / 2026-10-08
What this guide is based on
Reviewed on 8 October 2026 against the text and illustration of the official Resolve 21 Reference Manual: chapter 181, pp. 4118–4120; common FX controls on p. 4090; insert scope and order in chapter 180, pp. 4083–4087. Brief comparisons use Chorus, Flanger and Pitch descriptions on pp. 4099, 4110 and 4123. Names, visible scales and Phase marks were checked on the panel. The source does not establish the complete Phase range or a function for additional unlabelled scales; the teaching-view selection is described separately.
Blackmagic Design — DaVinci Resolve 21 Reference Manual · Spatial and creative Fairlight FX ↗
Official full PDF, chapter 181 Fairlight FX: Delay on 4103–4104; Echo on 4107–4108; Modulation on 4118–4120; Reverb on 4123–4125. Text and panel illustrations reviewed. Parameter names, menu choices and confirmed scales checked on 8 October 2026. The teaching diagrams do not reproduce native algorithms or measure a particular recording.
Blackmagic Design — Fairlight / FX, plug-ins and FlexBus ↗
The manufacturer page confirms clip and track processing, plug-in order, saved chains, automation and FlexBus routing. Exact controls for these four effects are checked against the full Resolve 21 manual rather than inferred from the general product overview.