FAIRLIGHT / SPACE / FX · 09
Delay
Place the repeats. Preserve the rhythm.
Set independent L/R times, feedback behaviour and repeat amount. Choose a single answer, doubling or a phrase-ending accent, then check filtering, feedback polarity and the combined signal.
- 01Choose the input and L/R times
- 02Control feedback polarity and persistence
- 03Fit repeats around speech and music
Move the repeats and change their decay. Negative feedback alternates the polarity of the repeats.
Give the repeat a place.↗
Choose the reply point after a word or hit. For music, convert the required beat value from BPM to milliseconds.
Check: the repeat supports the edit or rhythm.Change the controls to explore the diagram. No audio playback, native DSP or connection to Resolve.
Sources and scope · 8 October 2026
Reviewed on 8 October 2026 against the DaVinci Resolve 21 Reference Manual: Chapter 181, Delay, pages 4103–4104; Echo comparison on pages 4107–4108; plugin placement and automation in Chapter 180. The Delay panel on page 4103 was visually inspected. The original site capture URL is preserved; its filename does not establish a specific build. Rhythm calculations, exercises and the browser diagram are authored material. Native DSP and sound in an installed Resolve were not tested in this pass.
Read the source notes ↓On this page
01 / UNDERSTAND & APPLY
Decide which kind of repeat you need
Fairlight Delay creates delayed copies of a signal. The manual describes uses from doubling to early reflections; processing can be stereo or mono according to the track. Its graph shows repeat timing and intensity by channel, while Output shows the output signal level.
Choose the audible task first: slightly separate a copy from the source, create one answer after an event or build a repeat train. Then set time, feedback and balance. A long repeat train does not fix a poorly placed first repeat.
Doubling
A small timing difference changes how the copy combines with the source. Check tone and mono along with the sense of width.
One answer
Place one repeat after a word, hit or transition. Start without a long feedback train.
Repeat train
Set the interval and persistence so the train does not unintentionally occupy the next line.
Reference: Blackmagic Design — DaVinci Resolve 21 Reference Manual · Spatial and creative Fairlight FX
02 / UNDERSTAND & APPLY
Open the intended instance and check Input Format
Add Delay from the Effects Library to a clip or to the Mixer channel’s Effects section. For a clip, open the Effects Inspector; for a track, open the plugin window from the Mixer or selected track’s Inspector. Check the object name in the title: a local clip edit and whole-track processing have different scopes.
Input Format is visible when the plugin is inserted on a multichannel track. On a mono track, a single Delay section replaces the separate L/R sections and Stereo Blend is absent. Choosing Mono in a stereo panel’s Input Format and placing the plugin on a mono track are different UI situations.
| Input Format | What enters Delay |
|---|---|
| Stereo | Left and right inputs remain separate. |
| Mono | The sum of L/R feeds both processing channels. |
| Left | Only the left input is used. |
| Right | Only the right input is used. |
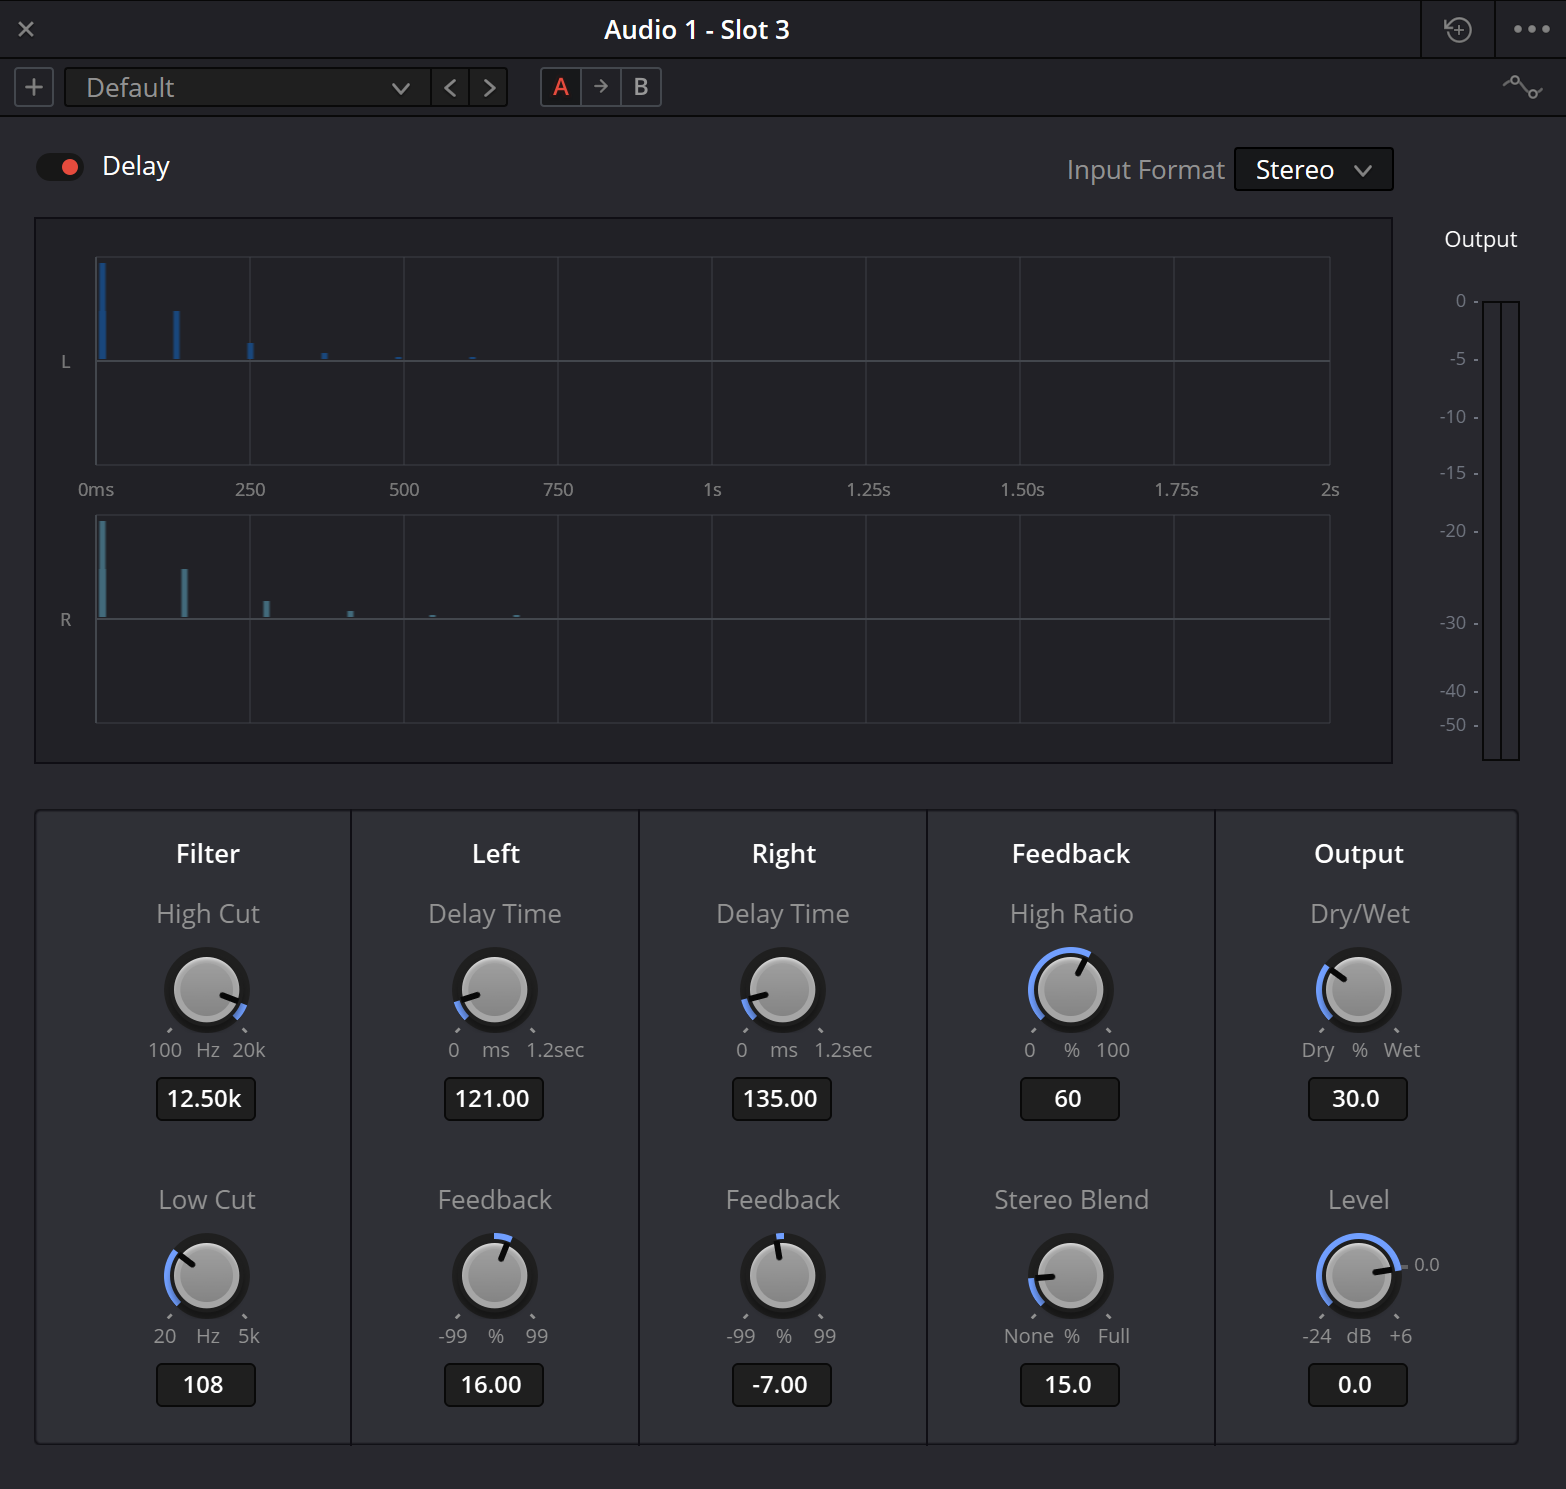
Delay · preserved stereo-panel capture
The original site interface capture. Names and labelled ranges were also checked against the official Resolve 21 manual panel; the displayed values describe one setting state.
Reference: Blackmagic Design — DaVinci Resolve 21 Reference Manual · Spatial and creative Fairlight FX · Blackmagic Design — Fairlight / FX, plug-ins and FlexBus
03 / UNDERSTAND & APPLY
Delay panel controls and ranges
Names and range labels were checked against the panel on page 4103 of the Resolve 21 manual. Values shown in its fields belong to one plugin state; they are not a recommended preset. The graph’s displayed time span is also not the same as a knob’s range.
| Control | Panel range | Purpose |
|---|---|---|
| Left / Right Delay Time | 0…1200 ms | Independent delay time for each channel. |
| Left / Right Feedback | −99…+99% | Signal returned to the same channel; a negative sign reverses the feedback polarity. |
| Low Cut | 20 Hz…5 kHz | Global high-pass filtering: reduces low-frequency content in the processed signal. |
| High Cut | 100 Hz…20 kHz | Global low-pass filtering: limits high-frequency content in the processed signal. |
| High Ratio | 0…100% | Adjusts the feedback damping-filter frequency. The number is not a frequency in Hz. |
| Stereo Blend | None…Full | Controls the share of feedback fed into the opposite channel. |
| Dry/Wet | 0…100% | Mixes original and processed signals; 0 is entirely original and 100 entirely processed. |
| Level | −24…+6 dB | Adjusts overall plugin output for balance and comparison. |
Reference: Blackmagic Design — DaVinci Resolve 21 Reference Manual · Spatial and creative Fairlight FX
04 / UNDERSTAND & APPLY
Convert BPM to milliseconds
For musical material, first establish that BPM refers to a quarter-note beat. A quarter then lasts 60 000 / BPM milliseconds. This is a time calculation: entering its result in Delay Time does not enable automatic tempo synchronisation.
For music with changing tempo, one time in ms keeps its interval. Check the relevant passage separately. If the calculated duration exceeds 1200 ms, it lies beyond Delay’s labelled range; choose another subdivision or another way to create the repeat.
| Note value | Calculation, ms | At 120 BPM |
|---|---|---|
| Quarter | 60 000 / BPM | 500 ms |
| Eighth | 30 000 / BPM | 250 ms |
| Dotted eighth | 45 000 / BPM | 375 ms |
| Quarter-note triplet | 40 000 / BPM | 333.33 ms |
Reference: Blackmagic Design — DaVinci Resolve 21 Reference Manual · Spatial and creative Fairlight FX
05 / UNDERSTAND & APPLY
Read polarity, filtering and stereo cross-feed
Left/Right Feedback returns part of the delayed signal to its own channel. The manual states that negative values reverse polarity in this branch. The sign does not mean negative time: the repeat remains delayed, while the way signals combine changes.
High Cut and Low Cut set the processed signal’s overall frequency band. High Ratio belongs to the feedback damping filter, so judge it through the repeat train’s evolution. The manual does not provide a conversion from its percentage scale to a specific frequency; the knob position alone cannot establish that frequency.
Stereo Blend adds feedback into the opposite channel. This is distinct from choosing different L/R Delay Time values. Compare independent channels without blending first, then add Stereo Blend and listen to the change in repeat movement.
Extend the train
Increase feedback magnitude gradually and listen to several returns in sequence. An overly persistent train fills pauses and changes the combined level.
Compare polarity
Keep timing fixed, then compare equal feedback magnitudes with positive and negative signs. Check with the direct sound and in mono.
Check L/R links
For explicit independent L→R and R→L controls, inspect Echo. Stereo Blend does not make the two panels identical.
Reference: Blackmagic Design — DaVinci Resolve 21 Reference Manual · Spatial and creative Fairlight FX
06 / UNDERSTAND & APPLY
Insert, shared return and delay throw
On an insert, Dry/Wet sets the source/repeat balance inside the instance. On a separate FX bus, the direct source already has its own route, so use a fully processed return and adjust the feed with the send. Check that the FX bus actually reaches the main output.
A delay throw targets a particular word, hit or transition. Send automation selects what enters the delay, allowing subsequent repeats to be checked separately. Automating output level or Dry/Wet changes the audible result and can affect the whole tail.
Isolate the task
Mark the event and the available space after it. Listen without Delay first.
Choose the route
Use one clip/track insert or one clear send-return route. Record which version you are comparing.
Set the repeat
Choose timing, restrained feedback and tone. Then set Dry/Wet or the send level in the full mix.
Write the change
If needed, automate the feed of the chosen event. Listen to the lead-in, the accent and the end of the train.
Automation
Choose and verify the parameter being changed.
↗Mixer and routing
Trace the source, send and return.
Reference: Blackmagic Design — DaVinci Resolve 21 Reference Manual · Spatial and creative Fairlight FX · Blackmagic Design — Fairlight / FX, plug-ins and FlexBus
07 / UNDERSTAND & APPLY
Study diagram: independent L/R repeats
The lab shows defined impulses and a finite repeat train in two independent channels. Change Left/Right Delay Time, then Feedback magnitude and sign. Negative feedback alternates the signs of successive returns in this study model.
Stereo Blend is fixed at zero here; High Cut, Low Cut and High Ratio are not modelled. Dry/Wet uses a linear teaching mix. The drawing does not calculate native filters, the stereo sum of a real recording or a measured output level.
| Study window | Model boundary |
|---|---|
| Delay Time · 50…1200 ms | The diagram starts at 50 ms; the native panel is labelled from 0 ms. |
| Feedback · −90…+90% | The study window is narrower than the native −99…+99%. |
| Dry/Wet · 0…100% | A linear mix of authored branches, without claiming the native mixing law. |
| 8 repeats / 4 s | The finite drawing truncates later events; it is not a limit on Delay’s tail. |
Space the repeats. Follow the feedback sign.
The two channels have independent delay times and self-feedback. Increase one delay without moving the other channel. Cross zero on Feedback to alternate the sign of successive returns.
The drawing follows the controls. It does not generate audio.
Feedback zero still leaves the first delayed copy. Raising its magnitude adds stronger later returns; delay time controls their spacing.
The drawing stops after eight repeats; 0 non-zero drawn events fall beyond the 4-second window. Omitted later events do not mean that a real tail has ended.
How this teaching model is defined
For a unit input, delayed copy n is placed at n × Delay Time and receives a coefficient Feedback^(n−1). A linear Dry/Wet blend scales direct and delayed drawings. These are independent authored loops with finite generations, not Resolve’s internal response, damping curve, pan law or stereo algorithm.
Reference: Blackmagic Design — DaVinci Resolve 21 Reference Manual · Spatial and creative Fairlight FX
08 / UNDERSTAND & APPLY
Delay, Echo, Reverb and Modulation
Choose by control structure. Delay offers independent L/R times and feedback with Stereo Blend. Echo separates Delay Time from Feedback Delay and provides L→R and R→L directions. Reverb controls a room model; Modulation applies an oscillator to frequency, amplitude, filtering and spatial movement.
| Desired result | Start with |
|---|---|
| Independent repeats on the left and right. | Delay |
| Choose the initial delay and feedback interval separately. | Echo |
| Connect a sound with a room and late decay. | Reverb |
| Create periodic variation in the sound. | Modulation |
Echo
Separate initial-response and feedback timing.
↗Reverb
Room, early reflections and late tail.
↗Modulation
Periodic processing character.
Reference: Blackmagic Design — DaVinci Resolve 21 Reference Manual · Spatial and creative Fairlight FX
09 / UNDERSTAND & APPLY
Check four practical uses
Short doubling
Listen to the combined attack, tone and centre. An L/R offset can change width, but finish by checking mono and the full mix.
Single answer
Start at feedback 0 and find a useful place for the first repeat. Then decide whether more returns are needed and how much space they may occupy.
Rhythmic pattern
Calculate the time and compare against the drums, not just a metronome. The copy may land on an existing accent and overcrowd the rhythm.
Delay throw
Check that the intended word enters the effect and the train neither drags in the previous phrase nor obscures the next one.
10 / UNDERSTAND & APPLY
Locate the cause before moving another control
| Symptom | Check |
|---|---|
| Repeats are inaudible. | Bypass, Dry/Wet, send, return routing and the selected Input Format. |
| The sound repeats for too long. | Feedback magnitude, Stereo Blend and accidental extra sends; listen through the entire tail. |
| The repeat masks consonants. | Timing relative to the next word, repeat level and the filtered frequency band. |
| The source becomes thin in mono. | The direct/delayed sum, L/R timing difference and feedback sign. |
| High Ratio is being read as Hz. | It is a percentage control for the damping filter; an exact frequency is not labelled. |
| A repeat disappears after editing or export. | Passage boundaries, automation, FX return and sufficient time after the event. |
11 / UNDERSTAND & APPLY
Save the decision and check the output file
Keep output levels close when comparing processing: a louder combined signal can seem more convincing regardless of repeat quality. Clear solo, restore the other tracks and check the actual delivery format, including mono when required.
When Delay Time changes during active feedback, the transition depends on the plugin implementation. Listen to it in Resolve; the page diagram does not predict clicks, pitch changes or smoothing. For a precise accent, consider keeping time fixed and automating the send.
Save the chosen version and record the processing scope, Input Format, L/R times, feedback, filters and balance. Export a short passage with time after the last repeat. Listen through the resulting file to check rhythm, the tail, routing and the phrase ending.
PRACTICE / NO AUTOPILOT
A small task. A checkable result.
Work in a test copy, listen before and after, and write down what you actually observed. The checklist contains no pre-approved results.
Choose an event
Choose a word or short hit followed by a pause. Record whether you need one answer, doubling or a rhythmic train.
Check input and timing
Identify the channels, choose Input Format and place Delay. For a 120 BPM example, calculate a 500 ms quarter and 375 ms dotted eighth; compare a suitable interval with the scene.
Understand the returns
In the lab, keep L/R times equal and compare feedback +40% with −40%. Then offset the times. Describe repeat signs and positions without attributing filters to the model.
Mix the actual effect
In Resolve, check High Cut, Low Cut, High Ratio and Stereo Blend one at a time. Set Dry/Wet or the send, compare against the original and listen in mono.
Check the tail and save
If needed, automate the selected word. Listen through the next edit and a short export with the full tail; record the settings and result.
FAQ / BEFORE THE NEXT MOVE
Questions that matter in practice
Why are the right channel and Stereo Blend missing on a mono track?
That is the documented mono configuration: one Delay section replaces separate L/R controls, and Stereo Blend is hidden. Input Format appears on a multichannel track. Check the track type before comparing panels.
Reference: Blackmagic Design — DaVinci Resolve 21 Reference Manual · Spatial and creative Fairlight FX
Does negative Feedback make the repeat arrive earlier?
The sign describes the polarity of the returned signal; Delay Time sets timing. The manual describes a negative value as phase reversal in the feedback path. Check it with the direct branch and in mono.
Reference: Blackmagic Design — DaVinci Resolve 21 Reference Manual · Spatial and creative Fairlight FX
How do I get one repeat?
Start at feedback 0 and choose the first answer’s time. In the stereo panel, check both channels and Stereo Blend separately. Then set audibility through Dry/Wet or the send without adding an unnecessary long train.
Reference: Blackmagic Design — DaVinci Resolve 21 Reference Manual · Spatial and creative Fairlight FX
What delay time is a quarter note at 120 BPM?
If BPM refers to the quarter note, 60 000 / 120 = 500 ms. An eighth is 250 ms and a dotted eighth 375 ms. These are calculated values to enter in Delay Time; changing the music’s tempo does not automatically change the number.
Is High Ratio another High Cut?
High Cut is described as a global low-pass filter. High Ratio adjusts the feedback damping-filter frequency. Its percentage scale cannot be read directly in Hz; compare the first repeat and the developing train with other controls unchanged.
Reference: Blackmagic Design — DaVinci Resolve 21 Reference Manual · Spatial and creative Fairlight FX
How does Delay differ from Echo?
Delay offers independent L/R time and feedback with Stereo Blend. Echo additionally separates Delay Time from Feedback Delay and has explicit L→R and R→L feedback directions. Choose by the control structure you need, not only by the word “echo”.
Reference: Blackmagic Design — DaVinci Resolve 21 Reference Manual · Spatial and creative Fairlight FX
The lab has only 8 repeats: is that the plugin limit?
It is the limit of a finite 4 s teaching diagram. Its 50–1200 ms times and −90…+90% feedback are exercise windows; the native panel has 0–1200 ms and −99…+99%. Filters and Stereo Blend are not calculated in the drawing. Judge the actual tail length and sound in Resolve.
Reference: Blackmagic Design — DaVinci Resolve 21 Reference Manual · Spatial and creative Fairlight FX
REFERENCES / 2026-10-08
What this guide is based on
Reviewed on 8 October 2026 against the DaVinci Resolve 21 Reference Manual: Chapter 181, Delay, pages 4103–4104; Echo comparison on pages 4107–4108; plugin placement and automation in Chapter 180. The Delay panel on page 4103 was visually inspected. The original site capture URL is preserved; its filename does not establish a specific build. Rhythm calculations, exercises and the browser diagram are authored material. Native DSP and sound in an installed Resolve were not tested in this pass.
Blackmagic Design — DaVinci Resolve 21 Reference Manual · Spatial and creative Fairlight FX ↗
Official full PDF, chapter 181 Fairlight FX: Delay on 4103–4104; Echo on 4107–4108; Modulation on 4118–4120; Reverb on 4123–4125. Text and panel illustrations reviewed. Parameter names, menu choices and confirmed scales checked on 8 October 2026. The teaching diagrams do not reproduce native algorithms or measure a particular recording.
Blackmagic Design — Fairlight / FX, plug-ins and FlexBus ↗
The manufacturer page confirms clip and track processing, plug-in order, saved chains, automation and FlexBus routing. Exact controls for these four effects are checked against the full Resolve 21 manual rather than inferred from the general product overview.