FAIRLIGHT / CREATIVE / FX · 09
Chorus
Add voices. Keep the character.
Bring movement to a musical layer, widen a synthetic atmosphere or design a character voice. Understand short delays, six LFO shapes, Pitch and Level, then build width and feedback while keeping the original attack readable.
- 01Separate timing, pitch and level
- 02Shape modulation and feedback
- 03Check voices and width in the mix
Change the rate and delay excursion of three teaching voices. Compare their movement with the source line.
Separate short copies.↗
Delay Time and Voice Separation create timing differences. Three teaching voices show how one source can become a moving layer.
Check: the original attack remains readable.Change the controls to explore the diagram. No audio playback, native DSP or connection to Resolve.
Sources and scope · 9 October 2026
Reviewed 9 October 2026 against the DaVinci Resolve 21 Reference Manual, Chapter 181, Chorus, printed and PDF pages 4099–4100. Both the text and the panel were inspected. Native labels and visible ranges come from that reference. Workflows and browser models are authored teaching material; the models do not reproduce Blackmagic DSP or process your recording. The Modulation graph is also explained in the official Fairlight Audio Guide to Resolve 18, printed page 363.
Read the source notes ↓On this page
01 / UNDERSTAND & APPLY
When one source needs several voices
Chorus combines a source with short delayed and modulated versions of itself. Small timing and pitch differences suggest several performances; stronger modulation turns that layer into a distinct effect. These are processed copies of one recording, not newly performed takes.
Choose it for a concrete scene requirement. A synthesizer may need motion, backing vocals may need density, or a character voice may need an artificial quality. On ordinary dialogue, use Chorus as a deliberate stylistic choice: pitch and level movement can compete with the words.
Short timing
Small delays keep copies close to the original attack. Their spacing is a different decision from the speed of modulation.
Different movement
Pitch and amplitude modulation change the layer in different ways. Listen to each contribution separately first.
Overall balance
Dry/Wet sets the contribution of the processed layer. Width, Feedback and Blend change how that layer behaves.
Reference: Blackmagic Design — DaVinci Resolve 21 Reference Manual · Chorus, Flanger, Pitch and Distortion
02 / UNDERSTAND & APPLY
Read the native panel and its input channels
Open Chorus on the intended clip or in the Mixer channel Effects section. Check the window title: a clip instance affects that event, while a track instance processes material passing through the track. The graphs help reveal timing differences and processing; the output meter helps you watch level.
Input Format appears on a multichannel track. It selects the signal entering the effect. Setting that input to Mono is a different operation from listening to the finished stereo mix folded down to mono.
| Input Format | Signal entering Chorus |
|---|---|
| Stereo | Left and Right enter separately. |
| Mono | Left and Right are summed and the sum is fed to both channels. |
| Left | Only the left input channel is used. |
| Right | Only the right input channel is used. |
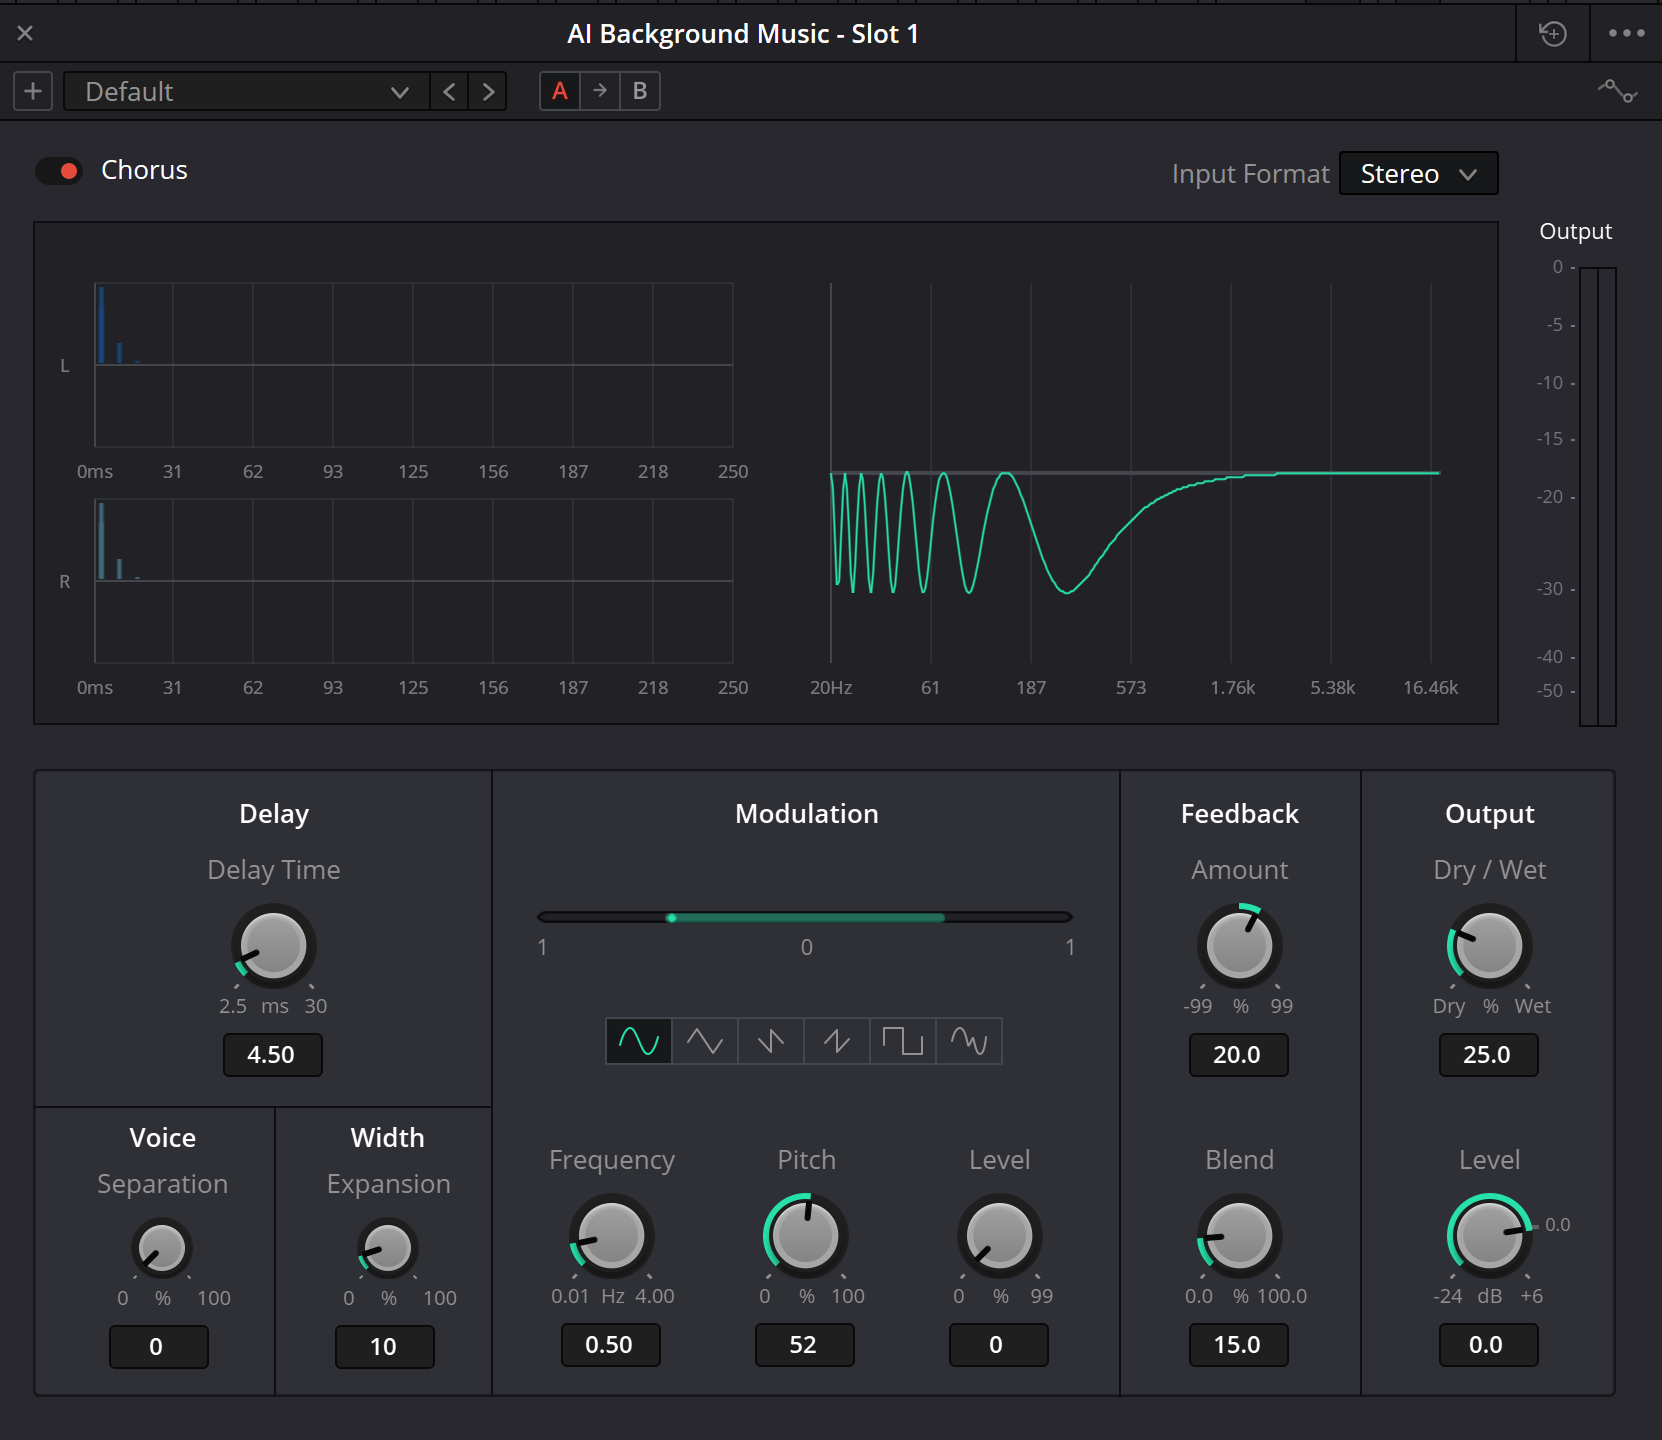
Chorus · Resolve 21
The original Resolve 21 Chorus capture. Labels and ranges are cross-checked against the reference-manual panel; the values shown are an example state, not a recommended preset.
Reference: Blackmagic Design — DaVinci Resolve 21 Reference Manual · Chorus, Flanger, Pitch and Distortion · Blackmagic Design — Fairlight / FX, plug-ins and FlexBus
03 / UNDERSTAND & APPLY
Establish timing and separation first
Delay Time, Voice Separation and Width Expansion have distinct jobs. Delay Time sets delay-line length; Separation sets the time separation of the voices; Expansion changes L/R length differences and modulator phase offsets. A Separation percentage is not a direct millisecond readout.
The following ranges are printed on the Resolve 21 panel. The values in the original capture are one example state. Source material, tempo and existing ambience determine which settings are useful.
| Control | Panel range | What to assess |
|---|---|---|
| Delay Time | 2.5–30 ms | Listen to the copy separating from the attack and changing its colour. This is not the long-repeat timing of an echo. |
| Voice Separation | 0–100% | Change the time separation of voices. Compare a short attack with a sustained note. |
| Width Expansion | 0–100% | Adjust L/R delay differences and modulator phases. Compare the centre, stereo output and mono fold-down. |
Reference: Blackmagic Design — DaVinci Resolve 21 Reference Manual · Chorus, Flanger, Pitch and Distortion
04 / UNDERSTAND & APPLY
Six LFO shapes and two kinds of movement
Frequency is the rate of the low-frequency oscillator. At 0.5 Hz, a cycle takes two seconds; at 2 Hz it takes half a second. This is the repetition rate of the modulation pattern, not the musical note frequency, and it does not by itself align a cycle with an edit.
The green bar and dot above the shape buttons are a modulation display. The official audio guide shows the dot moving faster as Frequency increases. This area should not be presented as another unnamed offset control.
Pitch sets the amount of pitch movement; Modulation Level sets the depth of amplitude movement. Level in the Output section has a different job: final output gain in dB. For a clear comparison, change only one of those three controls at a time.
Sine
Smooth periodic motion with rounded turns. A useful starting point for a slowly moving layer.
Triangle
Linear movement between extremes, with a more defined change of direction.
Saw1
One of two saw-shaped patterns: a gradual movement followed by an abrupt return.
Saw2
The other saw-shaped pattern. Compare the direction and reset with Saw1 on the same phrase.
Square
Alternating levels with abrupt transitions. Useful when the movement should sound deliberately artificial.
Random
Irregular changes. Listen through the whole passage again; one appealing instant is not enough to judge it.
| Control | Range | Purpose |
|---|---|---|
| Frequency | 0.01–4.00 Hz | LFO rate. |
| Pitch | 0–100% | Pitch-modulation depth, not a semitone transpose control. |
| Modulation Level | 0–99% | Amplitude-modulation depth, not final output gain. |
Reference: Blackmagic Design — DaVinci Resolve 21 Reference Manual · Chorus, Flanger, Pitch and Distortion · Blackmagic Design — The Fairlight Audio Guide to DaVinci Resolve 18 · Chorus modulation graph
05 / UNDERSTAND & APPLY
Separate Feedback, Blend and the output mix
Feedback Amount returns part of the processed signal to the delay line. Positive and negative settings use different feedback polarity. Increasing the absolute amount gives the loop more influence; the sign does not select a stereo direction.
Blend controls feedback crossing into the opposite channel. It is available in stereo and works with Amount. Amount at zero removes feedback recirculation, but delayed and modulated voices may still be audible.
Once the character is useful, set Dry/Wet and Level. A bypass comparison should tell you whether the intended detail becomes more effective at a similar listening level. A louder output alone does not establish that Chorus helped.
| Control | Panel range | Distinct task |
|---|---|---|
| Feedback Amount | −99…+99% | Amount and polarity of recirculation into the delay. |
| Feedback Blend | 0–100% | Feedback crossing to the opposite channel; stereo only. |
| Dry/Wet | 0–100% | Original/processed output mix. At 100%, only the wet path remains. |
| Output Level | −24…+6 dB | Final output gain for matching the effect to the mix. |
Reference: Blackmagic Design — DaVinci Resolve 21 Reference Manual · Chorus, Flanger, Pitch and Distortion
06 / UNDERSTAND & APPLY
Build the effect in one deliberate pass
Choose a representative passage
Include an attack, a sustained portion and an ending. For speech, include quick consonants; for music, include a dense part of the arrangement.
Establish short copies
Start with a restrained Dry/Wet balance and little Feedback. Find Delay Time and Separation settings that create the intended density.
Choose motion
Compare shapes at one Frequency. Then set Pitch and Modulation Level separately, returning to the complete phrase.
Build stereo and feedback
Add Width, then Amount and Blend. Check mono periodically and listen for a stable centre.
Match the level
Set Output Level, compare bypass and return to the full mix. Save the choice after checking the scene entrance and ending.
07 / UNDERSTAND & APPLY
What to hear in voices, music and ambience
Solo helps identify a source of movement; the full mix tells you whether it is useful. A finished music track may already contain delays and modulation, which the new Chorus will compound. On a parallel return, also check whether the dry signal is being duplicated.
Character voice
Keep consonants and vocal identity readable if the scene needs them. Test strong movement on quiet endings and stressed words.
Guitar, pad or synth
Listen against surrounding notes and instruments. A moving layer should not accidentally make the main instrument sound out of tune.
Atmosphere or drone
Check whether a background becomes an unwanted recurring accent. Lower Frequency and less wet signal may be enough.
Percussion and attacks
Listen for the weight of the central hit. If it loses focus, compare a shorter Delay Time and a smaller wet contribution.
08 / UNDERSTAND & APPLY
Teaching model: separate voices and read the sum
The lab uses three authored voices derived from a fixed harmonic source. It plots their delay trajectories, the source waveform and the mixture. Three was chosen for clarity; it is not a claim about the native Chorus voice count.
The voices have fixed LFO phase offsets of 0°, 120° and 240°. Separation spreads their base times, Pitch adds delay movement, and Modulation Level changes their amplitude envelopes. The wet signal is the mean of the three voices. Start with one variable, then compare Dry/Wet and bypass.
The model does not reproduce native Feedback, Blend, Width or Output Level, process a recording, or assess the mono compatibility of your mix. Random uses a repeatable teaching sequence. Take listening questions from the model into Resolve.
| In the lab | Authored assumption |
|---|---|
| Delay Time · 2.5–30 ms | Base delay time. Matching a panel range does not mean matching its DSP. |
| Separation · 0–100% | At 100%, voices receive offsets of 0, 3 and 6 ms. This is a teaching mapping, not a disclosed Fairlight formula. |
| Frequency · 0.1–4 Hz | A narrower lab window. The native control starts at 0.01 Hz. |
| Pitch · 0–100% | Delay excursion grows from zero to ±2 ms. The native percentage-to-time relationship is not specified. |
| Modulation Level · 0–99% | Controls an authored amplitude envelope. Dry/Wet blends the source with the mean of the voices. |
Separate three voices. Move their delay lines.
Delay Time moves all voices together. Voice Separation offsets the three arrivals. Pitch bends their time trajectories, while Modulation Level changes the amplitude of each voice. Compare their mixture with the same harmonic source.
The drawing follows the controls. It does not generate audio.
Pitch and Modulation Level are independent: reducing Pitch to zero freezes delay motion, while level modulation can remain. Setting Separation to zero aligns the base offsets but retains the three authored LFO phases.
How this teaching model is defined
For voice i = 0, 1, 2: delay = Delay Time + i × 3 ms × Separation/100 + 2 ms × Pitch/100 × LFO. Its gain is 1 − d/2 + d/2 × LFO, where d = Modulation Level/100. Three delayed versions of a harmonic 220 Hz reference are averaged, then blended linearly with the source. The waveform begins at the fixed LFO time 0.5 seconds.
The teaching Frequency window is 0.1–4 Hz; the native control reaches 0.01 Hz. Feedback, Blend, Width Expansion and output trim are not calculated here. Saw and Square discontinuities are literal teaching functions; no smoothing or audio interpolation algorithm is claimed.
Reference: Blackmagic Design — DaVinci Resolve 21 Reference Manual · Chorus, Flanger, Pitch and Distortion
09 / UNDERSTAND & APPLY
Change the cause of a problem
| Observation | Check | Next comparison |
|---|---|---|
| Words became harder to follow | Pitch, Modulation Level, Delay Time and wet amount. | Reduce one contribution at a time on the same phrase. |
| The width works but the centre weakened | Width, Separation and the finished mono fold-down. | Restore a stable direct signal and reassess the width. |
| An unwanted pulse is obvious | Frequency, LFO shape and Modulation Level. | Compare Sine with less amplitude depth. |
| The colour became sharply resonant | Feedback Amount magnitude and sign. | Move closer to zero and evaluate Blend separately. |
| The effect only works in solo | Bypass level and masking in the mix. | Match Output Level and compare in the scene. |
| Blend has little audible effect | Stereo mode, feedback amount and channel differences. | Check that meaningful feedback exists to cross between channels. |
10 / UNDERSTAND & APPLY
Choose the neighbouring effect for its result
Chorus can be combined with other effects, but the order is audible. Chorus before Reverb colours the source that enters the room; Chorus after Reverb modulates the completed reverberant signal. Compare both on the same scene at similar levels.
11 / UNDERSTAND & APPLY
Check the processing scope and the finished passage
For an effect on a word or musical accent, decide where it belongs: a clip, track or automated parameter. On a shared return, check its Dry/Wet setting and the independent direct path. Plugin bypass and turning down Dry/Wet are different comparisons.
Entrance and ending
Listen to the effect entering, the last attack and the next event. The intended character should appear at the intended moment.
Complete route
Remove solo and check the main bus and overall level. Listen to stereo and mono through the intended monitoring route.
Short export
Export a representative passage and listen separately. Check channels, duration and the audible movement.
Recorded observations
Save the version and describe what Delay, LFO and Feedback contributed. Record any remaining weak spots.
Reference: Blackmagic Design — Fairlight / FX, plug-ins and FlexBus
PRACTICE / NO AUTOPILOT
A small task. A checkable result.
Work in a test copy, listen before and after, and write down what you actually observed. The checklist contains no pre-approved results.
1 · Prepare a reference
Choose 10–15 seconds of voice, guitar or a synthetic layer. Write why Chorus is needed and which detail must stay intact.
2 · Separate timing from motion
In the lab, compare Delay Time and Separation without changing LFO or Dry/Wet. Make a similar comparison on your recording in Resolve and record the differences.
3 · Separate Pitch from Level
Compare pitch movement with level movement and audition all six LFO shapes. Record the shape and pace that fit the material.
4 · Check stereo and feedback
In Resolve, change Width, Amount and Blend one at a time. Compare mono and record what happened to the centre and attacks.
5 · Match and export
Match the bypass level, restore the full mix and listen to a short export. Record what actually happened, not the effect you expected.
FAQ / BEFORE THE NEXT MOVE
Questions that matter in practice
Can Chorus replace a genuine second take?
It creates processed versions of the same source. A new performance can contain different articulation, attacks and phrasing; Chorus cannot obtain those independent details from one recording.
Reference: Blackmagic Design — DaVinci Resolve 21 Reference Manual · Chorus, Flanger, Pitch and Distortion
Does Pitch inside Chorus transpose the source?
It sets pitch-modulation depth as a percentage. A separate pitch-change task belongs to Pitch; the Chorus control name does not imply a semitone scale.
Reference: Blackmagic Design — DaVinci Resolve 21 Reference Manual · Chorus, Flanger, Pitch and Distortion
Why are there two Level controls?
Modulation Level sets amplitude-modulation depth. Output Level sets final output gain in dB. Their functions and units are different.
Reference: Blackmagic Design — DaVinci Resolve 21 Reference Manual · Chorus, Flanger, Pitch and Distortion · Blackmagic Design — The Fairlight Audio Guide to DaVinci Resolve 18 · Chorus modulation graph
Is the green bar above the shapes another slider?
The official audio guide calls it the Modulation graph: the dot shows LFO motion and Frequency changes its speed. This guide does not assign a separate manual offset function to that display.
Reference: Blackmagic Design — The Fairlight Audio Guide to DaVinci Resolve 18 · Chorus modulation graph
How is Blend different from Dry/Wet?
Blend feeds some feedback into the opposite channel and belongs to the stereo loop. Dry/Wet blends the original and processed output signals.
Reference: Blackmagic Design — DaVinci Resolve 21 Reference Manual · Chorus, Flanger, Pitch and Distortion
Why can I hear the effect with Feedback Amount at zero?
Zero removes feedback recirculation but does not necessarily remove the delayed, modulated voices. Their contribution still depends on the other controls and Dry/Wet.
Reference: Blackmagic Design — DaVinci Resolve 21 Reference Manual · Chorus, Flanger, Pitch and Distortion
Are the three teaching voices the exact native architecture?
No. They are an authored model with fixed phases and readable time separation. The manual does not specify that voice count or the model’s percentage mappings.
How can I check whether width harms an important sound?
Listen to the finished stereo output folded down to mono and assess the centre in the full mix. Start with attacks and key words. Input Format Mono changes the effect input and is a different test.
REFERENCES / 2026-10-09
What this guide is based on
Reviewed 9 October 2026 against the DaVinci Resolve 21 Reference Manual, Chapter 181, Chorus, printed and PDF pages 4099–4100. Both the text and the panel were inspected. Native labels and visible ranges come from that reference. Workflows and browser models are authored teaching material; the models do not reproduce Blackmagic DSP or process your recording. The Modulation graph is also explained in the official Fairlight Audio Guide to Resolve 18, printed page 363.
Blackmagic Design — Fairlight / FX, plug-ins and FlexBus ↗
The manufacturer page confirms clip and track processing, plug-in order, saved chains, automation and FlexBus routing. Exact controls for these four effects are checked against the full Resolve 21 manual rather than inferred from the general product overview.
Blackmagic Design — DaVinci Resolve 21 Reference Manual · Chorus, Flanger, Pitch and Distortion ↗
Official full PDF, chapter 181: Chorus on 4099–4100; Distortion on 4105–4106; Flanger on 4110–4111; Pitch on 4123, with Reverb beginning lower on the same page. Physical and printed page numbers match. Text and panels reviewed on 9 October 2026 for controls, menus and readable scales. The page curves and signals are authored teaching examples, not native Resolve algorithms.
Blackmagic Design — The Fairlight Audio Guide to DaVinci Resolve 18 · Chorus modulation graph ↗
Primary training guide, printed page 363: the moving dot and bar are identified as the Modulation graph rather than a separate control. Used only to clarify the Chorus indicator. Current controls, options and ranges for the second group are checked against the full Reference Manual 21.