FAIRLIGHT / CHARACTER / FX · 09
Distortion
Wave shape. Harmonics. Level control.
Give a sound density, roughness or the character of overdriven equipment. Control its waveform, separate distortion amount from output level and preserve the details that matter in the mix.
- 01Distinguish modes and the two Level controls
- 02Shape distortion with Level and Ceiling
- 03Compare character at similar loudness
Change the amount and threshold of an authored nonlinear curve. Compare the input and output waveforms.
Changing the wave creates character.↗
Compare a source waveform with nonlinear processing. The same input takes on a different pattern as intensity changes.
Check: the parts of the wave affected most are clear.Change the controls to explore the diagram. No audio playback, native DSP or connection to Resolve.
Sources and practice · 9 October 2026
Reviewed on 9 October 2026 against the official DaVinci Resolve 21 Reference Manual: chapter 181, Distortion on physical and printed pages 4105–4106; common FX controls on p. 4090; scope, order and automation in chapter 180, pp. 4083–4087. Distortion/Destroy and Auto Level names are confirmed in the text; both Level scales, Ceiling and filter scales were checked on the panel. Exact native topology and processing equations are not assumed. The lab uses authored curves and RMS compensation of its test signal.
Read the source notes ↓On this page
01 / UNDERSTAND & APPLY
Use distortion as a deliberate part of the sound
Distortion changes the waveform nonlinearly. It can add saturation, hard accents and the character of limited or overdriven equipment: communications, loudspeakers and old recordings. The manual also identifies soft tube emulation in the output stage.
Define the intended change: a rougher voice, a denser hit, a more noticeable small source or a disrupted transition. Separately name the detail that must survive, such as consonants, an initial click, bass support or the gap after an event.
Start with a short passage containing quiet and loud parts. Nonlinear processing responds to input level, so identical knob positions on different recordings need not create the same amount of distortion.
Reference: Blackmagic Design — DaVinci Resolve 21 Reference Manual · Chorus, Flanger, Pitch and Distortion
02 / UNDERSTAND & APPLY
Three sections and two different Level controls
The upper window contains the waveform view and Input/Output meters. Filter, Distortion and Output sit below it. The central Level uses percent and controls effect intensity; the right-hand Level uses dB and controls output. Read the section name along with the knob label.
The two Distortion icons have names in the manual: Distortion and Destroy. The left button selects harmonic distortion; the right selects more extreme polynomial waveshaping. An additional distortion-type menu is not described for this window.
The small A beside output Level enables Auto Level, compensating gain changes from processing. It is separate from the upper A button used for A/B comparison. Presets, A/B and Reset belong to common Fairlight FX operation.
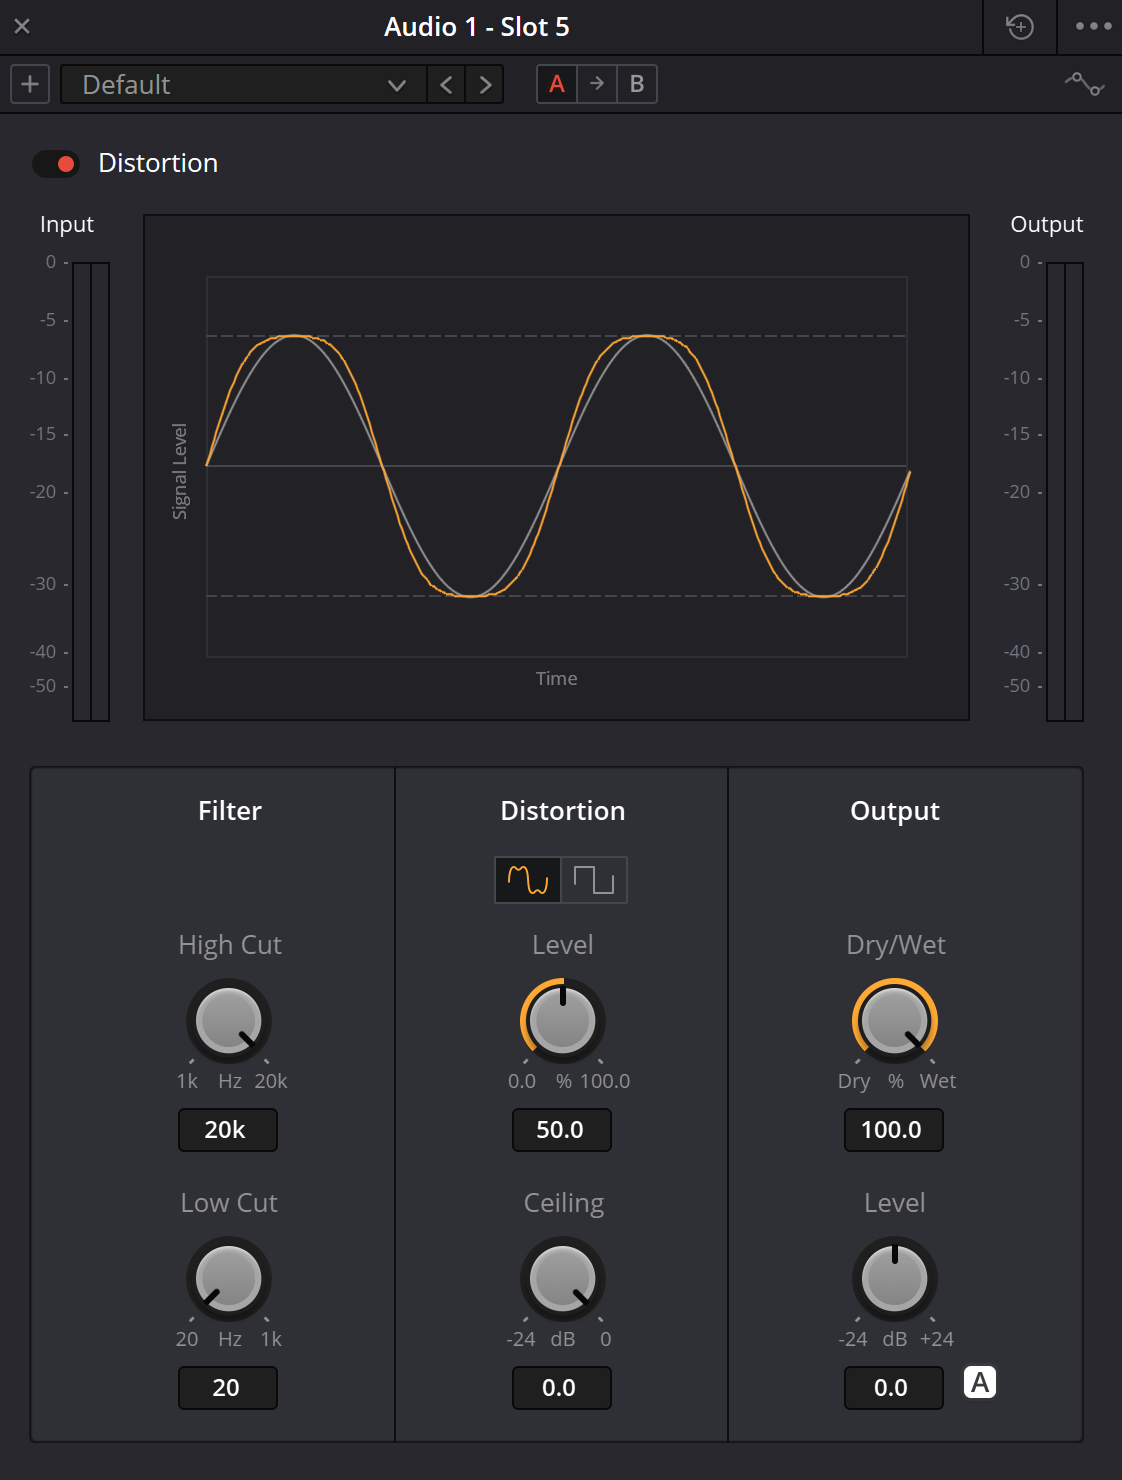
Distortion: interface capture
The panel shows separate distortion and output Level controls. The manual identifies the two icons as Distortion / Destroy and the A button as Auto Level. Values in the capture are one example, not a recommended preset.
Reference: Blackmagic Design — DaVinci Resolve 21 Reference Manual · Chorus, Flanger, Pitch and Distortion
03 / UNDERSTAND & APPLY
Every control and the visible Resolve 21 scales
The table was checked against the Distortion description and panel on pages 4105–4106 of the Resolve 21 manual. The text calls the filters LF Cut/HF Cut, while the panel labels them Low Cut/High Cut. These are corresponding labels for one pair, not four controls.
The numbers describe the documented panel. Change one parameter at a time and check level after the output section; a scale endpoint is not a recommended operating point.
| Section / control | Scale or choice | Function |
|---|---|---|
| Filter · High Cut | 1 kHz–20 kHz | Limits the upper frequency region of the effect. |
| Filter · Low Cut | 20 Hz–1 kHz | Reduces the low-frequency contribution to the effect. |
| Distortion · two buttons | Distortion / Destroy | Choose nonlinear character; the mode names come from the manual. |
| Distortion · Level | 0…100% | Controls distortion intensity, separately from output Level. |
| Distortion · Ceiling | −24…0 dB | Changes the input level at which clipping occurs. |
| Output · Dry/Wet | 0…100% | Blends the original and processed signal; 0% is Dry and 100% is Wet. |
| Output · Level | −24…+24 dB | Adjusts overall output level. |
| Output · A | Auto Level on/off | Compensates gain change caused by distortion. |
| Bypass | Effect bypass | Checks the original sound while retaining settings for return. |
Reference: Blackmagic Design — DaVinci Resolve 21 Reference Manual · Chorus, Flanger, Pitch and Distortion
04 / UNDERSTAND & APPLY
Read shape, amount and threshold together
Linear gain scales a waveform while preserving relationships between its values. A nonlinear curve changes those relationships: different input regions receive different gain, and peaks are rounded or reshaped. On a periodic tone this can add harmonics; on complex material it can also change how components interact.
Level and Ceiling address connected decisions. Level sets distortion amount; Ceiling sets the input level at which clipping begins. Lowering Ceiling allows quieter signal regions to enter clipping. Reassess output afterwards, since character and loudness may change together.
Compare both modes on one passage. The manual describes harmonic distortion for Distortion and a more extreme polynomial waveshaper for Destroy. It does not publish their exact curves. The graph helps explain waveform changes, but actual-source listening decides the result.
Reference: Blackmagic Design — DaVinci Resolve 21 Reference Manual · Chorus, Flanger, Pitch and Distortion
05 / UNDERSTAND & APPLY
Connect a transfer curve to the processed waveform
The lab calculates a test wave and processes it through two authored curves: soft tanh and a bounded cubic curve. Teaching Level, Ceiling, Dry/Wet and output Level link the source, input/output relationship and resulting waveform.
Here, Level 0–100% maps to gain g=1+7×Level/100, and Ceiling converts from dB to relative amplitude. The output Level teaching window is −18…+6 dB; the native panel provides −24…+24 dB. RMS compensation matches mixed RMS to the source’s 401-point reference before output Level, only for this static test.
These curves do not reproduce native Distortion/Destroy, and RMS compensation does not copy Resolve Auto Level or measure perceived loudness. Filters and the tube output stage are outside the model. Use the separate Bypass for a source comparison; zero teaching intensity is not declared a universal bypass of nonlinearity.
Connect a transfer curve to the wave it produces.
Increase Level to drive an authored nonlinear curve. Lower Ceiling to move its amplitude scale. Compare two published teaching laws, then separate the Dry/Wet mixture, RMS compensation and output trim.
The drawing follows the controls. It does not generate audio.
Level zero still uses the selected nonlinear law. It is not bypass. Auto Level matches the RMS of this finite reference before output trim; it does not restore the original waveform, equal perceived loudness or a true-peak limit.
Wave plots use a fixed ±1.25 drawing window. 0 output points exceed it; the peak readout uses the unclipped numerical samples.
How this teaching model is defined
Authored drive g = 1 + 7 × Level/100 and amplitude c = 10^(Ceiling/20). Soft curve: y = c × tanh(gx/c). Cubic curve: u = clamp(gx/c, −2, 2), y = c × (1.5u − 0.5u³). The cubic can fold and reverse sign. A linear Dry/Wet blend follows; optional RMS matching uses the displayed static 401-point reference, then Output Level multiplies the result.
Low Cut, High Cut, native oversampling, anti-aliasing and the plugin’s tube output stage are not calculated. The teaching Output Level window is −18 to +6 dB; the native control spans −24 to +24 dB. The diagram is not an audio export or a measurement of native distortion.
06 / UNDERSTAND & APPLY
Auto Level assists comparison; finish it by listening
Choose the character at a moderate input level first. Enable Auto Level to reduce the influence of gain increase, then compare processing with bypass. If the version feels denser, check whether that benefit remains after manual loudness matching.
Auto Level does not mean normalisation to a target programme LUFS or a guaranteed true-peak limit. Input/Output meters show level changes, but perception also depends on spectrum and dynamics. Listen to quiet gaps as well as the loud event.
Check levels after Dry/Wet, output Level and subsequent plug-ins. Strong distortion followed by attenuation can be a useful choice. Lowering output Level alone does not restore a lost attack shape: revisit intensity, threshold or the dry contribution.
Limiter
Control final peaks separately.
↗Loudness Meter
Assess programme loudness with appropriate measures.
Reference: Blackmagic Design — DaVinci Resolve 21 Reference Manual · Chorus, Flanger, Pitch and Distortion
07 / UNDERSTAND & APPLY
Filtering determines bandwidth and role
Low Cut and High Cut help retain the intended frequency region. For a communications texture, find a bandwidth that keeps the message intelligible, then add distortion. On a dense hit, check whether bass masks useful midrange; on a voice, check whether the top end becomes tiring.
The manual explains the built-in filters’ purpose without exposing the complete internal topology here. If a task requires explicit processing before or after the nonlinear stage, use a separate EQ in that chosen chain position.
EQ before Distortion changes the material causing the nonlinear response. EQ afterwards shapes the resulting spectrum, including added components. Compare these as separate decisions at similar level, listening to both timbre and attack.
| Observation | Specific comparison |
|---|---|
| Processing sounds too harsh | High Cut and intensity, then a separate EQ after the effect. |
| Bass becomes blurred and dominates the character | Low Cut and separate filtering before Distortion. |
| A narrow communications sound loses intelligibility | Reduce filtering or distortion to restore useful consonants. |
| Moving EQ changes the sound | Check the new input content and match output level again. |
Reference: Blackmagic Design — DaVinci Resolve 21 Reference Manual · Chorus, Flanger, Pitch and Distortion
08 / UNDERSTAND & APPLY
Clip processing, parallel return and bus processing
Put Distortion on a clip for one accent, or in its Mixer channel for a consistent track character. Bus processing receives the combined sources. Because the effect is nonlinear, distorting that sum may differ from summing individually distorted tracks.
On a serial insert, Dry/Wet sets the internal blend. For a separate parallel path, establish the dry route first, then add a fully processed return with its level. Check for a duplicated dry signal or an accidental change to the source balance.
Distortion before Reverb places an altered source into a space. After Reverb, it also processes reflections and the tail, which can change density and decay character. After Echo or Delay it receives repeats too: quiet returns may react differently from the first loud event.
Reverb
Compare source treatment with processing the whole space.
↗Echo
Assess nonlinear processing on a repeat pattern.
↗Mixer and routing
Isolate a return and check bus sources.
Reference: Blackmagic Design — DaVinci Resolve 21 Reference Manual · Chorus, Flanger, Pitch and Distortion · Blackmagic Design — Fairlight / FX, plug-ins and FlexBus
09 / UNDERSTAND & APPLY
Choose the character for a specific event
Radio or intercom
First find a bandwidth that keeps the message clear. Add distortion for the equipment’s character and check the line with its background.
Impact or edit accent
Compare density and the first transient. If the beginning disappears, reduce processing or retain a dry layer instead of raising output level.
Motor, mechanism or tense texture
Check quiet and loud detail. A harsher mode can make a useful expressive layer without remaining active constantly.
Parallel saturation
Create a clearly processed version, then blend it carefully with the source. Assess whether useful texture appears at the original loudness.
Scene transition
Limit the effect in time. Increased character before the cut and a calmer return afterwards must be checked with neighbouring sounds.
10 / UNDERSTAND & APPLY
Write the movement and check its transitions
Choose what should change over time: amount, threshold or effect contribution. Prepare two useful states and compare them with A/B first. Then select the required plug-in automation parameters, avoiding unrelated control changes in the same pass.
Check the loudest parts of the movement and the return point. Abrupt changes to mode or processing can become audible events, so compare them with a gradual Dry/Wet transition for the particular scene.
After writing, replay automation, save a preset and make a short reference export. Also record input level, Auto Level state and plug-in order. Without them, identical central Level values may not reproduce the same character.
Reference: Blackmagic Design — DaVinci Resolve 21 Reference Manual · Chorus, Flanger, Pitch and Distortion · Blackmagic Design — Fairlight / FX, plug-ins and FlexBus
11 / UNDERSTAND & APPLY
Check the cause of a change and the final output
| Problem | Next check |
|---|---|
| Louder appears better | Auto Level, manual output matching and the same reference passage. |
| Lowering right-hand Level does not soften the effect | The right-hand Level controls output; intensity is in the central Distortion section. |
| A low Ceiling still leaves high final peaks | Dry/Wet, output Level and the remaining chain; measure final true peak separately. |
| Consonants or attack disappear | Central Level, Ceiling, mode and the dry contribution. |
| Bass is muddy and treble harsh | Built-in filters and separate EQ placement. |
| The same preset sounds different on another clip | Frequency content and level reaching the effect input. |
| Every source changes on the shared bus | Bus sources and their combined influence on nonlinear processing. |
| A is mistaken for a comparison slot | A beside output Level means Auto Level; the upper A/B pair has a separate function. |
PRACTICE / NO AUTOPILOT
A small task. A checkable result.
Work in a test copy, listen before and after, and write down what you actually observed. The checklist contains no pre-approved results.
Define the task and keep the source
Choose quiet and loud parts of one passage. Record the intended character and the detail that must survive.
Compare the two native modes
In Resolve, audition Distortion and Destroy separately on the same input. Change central Level and Ceiling one at a time and note the response.
Set bandwidth and blend
Compare High Cut/Low Cut, then Dry/Wet. Check consonants, attack and the dry route’s role.
Match comparison loudness
Use Auto Level to help and finish the comparison manually with output Level. Check final output and the scene context.
Record the result
Note mode, settings, input level, Auto Level, chain order and automation boundaries. Repeat the check after reopening and in a render.
FAQ / BEFORE THE NEXT MOVE
Questions that matter in practice
What are the two curve buttons called?
The Resolve 21 manual names the left mode Distortion and the right mode Destroy. The first is described as harmonic distortion and the second as more extreme polynomial waveshaping.
Reference: Blackmagic Design — DaVinci Resolve 21 Reference Manual · Chorus, Flanger, Pitch and Distortion
What does the small A beside output Level do?
It is Auto Level, compensating gain changes associated with distortion. The upper A in the A/B pair belongs to comparison of two settings and does a different job.
Reference: Blackmagic Design — DaVinci Resolve 21 Reference Manual · Chorus, Flanger, Pitch and Distortion
Why are there two Level controls?
Central Level in the Distortion section spans 0–100% and controls intensity. Output Level spans −24…+24 dB and adjusts the result’s level.
Reference: Blackmagic Design — DaVinci Resolve 21 Reference Manual · Chorus, Flanger, Pitch and Distortion
Does Ceiling set the file’s maximum true peak?
No. In Distortion it sets the input level that triggers clipping. After blending, output gain and later processing, final peaks must be assessed separately.
Reference: Blackmagic Design — DaVinci Resolve 21 Reference Manual · Chorus, Flanger, Pitch and Distortion
Does Auto Level match LUFS?
The manual describes gain compensation, not normalisation to a programme LUFS target. Match perceived loudness manually and use an appropriate meter for the final programme.
Reference: Blackmagic Design — DaVinci Resolve 21 Reference Manual · Chorus, Flanger, Pitch and Distortion
Why put EQ before or after Distortion?
Before the effect, EQ changes the signal causing the nonlinear response. Afterwards, it shapes the resulting spectrum. Compare the positions separately; the built-in filter pair does not reveal the entire internal layout.
Why use Bypass instead of 0% distortion?
Bypass checks the whole original path. Zero intensity on one control does not describe the filter, blend and output-section states; use the global bypass for a proper comparison.
Reference: Blackmagic Design — DaVinci Resolve 21 Reference Manual · Chorus, Flanger, Pitch and Distortion
Are the lab curves exact Distortion and Destroy models?
No. They are two authored teaching curves linking input, transfer shape and output. Native algorithms, filters, the tube stage and Resolve Auto Level are not reproduced.
REFERENCES / 2026-10-09
What this guide is based on
Reviewed on 9 October 2026 against the official DaVinci Resolve 21 Reference Manual: chapter 181, Distortion on physical and printed pages 4105–4106; common FX controls on p. 4090; scope, order and automation in chapter 180, pp. 4083–4087. Distortion/Destroy and Auto Level names are confirmed in the text; both Level scales, Ceiling and filter scales were checked on the panel. Exact native topology and processing equations are not assumed. The lab uses authored curves and RMS compensation of its test signal.
Blackmagic Design — Fairlight / FX, plug-ins and FlexBus ↗
The manufacturer page confirms clip and track processing, plug-in order, saved chains, automation and FlexBus routing. Exact controls for these four effects are checked against the full Resolve 21 manual rather than inferred from the general product overview.
Blackmagic Design — DaVinci Resolve 21 Reference Manual · Chorus, Flanger, Pitch and Distortion ↗
Official full PDF, chapter 181: Chorus on 4099–4100; Distortion on 4105–4106; Flanger on 4110–4111; Pitch on 4123, with Reverb beginning lower on the same page. Physical and printed page numbers match. Text and panels reviewed on 9 October 2026 for controls, menus and readable scales. The page curves and signals are authored teaching examples, not native Resolve algorithms.